GT-Forte GTs40 build

I have the 750mm one just liike that item, just its branded something else. I had previously borrowed the MM one and found it a little too small. Depends n what you end up doing.
 
Now, ain't this forum great guy's!

I think just about the friendliest most helpful forum I've been on. :)

Today I've been doing some part enquiries. Need some Granada Mk2 front uprights and Mk3 rear bearing carriers, we'll see what stupid prices the breakers come back with. From the first few quotes I'm not sure if the aftermarket alloy ones will end up cheaper! Madness.

Also been investigating engine options again. I know I 'should' go Ford V8 (and if I was in the US wouldn't even be a question) but in the UK the Audi/BMW/Lexus V8's are looking very attractive from an availability/cost/power/reliability basis as standard engines, especially the Audi as it'll bolt straight to the 01E/01X transaxle.
 
First off a *second* big thanks to Mick, this is because while I have yet to play with the angle grinder discs he very generously sent me I was in the garage with the hand nibbler and thought "Hmmm, I wonder if this might help" and used the gold stick on the nibbler.

Suddenly it no longer becomes a bind and romps through the sheet. The only limiting factor being when the snail of kerf becomes too big!

I'm going to have to clear up soon, my floor is getting covered with the little things.
2011-08-24%25252001.07.00.jpg


So seeing as it was much easier than previously I ended up cutting out three panels tonight, both sides (although only one shown)
2011-08-24%25252001.06.49.jpg


And the footwell panel
2011-08-24%25252000.58.07.jpg


Although I've marked it I haven't cut the access panel hole out yet. Plenty of time for that though, even once I've drilled it that panel wont actually be fitted for a while. Also it needs a fold at the top.
 
Hi David,
I did on the panelling on my ’40 using a 2ft folder I made years ago, which is very similar to the Machine Mart one you’re considering. The other really useful tools for folding are:
· A Black & Decker Workmate
· A couple of lengths of 25mm x 5 mm angle aluminium (about 18” long) to extend the width of my vice
· Nylon faced hammer, so not to mark the material
· Various G-clamps & panel clamps
Before you get too far with your panelling, consider how you will finish the external corners. Tornado recommends using a aluminium finishing strip, but by leaving an additional 10mm on the edge of the panel, it can be formed around the mating panel, which gives a neater and more professional appearance.
Regards,
Andy
 

Attachments

  • P8241710.jpg
    P8241710.jpg
    191.7 KB · Views: 963
I've been making templates the last few nights, nothing really interesting to report (apart from the 4 panels behind the front wheels are a bitch!)

Seeing as I got some clecos this morning, thought I'd actually make use of them and do some drilling. Still haven't got through the 4.0mm drills I ordered :furious: but seeing as I had a single sharp 4.0mm drill that wasn't the end of the world.

Figured I'd do the footwell cover first, the sills really need the rear's cutting to ensure I get front and rear to align plus I need to work out if pressing ribs is going to work.

Panel was drilled no problems
2011-08-26%25252001.36.34.jpg


Only issue at all was I have vastly underestimated the number of clecos I'll need! Anyone got any suggestion as to how many is a good number and/or where is cheapest for them?
 
Last edited:
Yes, it looks 'nice' but no need for every hole to have one! Its more I realised that while I was fine for one panel (I used more here than I needed to for example) but as soon as I was trying to do multiple panels (for example the wheel inners) or larger panels (eg rear bulkhead), I was going to need a lot. Especially if I wanted to leave sections 'skinned'.

I should have ordered some from the states, seems they are about £0.24ea over there (plus postage) or £0.54 from LAS (inc postage), cheaper than ebay anyway. Oh well, 50 more ordered, that should do me for now. :)
 
Two more panels cut, RHS wheel panel #1 and LHS panel #2. I'll give you one guess why they're on different sides... Ooops! :furious:

Panel #1 was a right PITA, took ages to find a way to slot it in, had to make one flange a little smaller than ideally I'd have liked but its the one that goes under the sill and I'm not going to be able to get a drill in there anyway.

No pics because I forgot to put the memory stick back in the camera. :laugh:
 
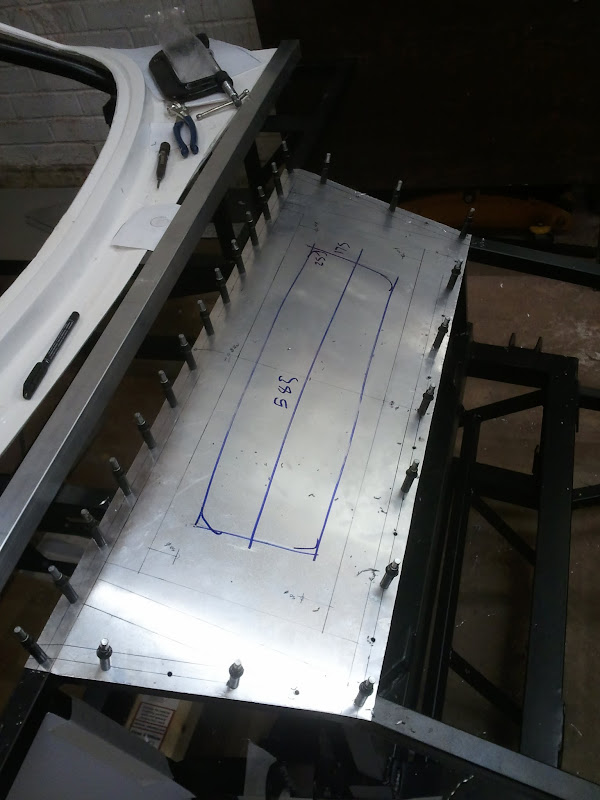
Been busy again (although not as much as I'd like!), cut and fitted two of the front panels
2011-08-29%25252000.47.36.jpg

Can just see panel #1 at the bottom left too.

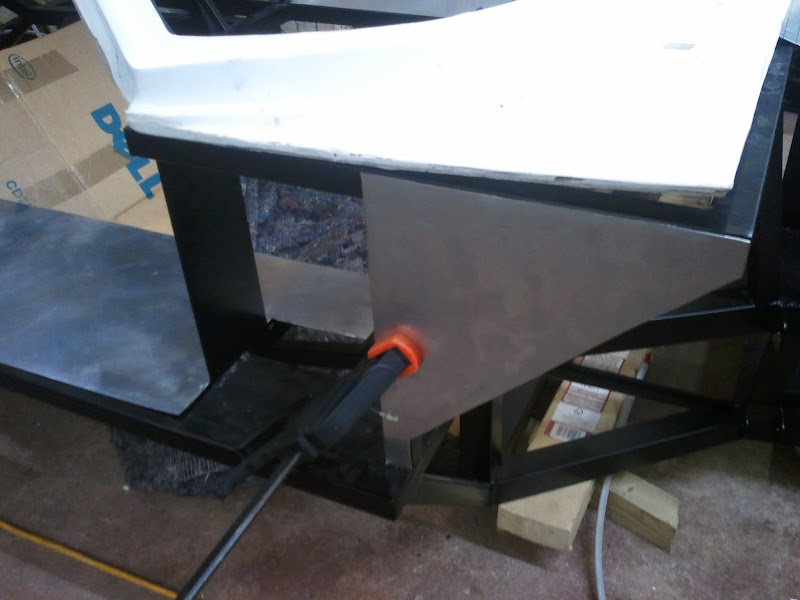
Some of the eagle eyed viewers may just be able to see there is a gap between the bottom horizontal panel and the vertical one, this is just because I made it to rivet to the underside of the chassis member and will drill it when I turn it over for the floor. Without being riveted or clamped it bows slightly hence the gap!

On the subject of rivets I'm already considering buying more without having used a single one. Just those three panels consume 75 clecos (and would have about 17 more holes that don't have clecos in or aren't drilled yet). I bought 1000 but if I'm using close to 1/10 on three panels that's not even going to come close is it!? Anyone know approximately how many rivets I'll need as with everything its cheaper in bulk and I may as well get the lot in one go!

Also had a think about panelling the cockpit and rear bulkhead, I'd always planned to double skin it and like the way Andy has done his with the compartments for relays/pumps/etc (http://www.gt40s.com/forum/gt40-build-logs/24109-norfolk-tornado-8.html#post314110) I shall aim I think for a very similar rear bulkhead. If nothing else it looks far simpler to make it in a number of pieces as he has than to attempt to make the cockpit rear, bulkhead wall and upper section in one piece.

On a related note, while planning the rear panelling I was thinking, does anyone use the radius arm tunnel space for anything? The arms can't take up all of the tunnel, is there any useful space in there? Not that I have any plans for there yet but its easier to add access panels now than later.
 
Hi David, Do you have to use cleco pins on every hole. I pinned about every third and when I was satisfied that the panel was flat and all holes were aligned I rivetted the hole and then moved the pin along to continue to keep the panel flat.
That's a lot of pins !
In the tunnel as you call it I have mounted the fuel pumps and filters, I wanted to keep the pumps as low as possible and mine fit ok. Remember the drivers side will need the gear rod going through it !
 

Dimi Terleckyj

Lifetime Supporter
Quote
("On a related note, while planning the rear panelling I was thinking, does anyone use the radius arm tunnel space for anything? The arms can't take up all of the tunnel, is there any useful space in there? Not that I have any plans for there yet but its easier to add access panels now than later.")

Hi David

In mine ,a DRB, I fitted the fuel pumps, surge tank,and filters in the passenger side and the engine ECU in the driver's side spaces.

This keeps the engine bay looking uncluttered with no exposed fuel parts or plumbing or wiring.

Dimi
 
No, don't need that many! I had 4 on each panel previously to hold them in place, I just put the lot on for the photo! :)

Pumps/filters are a good idea, I was thinking anyway that with the roll cage I'm going to struggle to make the rear sill tops in one piece so I may make them in two and its not then a problem to make the bits over the tunnels (I'm open rio suggestions on the correct name but I think everyone knows where I mean) removable.

I had clean forgotten about the gearchange! :) I think that was getting to the back via magic!
 
Along with everything else you can use it for placing all the wiring that goes to the rear. On my DRB, I took the sloping panels from the engine compartment and converted them to a shelf arrangement and put the fuel pumps, and one of two filters on the passsenger side, and the oil filter/bypass relocated to the drivers side(left). It makes getting to them difficult and this winter, may move the oil setup to the side of the transaxel for better access.

Bill
 
Thanks guys, looks like making those panels in two pieces is the best solution then.
Plus as a bonus it makes life far easier.

Another question, when people make panels removable that attach to the space frame do you drill and tap the frame or fit rivnuts? How do you make the panel sit flush if you use rivnuts?
 
I drill and tap where possible, you can use rivnuts but you then have to drill through the ally panel into the steel chassis with a say 3.3mm drill, remove the ally panel then drill the correct rivnut clearance drill. Then I go back and drill the ally panel with the clearance size drill for the bolt you are using.Finally de burr the hole with a much larger drill but do it by hand. Or buy a de burring tool.
On a the note of the rear roll cage supports, mine are removable that way you can have the rear bulkhead panel ( eng. side ) in one piece

Yesterday I fitted some edging trims, they do finish off the panels nicely but it's a lot of work and in doing so had to remove some of the nicely placed rivets and fit countersunk rivets so that the edging lays flat on the panel.
Worth remembering if your going to edge trim.
I will post a picture when I can on my build,, you can see what I mean.

You can buy countrsunk rivnuts but they still are not 100% flush

Practice on an old panel, then you can choose !
 
The other option I guess is to enlarge the hole in the panel so that the rivnut fits through it and the fit a screw with penny washer (I'm thinking countersunk allen head screws and countersink the washer). The idea works in my head but not sure how that would work in reality. Might have to go down to an M3 Rivnut to make it not stupid sized holes which then gets all fiddly. I've got some M5 and M6 rivnuts I'll have a bit of a play with some scrap and see how it turns out.
 
As for edging its a bit of a shame in some regards I'm planning on powder coating/painting the panels and not doing them as them polished aluminium, otherwise aluminium foil tape could seal, protect and finish of all the corners quite nicely. I shall probably use it anyway round the cockpit to seal as much as can be done but I'm both not sure if the bright silver will work against the (planned) black panels and also how well it would work under the arches etc.
 
Last edited:
These "clecos" are basically spring loaded temp rivets? I've honestly never heard of them before, but they sound pretty nice. In the past we've just stuck the rivets in place which generally did the job. Just wondering if these would be worth it compared to my old method.
 
Back
Top