GT40s.com
MK-I  MK-II  MK-III  MK-IV  GULF  MIRAGE  J-CAR  LOLA
GT40s.com
Home Forum Gallery Support GT40s.com  
Register FAQ Advertisers Search Today's Posts Mark Forums Read

Go Back   GT40s.com > GT40 Technical Forums > GT40 Build Logs

GT40 Build Logs For build threads and build diaries only.

Reply
 
LinkBack Thread Tools Display Modes
Old 25th December 2005, 09:54 AM   #1 (permalink)
Phil's Avatar
Phil
8 Tenths
United States
 
Join Date: Feb 2004
Location: New Jersey
GT40: Mk1B
Posts: 866
My Scratch Built Project

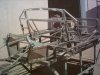
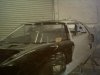
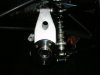
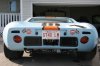
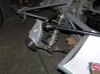
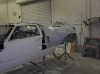
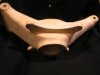
Not being the photo bug, I had a ton of shots of chassis and body in HI-Res, (860 kb) and could not post. I recently took some photos of the body....sorry about the dust! and thought I would start posting my project. I will try to re-size the chassis photos as the body is currently on the chassis for fitting, and I would like to continue with that right now. As you all can see some of the panels are older, these were tuned-up for the molds which are now done, but I am using the older panels as I fit and look for possible changes in order not to damage the new stuff. The spyder and nose are new, and that rear decklid is an original spare piece with original magnesium hinge plates on it...A lucky find, and I am currently working on that mold. The rockers need to be matched and those and the rear deck are the last two pieces to be done. I am hoping to get those chassis photos re sized soon and post them ASAP. Merry Christmas to all.
Cheers
Phil
Attached Thumbnails
Click image for larger version

Name:	71026-December232005025.jpg
Views:	1146
Size:	56.5 KB
ID:	12248  
Phil is offline  
Digg this Post!Add Post to del.icio.usBookmark Post in TechnoratiTweet this Post!
Reply With Quote
Old 26th December 2005, 01:02 AM   #2 (permalink)
ckouba's Avatar
ckouba
8 Tenths
United States
 
Join Date: Feb 2004
Location: Oregon, USA
GT40: RCR40-31
Posts: 860
Re: My Scratch Built Project

Phil,

Instead of a new thread for each picture, just reply to your original post and continue the same thread. Like this:


and this:


and:


Merry Christmas and keep up the progress!

Chris
ckouba is offline  
Digg this Post!Add Post to del.icio.usBookmark Post in TechnoratiTweet this Post!
Reply With Quote
Old 26th December 2005, 10:09 AM   #3 (permalink)
Phil's Avatar
Phil
8 Tenths
United States
 
Join Date: Feb 2004
Location: New Jersey
GT40: Mk1B
Posts: 866
Re: My Scratch Built Project

Chris
That was my original intent but not being the computer savvy guy I ended up with what you see...BTW I tried to attach all three and it didn't work...am I doing something wrong?
Cheers
Phil
Phil is offline  
Digg this Post!Add Post to del.icio.usBookmark Post in TechnoratiTweet this Post!
Reply With Quote
Old 26th December 2005, 10:59 AM   #4 (permalink)
ckouba's Avatar
ckouba
8 Tenths
United States
 
Join Date: Feb 2004
Location: Oregon, USA
GT40: RCR40-31
Posts: 860
Re: My Scratch Built Project

Hi Phil,

Once they're posted (not just here but anywhere on the net) you can put their URL into the post and they post the picture, which is what I did above.

You can do this with the box of options (the "Instant UBB Code" box) below the window where you type in your post. If you click on "Image," it brings you another window to enter the URL (best to just right click on the image, select "Properties," select and copy the location, then paste it in), then hit enter. Done!

If you want to post them as you write, you can check out my oh-so-detailed instructions ***HERE***.

Hope this helps. I'm still not too savvy myself, but pitch in where I can.

Chris
ckouba is offline  
Digg this Post!Add Post to del.icio.usBookmark Post in TechnoratiTweet this Post!
Reply With Quote
Old 26th December 2005, 10:11 PM   #5 (permalink)
Phil's Avatar
Phil
8 Tenths
United States
 
Join Date: Feb 2004
Location: New Jersey
GT40: Mk1B
Posts: 866
Re: My Scratch Built Project

Thanks again Chris for all the help...I hope I don't seem like a dummy, but I get on the computer only once a day, my forte is metal fabricating, so if you have any questions there feel free. Meanwhile I will try to post some more photos.
Bare chassis ready for paint, and some more viewa of the bodywork.
Attached Thumbnails
Click image for larger version

Name:	71099-December252005002.jpg
Views:	1702
Size:	203.7 KB
ID:	12253  
Phil is offline  
Digg this Post!Add Post to del.icio.usBookmark Post in TechnoratiTweet this Post!
Reply With Quote
Old 26th December 2005, 10:15 PM   #6 (permalink)
Phil's Avatar
Phil
8 Tenths
United States
 
Join Date: Feb 2004
Location: New Jersey
GT40: Mk1B
Posts: 866
Re: My Scratch Built Project

Another...
Attached Thumbnails
Click image for larger version

Name:	71100-December252005003.jpg
Views:	1224
Size:	197.2 KB
ID:	12254  
Phil is offline  
Digg this Post!Add Post to del.icio.usBookmark Post in TechnoratiTweet this Post!
Reply With Quote
Old 26th December 2005, 10:21 PM   #7 (permalink)
Wolfman
Rookie
United States
 
Join Date: Jan 2004
Location: Yorktown, VA
GT40: Body shell only...looking at chassis options or unfinished kit
Posts: 69
Re: My Scratch Built Project

Phil,

Very well done...are those your own scratch built chassis plans?

What suspension is it set up to use (donor?) ?

I am looking at making my own chassis in the future and am always looking for good ideas/plans to base my future build.

I have most of my large body pieces and some initial plans and drawings from dimensions I have gathered from posts here. However, if you have any tips or advise to the rest of us scratch builders, please post them. Again, good job so far!

Devin
Yorktown, VA
Wolfman is offline  
Digg this Post!Add Post to del.icio.usBookmark Post in TechnoratiTweet this Post!
Reply With Quote
Old 26th December 2005, 10:24 PM   #8 (permalink)
Phil's Avatar
Phil
8 Tenths
United States
 
Join Date: Feb 2004
Location: New Jersey
GT40: Mk1B
Posts: 866
Re: My Scratch Built Project

I guess I will get it eventually....Those black gel-coat portions of the body are new pieces (nose and spyder), and the rough looking finish on the other parts is actually the parts finish sanded and prepped for the molds. As you can see the finished parts come out of the mold really smooth , no voids or air pockets. The chassis uses all off the shelf parts, and I can upgrade brakes, shocks etc. I am going to take some more photos and post as soon as I can.
Regards
Phil : [img]/ubbthreads/images/graemlins/flamed.gif[/img]
Phil is offline  
Digg this Post!Add Post to del.icio.usBookmark Post in TechnoratiTweet this Post!
Reply With Quote
Old 27th December 2005, 12:47 AM   #9 (permalink)
BillE's Avatar
A Tenth
United States
 
Join Date: Feb 2005
GT40: Redding CA
Posts: 196
Re: My Scratch Built Project

Looks like good progress Phil. Keep the pitchers coming
BillE is offline  
Digg this Post!Add Post to del.icio.usBookmark Post in TechnoratiTweet this Post!
Reply With Quote
Old 28th December 2005, 12:25 AM   #10 (permalink)
Phil's Avatar
Phil
8 Tenths
United States
 
Join Date: Feb 2004
Location: New Jersey
GT40: Mk1B
Posts: 866
Re: My Scratch Built Project

Thank you Wolfman, Those chassis plans are my own, some done on Autocad, and some on paper with prototypes to check fit and actual dimensions in real time. I actually have done 3 chassis, the first was a mule so to speak that we cut and re-did a number of times to check front and rear suspension travel, geometry etc. that has since gone to the scrap heap!. The current chassis in these photos is the third, the second also has a body on it, and I am currently skinning that chassis...I will post some photos of that one also. The rear suspension is a close copy of the original, with aluminum uprights that use available bearings. hubs, and halfshafts. The rear uprights are fabricated aluminum, and I am currently having a pattern made from them for casting. The front ..without giving up the ranch..is mostly off the shelf parts, with custom upper and lower wishbones, My intent was to make the suspension as easy as possible to install and adjust, without comprimising quality etc.. I have been at this project quite a while, and have access to an original car for dimensions etc., but I wanted to keep things affordable. I am not a fiberglass expert by any means, and I have a friend in the mold business who does a fabulous job on intricate pieces like some of the parts on the GT40, and we currently have a complete set of molds short of the rear decklid and rockers, which should be finished soon. If you have any questions give me a PM and I will try to answer them to the best of my ability. Thanks to you Bill for the comments, coming from you that means a lot...by the way how is the Giant coming?
Here is a photo of the prototype upright
Cheers
Phil
Attached Thumbnails
Click image for larger version

Name:	71197-UprightLR002.jpg
Views:	1170
Size:	51.0 KB
ID:	12261  
Phil is offline  
Digg this Post!Add Post to del.icio.usBookmark Post in TechnoratiTweet this Post!
Reply With Quote
Old 29th December 2005, 12:03 AM   #11 (permalink)
Mark Worthington's Avatar
Mark Worthington
10 tenths
United States
 
Join Date: Dec 2001
Location: Massachusetts
GT40: RF No. 36
Posts: 1,925
Re: My Scratch Built Project

Cool project, Phil. I really admire someone who can start with a clean sheet of paper and an idea and build a car.

Awesome find on the rear body work. I like how the rear flares have small lips on them...I don't think I've seen that touch applied to any replica. Does your rear bodywork also have air outlet ducts to exhaust high-pressure air from the wheel wells?
Mark Worthington is offline  
Digg this Post!Add Post to del.icio.usBookmark Post in TechnoratiTweet this Post!
Reply With Quote
Old 29th December 2005, 08:25 AM   #12 (permalink)
Phil's Avatar
Phil
8 Tenths
United States
 
Join Date: Feb 2004
Location: New Jersey
GT40: Mk1B
Posts: 866
Re: My Scratch Built Project

Hi Mark
I don't think I have the rear air outlet ducts you spoke of, maybe I am missing that..I will look and let you know. I can tell you that The rear decklid has two ducts on each side, one feeds the brakes and one would feed an oil cooler or trans cooler on each side..going by their positioning. Also, the ducts both originate in the side scoop with it being bisected horizontally just inside the opening to feed them. The decklid has some pecularities in the fiberglass, particularly the shape of the flares, which I compared with photos of the Gulf bodywork and it looks identical..I believe this piece came from that mold. I can tell you I was surprised at the details that matched in a number of places. When I got the decklid it had some stickers on it indicating it was made in the UK. I don't think I am going to use this original piece on the car...since I will have a mold and make a new one for my chassis I would like to possibly sell it after I am happy with the duplicate piece. For now just working on the fit...especially the doors..is where I am at.
Cheers
Phil
Phil is offline  
Digg this Post!Add Post to del.icio.usBookmark Post in TechnoratiTweet this Post!
Reply With Quote
Old 29th December 2005, 08:38 AM   #13 (permalink)
Mark Worthington's Avatar
Mark Worthington
10 tenths
United States
 
Join Date: Dec 2001
Location: Massachusetts
GT40: RF No. 36
Posts: 1,925
Re: My Scratch Built Project

I did a little browsing through a bunch of original GT40 photos last night, Phil, and I agree with you that you likely have a Wyer rear body section, as I don't think anyone else used those little lips on the wheel flares. Lucky guy! Heven forbid, if I ever smash up the rear end of my car, I'll come to you looking for a replacement from that mold of yours. The ducting I'm referring to is just something that I heard that the Gulf cars had in 1968 and 1969. What I hears is that air pressure would build up in the wheel wells and those cars had special ducts to reduce this.
Mark Worthington is offline  
Digg this Post!Add Post to del.icio.usBookmark Post in TechnoratiTweet this Post!
Reply With Quote
Old 29th December 2005, 01:47 PM   #14 (permalink)
Russ Noble's Avatar
Russ Noble
Lifetime Premier Supporter
New Zealand
 
Join Date: Jul 2004
Location: Christchurch,NZ
GT40: Scratch Kiwi 40
Posts: 2,033
Re: My Scratch Built Project

Good work there Phil. Chassis and uprights look top quality. You will have a great car when it is done.

The rear outlets Mark is talking about are shown very nicely in this picture just above the tail lights.

http://www.racingicons.com/gt/finish.htm

Regards
Russ Noble is offline  
Digg this Post!Add Post to del.icio.usBookmark Post in TechnoratiTweet this Post!
Reply With Quote
Old 29th December 2005, 03:11 PM   #15 (permalink)
ijvpet's Avatar
ijvpet
A Tenth
Canada
 
Join Date: Jan 2004
Location: Calgary, Alberta
GT40: CAV
Posts: 146
Re: My Scratch Built Project

Something like this...
Attached Thumbnails
Click image for larger version

Name:	71310-John-6.jpg
Views:	1025
Size:	213.0 KB
ID:	12274  
ijvpet is offline  
Digg this Post!Add Post to del.icio.usBookmark Post in TechnoratiTweet this Post!
Reply With Quote
Old 29th December 2005, 10:51 PM   #16 (permalink)
Gulf GT40
Rookie
United States
 
Join Date: Dec 2005
Location: Utah
Posts: 29
Re: My Scratch Built Project

John, can you email me or post some more pics of your car. From the picture above it looks like a beautiful car.
Gulf GT40 is offline  
Digg this Post!Add Post to del.icio.usBookmark Post in TechnoratiTweet this Post!
Reply With Quote
Old 30th December 2005, 07:59 AM   #17 (permalink)
Phil's Avatar
Phil
8 Tenths
United States
 
Join Date: Feb 2004
Location: New Jersey
GT40: Mk1B
Posts: 866
Re: My Scratch Built Project

Mark, Russ, and John
Thanks Gents for all the positive replies, and the photo. Mark, When I received that rear deck it had never been installed on a vehicle..it still had the flashing running past the mold edges at the top, and the mold separation lines, so it took a lot of prep before it was ready for the mold process. Russ and John, think I may have to install those vents, Looks like a little cutting and shaping work, thanks for the details on that. I guess another change is in the works!
Thanks again for all the input.
Cheers
Phil [img]/ubbthreads/images/graemlins/flehan.gif[/img]
Phil is offline  
Digg this Post!Add Post to del.icio.usBookmark Post in TechnoratiTweet this Post!
Reply With Quote
Old 6th February 2006, 12:06 AM   #18 (permalink)
Phil's Avatar
Phil
8 Tenths
United States
 
Join Date: Feb 2004
Location: New Jersey
GT40: Mk1B
Posts: 866
Re: My Scratch Built Project

Some additional photos of the bodywork and rear suspension. We had a problem with the spyder fitting, and the solution was to trash the first piece, and fit a new one installing the inner panel first, then bonding the outer to it...seems to fit much better. Concentrating now on fitting the doors and spyder together. Also I am working on a new upright assembly to replace the ones you see here. Will post more as I progress.
Cheers
Phil
Attached Thumbnails
Click image for larger version

Name:	73965-October2004016.jpg
Views:	1300
Size:	20.0 KB
ID:	12630  
Phil is offline  
Digg this Post!Add Post to del.icio.usBookmark Post in TechnoratiTweet this Post!
Reply With Quote
Old 6th February 2006, 12:08 AM   #19 (permalink)
Phil's Avatar
Phil
8 Tenths
United States
 
Join Date: Feb 2004
Location: New Jersey
GT40: Mk1B
Posts: 866
Re: My Scratch Built Project

More...
Attached Thumbnails
Click image for larger version

Name:	73967-Newbody2.jpg
Views:	1038
Size:	61.8 KB
ID:	12631  
Phil is offline  
Digg this Post!Add Post to del.icio.usBookmark Post in TechnoratiTweet this Post!
Reply With Quote
Old 25th February 2006, 12:19 AM   #20 (permalink)
Phil's Avatar
Phil
8 Tenths
United States
 
Join Date: Feb 2004
Location: New Jersey
GT40: Mk1B
Posts: 866
Re: My Scratch Built Project

Some more photos of the rear uprights;
I am currently developing an upright that will use an 11" rotor 1" thick. Right now I need to test the model on my chassis, but all the dimensions look good so far. Next step is to casting shop for a pair of prototypes, and if all looks good then to the pattern maker for the actual piece to be copied with the additional dimensions to allow for shrinkage. Will post more as I progress.
Cheers
Phil
Attached Thumbnails
Click image for larger version

Name:	75438-February24,2006010.jpg
Views:	1015
Size:	63.9 KB
ID:	12843  
Phil is offline  
Digg this Post!Add Post to del.icio.usBookmark Post in TechnoratiTweet this Post!
Reply With Quote
Reply


Currently Active Users Viewing This Thread: 1 (0 members and 1 guests)
 
Thread Tools
Display Modes

 
Posting Rules
You may not post new threads
You may not post replies
You may not post attachments
You may not edit your posts

BB code is On
Smilies are On
[IMG] code is On
HTML code is Off
Trackbacks are On
Pingbacks are On
Refbacks are On


All times are GMT -4. The time now is 05:06 AM.