Hello members ,
The time is now arrived for me to post my first thread after several months of "guest" position on this forum ..
It has been such a major source of informations for my project that I feel now to have to "cross the border" and share my new experience on a GT40 MK1 scratchbuilt project.
I started 2 years ago from a "white paper", and despite not yet finished..., it comes now in the situation where I feel more confident and ready to exchange about it on the forum.
My first action was to spend some "Brainstorming " time in order to define the main objctives :
*"Sell" the project to my family ! No problem for this step and it is amazing to see how the GT40 image in evocating in France .
*Choose the "Scratchbuilt" route , body excepted : Cheaper ( may be...) longer of course, but so rewarding when it comes to be reality ...
*Decide for a track capability , but no racing : French autorithies are so unfriendly with kit-car builders that I immediatly decided to skip the road homlogation setp and to focus a track compatible design.
I may come back later on this issue ( SVA UK solution ?) Any advice on the subject is wellcome !
*Decide for my own design , with a friend of mine who is CAD "Solid Works" expert .
For this step, the main information source came from this forum and others : Cobra, Lambolounge, kits suppliers etc ..
As I got contact with Chris Melia, he sent me the interesting drawing package , Webguy.ca, which was a good asset for the design start up.
In addition, thanks to Chris, he gave me the opportunity to meet a former GT40 racing driver who owns an original full aluminum MK1, neaby my location on the French Riviera, close to Monaco .
Despite is car is not presently in road conditions, we had the opportunity to check all the chassis dimensions and we got wery productive informations that way .
I thinck to share the drawings on this forum if somebody is interested , after moderators acceptance, and after some basic validations :
body fitting, suspensions and uprights behavior, final torsionnal stiffness etc ..
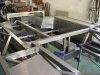
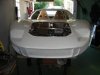
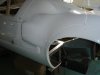
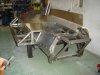
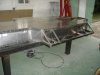
As first overview, you can see attached the general chassis view ( Sorry, you may have to turn on the right orientation ..)
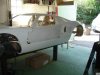
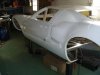
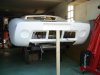
I will post soon on the detailled subjects : Chassis, suspensions, body, gear box etc , with some pictures .
The time is now arrived for me to post my first thread after several months of "guest" position on this forum ..
It has been such a major source of informations for my project that I feel now to have to "cross the border" and share my new experience on a GT40 MK1 scratchbuilt project.
I started 2 years ago from a "white paper", and despite not yet finished..., it comes now in the situation where I feel more confident and ready to exchange about it on the forum.
My first action was to spend some "Brainstorming " time in order to define the main objctives :
*"Sell" the project to my family ! No problem for this step and it is amazing to see how the GT40 image in evocating in France .
*Choose the "Scratchbuilt" route , body excepted : Cheaper ( may be...) longer of course, but so rewarding when it comes to be reality ...
*Decide for a track capability , but no racing : French autorithies are so unfriendly with kit-car builders that I immediatly decided to skip the road homlogation setp and to focus a track compatible design.
I may come back later on this issue ( SVA UK solution ?) Any advice on the subject is wellcome !
*Decide for my own design , with a friend of mine who is CAD "Solid Works" expert .
For this step, the main information source came from this forum and others : Cobra, Lambolounge, kits suppliers etc ..
As I got contact with Chris Melia, he sent me the interesting drawing package , Webguy.ca, which was a good asset for the design start up.
In addition, thanks to Chris, he gave me the opportunity to meet a former GT40 racing driver who owns an original full aluminum MK1, neaby my location on the French Riviera, close to Monaco .
Despite is car is not presently in road conditions, we had the opportunity to check all the chassis dimensions and we got wery productive informations that way .
I thinck to share the drawings on this forum if somebody is interested , after moderators acceptance, and after some basic validations :
body fitting, suspensions and uprights behavior, final torsionnal stiffness etc ..
As first overview, you can see attached the general chassis view ( Sorry, you may have to turn on the right orientation ..)
I will post soon on the detailled subjects : Chassis, suspensions, body, gear box etc , with some pictures .