bump steer

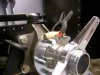
I have gotten my steering rack, a unit from Flaming River. The rack mounts are a little narrower than what comes on the DRBs(15 1/2 vs 17) and moving them is no real problem. The point of the universal joints(don't know its real name) in the rod ends are 24" apart. The mounting bolt for the lower A arms are 24" apart. My question is, will this create or increase bump steer and if it makes it worse, what are my alternatives. I believe I read somewhere that raising the rack will help cancel out the bump steer problem. Where does the line of the shaft have to be in relation to the mounting of the rod ends(C-4 Corvette suspension)? Not being an engineer, I am way out of my knowledge base here. I also don't want to make a bunch of holes in the shiney new stainless getting it mounted. So a little info from the more knowledgable ones would be appreciated.

Bill
 
Last edited:
The best thing to do is to put the rack in and clamp it in position and check the bump steer. Depending on the results you get you can then shim it to raise the rack or move its position forward or back and clamp again and recheck until you get it right.

Regards
 
Paul,
Thanks for the imput. Since I have to move the "stock" mounting position to get the mounting holes to line up horizontally, I wa hoping someone would chime in on the vertical component. I plan on taking the car to a well known Corvette racing shop next week for front end work. They may be able to work out the bump steer. I was hoping I could go in there armed with a little information. The lower A arms have a little room for front and back movement and will have to be shimmed into place just as they do for a factory setup. I was hoping that I could get info on the geometric placement of the rack(3D) in relation to the location of the steering arm. Here are some pics of what I am working with.

Bill
 

Attachments

  • P1010237 (Small).jpg
    P1010237 (Small).jpg
    62.9 KB · Views: 922
  • P1010239 (Small) (2).JPG
    P1010239 (Small) (2).JPG
    32.8 KB · Views: 898
  • P1010242 (Small).jpg
    P1010242 (Small).jpg
    43.8 KB · Views: 906
  • P1010243 (Small).JPG
    P1010243 (Small).JPG
    42.3 KB · Views: 892
Bill,

Here is a portion of the rack tech section on Woodwards web sight. It has some good info on getting the correct rack position and length.

Richard
 

Attachments

  • rack length small.JPG
    rack length small.JPG
    87.8 KB · Views: 891

Doug S.

The protoplasm may be 72, but the spirit is 32!
Lifetime Supporter
Off topic, but.....

Bill, I have to mention how much I drool over all the engine turned SS I see in your build! Like you, I have an affinity for the engine turned look and once this build is complete I think it will be right up there with others that set the bar high in this field!

Good luck on the bump steer issue--even if you never get it right (although I have read enough of your posts to know that you WILL get it right) I'll still be drooling every time you post photos!

Doug
 
I see your challange and hindsight is a wonderfull thing as it would have probably been easier to sort out your rack position before cladding which I must say looks very good. Hope that you manage to get it sorted.

Regards
 
Bill, while Richards article helps it does not allow for the amount the steering ball joint is outboard of KPI ( a line drawn thru the center's of the top & bottom ball joints ). You must double this & add it to the rack measurement for total rack length. If your having trouble following this PM me & I will give you a 'country boy' explanation using Richards drawing feature's as a guide.

Jac Mac
 
Bill
Jac Mac makes the most relative point here. The upper and lower wishbones are swinging in different radii, also the steer arm connector has its own radius. The trick here is to make sure that the tie rod swings in a radius that does not move the steering arm out or in during the suspension bump or droop, causing bump steer. I would map out your suspension points, as close as you can at the pivots of the wishbones, ball joints and steering ball joint (or rod end if applicable), this will give you a very close approximation of the pivot width at the inner rack joints. From there you can cut your tie rods to size set the toe and shim the rack (or the outer tie rods) to take out the bump, or most of it. It may be difficult to take measurements of your pivot points with chassis members etc. in your way, but it is possible. If you need further help I may be able to e-mail you some basic front end diagrams showing the critical points that need to be considered.
Good Luck
Phil
 
I think Richard's article will get me started. I would appreciate any info via PMs etc. as this will be a foray into unknown territory. The alignment may wind up being exactly where it should be. The outboard ball joint is only about 1/2" beyond the lower A arm attachment point on either side. The upper A arm attachment is just outside the cladding. It apears(in my minds' eye) that movement of the rack will be minimal for cancelation of the bump steer. Richard's article will get me started, but do send any info on the setting up of the steering, as that is where I am at present. Thanks guys. I am sure this info will be helpful to a lot of others.

Bill
 
Bill,

Maybe this will help, it's one of the best & most simple ideas I've seen for checking bump-steer.

You can see in the photo I clipped a laser pointer to the hub. you can pick up these in the uk for 3-4 pounds.

All you do is pin a sheet of graph paper to your garage wall where the pointer strikes (the further away, the more accurately you can measure) & you can plot the amount of 'steer' as you raise the suspension on, say,wooden blocks, 1 inch at a time.

you can easily clip the pointer on different parts of the suspension & track & mark the different radii of the various suspension components (as pointed out by Phil).

Best Regards,
 

Attachments

  • brilliant idea.jpg
    brilliant idea.jpg
    53 KB · Views: 759

Ian Anderson

Lifetime Supporter
Julian
That really is simple but must be pretty effective.

Can on of the Gurus please explain at what ride height the chassis should be to set the bump steer? Presumably it is set at a nominal (say)4.5 inches. But correct me now if I am wrong the bump multiplies the further from neutral you go, so do you try and set it with less movement under braking (Say) 2.5 inches to end of travel or when under power (Say) 5.5 inches.

Reason I ask is if you are doing 120mph (or more) and the nose is up higher than at rest and you get movement the resulting car "wander" could be uncontrolable compared to under hard braking the "wander" would be less (Lower speed times change of angle).

Yes I accept you are trying to minimise the movement but at what end of the travel is the lowest movement required?

Thanks
Ian
 
nose up because of lift means less pressure on your tyre = drop.you can have a little steer on drop but not on bump (like cornering,no pressure on the inboard tyre
 
Question about the laser bump steer method. How do you account for the fact that even with absolutely zero bumpsteer, the dot will still move side to side because of the fact that the upright / hub moves in an arc?

Concerning the ride height at which to set bump steer - I would personally minimize it at ride height since this is where it will bite you the hardest. The big reason for setting bump steer is to keep the car from darting around while driving in a straight line. Obviously you also want the wheels to do what you intend when turn the wheel and subject the chassis to a roll angle; this is the other big reason for doing it. With any half way decent suspension design you should be able to get the bump steer minimized enough that it doesn't matter what ride height you choose, just make sure it's good throughout the whole range.
 
Bill: Get a copy of Fred Puhn's book "How to Make Your Car Handle". It covers about everything you'll ever need concerning bump steet, roll steer, camber change, anti-features and a lot of other stuff about suspensions and the effects of aero and braking on handling.

Tom
 
Last edited:
Sorry for the short post. The laser idea is good except for it does not take into account the track change versus actual steering. If the wheels move inward under bump (normal for typical setups) it will show up as a laser movement toward the center of the car even if there is no bump steer. Most systems measure the relative motion of the front and rear of a tire/wheel. Ride height should be set to the actual as used track condition (weight, fluids, fuel, etc.).
 
Before I go any further, I am not a suspension expert, just sharing ideas for discussion.

Sure Chris, Gary, I hear what you are saying & the laser idea doesn't take any geo into account, it is simply a way of plotting the movement of a particular part of the suspension.

I guess you could use the same method to plot the arc of the outer ends of the top & bottom wishbones & compare this to the arc taken off the hub. In an ideal world (ie minimal bump-steer) the arc taken off the hub would be somewhere inbetween the two arc taken off the balljoints.

WDYT??
 
Thats an idea. Take a laser on the upper ball joint for example (which you know is not towing in/out) versus the one on the hub. Look at the differences in motion.

Sorry if I come off as short, but new job has me working many hours and I just jump in to the point. I am certainly up for fresh ideas, etc.
 
Last edited:
Julian West said:
Before I go any further, I am not a suspension expert, just sharing ideas for discussion.

Sure Chris, Gary, I hear what you are saying & the laser idea doesn't take any geo into account, it is simply a way of plotting the movement of a particular part of the suspension.

I guess you could use the same method to plot the arc of the outer ends of the top & bottom wishbones & compare this to the arc taken off the hub. In an ideal world (ie minimal bump-steer) the arc taken off the hub would be somewhere inbetween the two arc taken off the balljoints.

WDYT??

How is this going to help Bill who needs to calculate his rack install height so that he can drill /machine the clearance holes in the correct position on his nicely polished/turned panels in situ, before he can even begin to work out rack and tie rod lengths. Until he has his rack in place he cannot proceed.

Clamp the laser to the upright[ with coilover & steering removed] and plot laser arc on wall while lifting suspension thru travel without bumping upright, then refit steering arm, replot arc & compare.

Jac Mac
 
This laser deal doesn't take into account tread change and anti-dive features, so using a laser as described can screw up bump steer badly if you use this method to locate steering pivots.

The most accurate way of doing a bump-steer check is with a surfaces plate mounted to a hub, then position two dial indicators level with each other to stands sitting on the floor. With the indicator plungers compressed and at the indicator set a zero, run the suspension up and down. By the way, you have to remove the coil-over assembly and support the car while doing this. After moving the suspension up and down from ride height one inch at a time, record suspension position and indicator readings. Calculations will give you toe in inches or degrees, whichever way you prefer to go.

Another quicker, but not as accurate way of doing bump steer is to support the car at whichever end you be checking--in your case, Bill, the front--, remove the coil-over units, set each wheel on turn plates and jack the front up and down from ride height. You can then read out toe directly at turn plates at each position.

A quick check can be done by setting the front wheels with the coil-overs intalled, then get someone to step in the front bay behind the radiator and read the change in turn-plate degrees. Ideally, there shouldn't be any change. You'll can also check for any bump steer in rebound by raising the front in increments with a jack. There are other methods of checking bump steer, but they all involve moving the wheels up and down a prescribed amount and measuring bump one way or another.
 
All,

Every method you stated will work with a completed car (some better than others). But, Bill is trying to locate the rack (which is not mounted) to minimize the steer. As you can see in his pictures he has spent a great amount of time on his paneling and it looks to be fastened to the frame with welds. I don't know about you but punching holes in that nice work just to see what the steer would be with the rack in that position does not look like a option. With that said, the only method to determine the best position is to do this on paper (or cad). Or it just looks that way to me.
 
Back
Top