crossover exhaust question

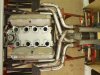
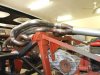
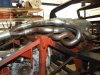
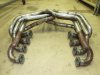
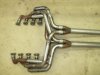
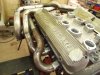
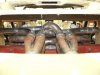
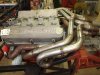
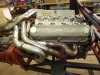
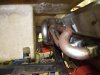
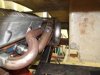
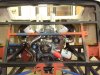
I’m starting to make a set of crossover pipes and after looking through lots of books, it seems the small block system had the middle two cylinders crossover to the opposite collector. The collectors as viewed from behind with the numbers indicating the cylinders.

8 2 7 4
5 3 6 1

With either firing order, 13726548 or 15426378. The pulses are equal but do not rotate in a circular motion around the collector. My question is, would it help if you made it rotate :huh2:

I have searched the forum, but nothing really specific comes up.

Clayton
 
Well it’s been awhile, but have finally finished cutting and tacking the pipes for my system. Changed the pipes around to get a circular firing order and tried to get them the same length as much as possible.
Also used Jims post to make my own merged collectors, but think I’ll buy them next time :)
 

Attachments

  • exhaust15.06.2008 060.jpg
    exhaust15.06.2008 060.jpg
    47.9 KB · Views: 944
  • exhaust15.06.2008 062.jpg
    exhaust15.06.2008 062.jpg
    43.5 KB · Views: 727
  • exhaust15.06.2008 065.jpg
    exhaust15.06.2008 065.jpg
    51.3 KB · Views: 748
  • exhaust15.06.2008 079.jpg
    exhaust15.06.2008 079.jpg
    39.3 KB · Views: 906
  • exhaust15.06.2008 082.jpg
    exhaust15.06.2008 082.jpg
    33.6 KB · Views: 898
  • exhaust15.06.2008 067.jpg
    exhaust15.06.2008 067.jpg
    50.5 KB · Views: 746
  • exhaust15.06.2008 069.jpg
    exhaust15.06.2008 069.jpg
    35.6 KB · Views: 784
Well it’s been awhile, but have finally finished cutting and tacking the pipes for my system. Changed the pipes around to get a circular firing order and tried to get them the same length as much as possible.
Also used Jims post to make my own merged collectors, but think I’ll buy them next time :)

Good job Clayton, it's a lot of work isn't it ! You might have seen the 5.4 exhaust on the open day posts, quite a packaging effort to get similar lengths and cross over. The time consuming bit next is tig-ing up all the joins and linishing them all off, count on an hour per join for a really good finish.

Well done again, PB
 

Randy V

Moderator-Admin
Staff member
Admin
Lifetime Supporter
Nice work!

I particularly like the attention you paid to tucking in the front pipes on both sides to get them as short as possible. I would imagine that you plan on ceramic coating them when complete. If not, I would probably consider wrapping the front pipes to keep some of the exhaust heat off the valve covers / gaskets..

Again - very nice work!
 
Thanks Paul
My hat goes off to everyone that makes up these headers. Working on your 1 hr per joint, I’ve got another 57hrs to go.:uneasy: The mandrel bends I got were crap and had to cut off the tail that was clamped in the bender. This means a lot more welding.

Thanks Randy
Yeah, they will be ceramic coated inside and out. So wasn’t too concerned about the closeness. Also tried to keep a decent gap between the pipes, apart from the top crossover one of course. The longest pipes were 2 & 6, so by keeping 1 & 5 close to the head it allowed 2 & 6 a shorter route.
<?xml:namespace prefix = o ns = "urn:schemas-microsoft-com<img src=" /><o:p></o:p>
Regards

Clayton
 

Attachments

  • exhaust15.06.2008 055 (940 x 705).jpg
    exhaust15.06.2008 055 (940 x 705).jpg
    48.1 KB · Views: 685
  • exhaust15.06.2008 058 (940 x 705).jpg
    exhaust15.06.2008 058 (940 x 705).jpg
    52 KB · Views: 644
  • exhaust15.06.2008 074 (940 x 705).jpg
    exhaust15.06.2008 074 (940 x 705).jpg
    39.6 KB · Views: 599
  • exhaust15.06.2008 075 (940 x 705).jpg
    exhaust15.06.2008 075 (940 x 705).jpg
    40.3 KB · Views: 602
  • exhaust15.06.2008 077 (940 x 705).jpg
    exhaust15.06.2008 077 (940 x 705).jpg
    50.5 KB · Views: 631
Wow, very nice Clayton. Beautiful work. I'm always so impressed by how much more hands-on and practical most folks are down under. Here in the States, most of us would be hmm'ing and haw'ing and fidgeting over what exhaust shop to go to, getting recommendations, etc. In Aus and NZ you guys just go get some bent pipe and start mocking it up - et viola, with some care and skill you have a beautiful bundle of snakes. Simply amazing.
 
Very nice work Clayton, well done. As someone who has been making headers for several years now I can appreciate just how much work goes into it. I am fascinated by the small stubs you have made coming from the flanges, how did you form them? because they are much nicer than the usual hammered ends. I have been to work on two original cars this week ( making bespoke silencers ) and I can say that the headers on both those cars are c---- (rubbish ) compared to yours. Well done, Frank
 
Thanks Pat
Yeah that and giving the plug leads clearance was high on my list. The photos make it look impossible, but the plugs are real easy to get out. These photos show a little bit more of the plugs !!
<?xml:namespace prefix = o ns = "urn:schemas-microsoft-com<img src=" /><o:p></o:p>
Thanks Cliff
I’m sure I caught the illness from my old man, he’s a fitter and turner and has always made everything himself.

<o:p></o:p>
Thanks Frank
Spent days making different dies and in the end it turned out to be quite a simple piece.
A short pipe slides onto the jig and is pressed on two sides, than rotated 90 deg and pressed again (with clamps on the first side). The collar is for getting them off after pressing. The other tool is for getting a tighter radius to fit the flanges.
After welding them from the head side, the flanges were machined flat.
Hope this makes sense.
<o:p></o:p>
Clayton
 

Attachments

  • exhaust19.06.2008 002 (940 x 705).jpg
    exhaust19.06.2008 002 (940 x 705).jpg
    34.9 KB · Views: 771
  • Exhaust1 006.jpg
    Exhaust1 006.jpg
    57.5 KB · Views: 826
  • exhaust15.06.2008 047 (940 x 705).jpg
    exhaust15.06.2008 047 (940 x 705).jpg
    46.7 KB · Views: 829
  • exhaust15.06.2008 051 (940 x 705).jpg
    exhaust15.06.2008 051 (940 x 705).jpg
    45.9 KB · Views: 722
Clayton
Those headers and those stubs are beautiful. Welding headers has always facinated me. I would love to try doing a set sometime just for the experience
 
Thanks Jim, yes its still the same chassis. Progress has been very slow to say the least :sad:
But you know me, I can’t stop changing things. You’ll be glad to know that it’s on its way to the sand blasters this week and from now on its assembly only :happy:
 
Clayton, awsome job on the pipes!

Could you tell me how many J or U bends you used?
How much straight pipe?
What did your primary length end up to be ?

I need a link to Jims post on building the collectors.
I did a search and could not find it.

Thanks
 
nice job Clayton, looks great! I worked at wheel to wheel powertrain until they went out of business and then got the change to go work for fran at rcr. fran suggested this site and check out some of the fab work being done in australia. he said it was pretty good stuff and after seeing this i agree. great job, keep it up!
 
Back
Top