

You are using an out of date browser. It may not display this or other websites correctly.
You should upgrade or use an alternative browser.
You should upgrade or use an alternative browser.
Header Tube Clearance - What to Use to Modify Tube
- Thread starter Silver66fb
- Start date
Tim,
Many of the others can tell you the best method of putting a ding into the pipes.All I can do is give you the information about bending the pipes. On a program that is out there by the name of, if I remember correctly, was Engine Masters, that was presented by David Fryberger. David used to be the spokes person for MSD and I believe was at one time the editor of Hot Rod Magazine. He and two other buddies would do strange things to engines and put them on the dyno to see if they made any changes, good or bad. They would look at any differences in say Fuel injection compared to carburetors. One they did was on putting bends or rather kinks in exhaust tubing and see what difference it made. They knew that on some hot rods there was no way to put smooth bends in exhaust tubing if there was a steering component(for instance) in the way, or the opening for the tubes was too small for the tube(s). Many of these type cars(32-24 Fords) had very little space for the exhaust if they routed it on the inside of the engine bay. They started out with one or two hammer bangs to the tubing and took it up to almost destroying the tubing in order to get it through some of the passages. There results were simply amazing. They discovered no matter how much you bang on the exhaust in order to get it through some small opening or space, it did not hamper the performance of the engine!!
I know you aren't planning to bang away on your beautiful exhaust, but just letting you know that you won't be dinging the performance.
Bill
If you have the Windsor "FE" style covers from Roush you must dimple the header to clear the corner. A large (2" plus") socket and a mallet will be one way. You will want to put the side that does not get dimpled on a sandbag to prevent damage to the ceramic coating and denting it.
Ian Anderson
Lifetime Supporter
https://m.youtube.com/watch?v=azPKIjxmmdU
Interesting video and technique but shows it will have little to no effect on power.
Ian
Interesting video and technique but shows it will have little to no effect on power.
Ian
This is the episode Bill was talking about --
Hard to believe, but I do. It tells me a couple of things.
1) The header was incorrectly sized for the engine and perhaps more power could have been produced with a smaller tube diameter.
2) I've been sweating nothing for a lot of years..
https://m.youtube.com/watch?v=azPKIjxmmdU
Interesting video and technique but shows it will have little to no effect on power.
Ian
Hard to believe, but I do. It tells me a couple of things.
1) The header was incorrectly sized for the engine and perhaps more power could have been produced with a smaller tube diameter.
2) I've been sweating nothing for a lot of years..
Tim,
What Roush valve covers do you have? I've got the polished aluminum ones on my 427SR and still have 1/2" clearance on #1 right side. Do you have all the header tubes assembled?
Dave,
I have the non-Pentroof covers in black crinkle finish - just as the engines are advertised by Roush on their website. In talking with Superformance, I knew this would be an issue before I purchased the engine.
All header tubes are in place and clearance at this corner is the only issue.
Rick,
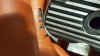
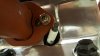
Thanks for that suggestion. My friend and I spent a couple of hours banging gently on it last night. We used a 1-1/4" socket and a sandbag behind it. It's very close to what I want now - just need to mock it up with a gasket and double-check the clearance before sending it off to coating.
On the exhaust flanges: I see that these SPF supplied tubes have 4 bolt holes per cylinder. I also noticed the outer "ears" of the flanges often touch the spark plugs. I'll have to cut off the outer "ears", smooth them, and use the inner (closer together) holes for assembly to the heads. I'm sure you've seen this.
Thanks, all.
Couple of hours tapping away.
Your friend needs a bigger hammer Tim.
Mark it use a torch on the spot to get it cherry use your socket or dolly give it a tap your done.
You have more control if you heat it especially if they are s/steel.
Jim
Your friend needs a bigger hammer Tim.
Mark it use a torch on the spot to get it cherry use your socket or dolly give it a tap your done.
You have more control if you heat it especially if they are s/steel.
Jim
On the exhaust flanges: I see that these SPF supplied tubes have 4 bolt holes per cylinder. I also noticed the outer "ears" of the flanges often touch the spark plugs. I'll have to cut off the outer "ears", smooth them, and use the inner (closer together) holes for assembly to the heads. I'm sure you've seen this.
Thanks, all.
Tim,
Are you sure on the clearance? My spark plugs clear even with boot insulators. I do have to use a thinwall socket for plug installation. Maybe your plug boots are bigger? I'd be hesitant to cut the outer ears off the headers. Access to the inner bolts might be really limited.
Dave,
I'll double check on the next dry fit, but I'm pretty sure some of the flange tabs were sitting against the ceramic part of the spark plugs. I couldn't see a way for the boot (or a socket, for that matter) to fit in that situation.
I'll take some pics to document it as well.
Jim,
I should have heated it. But now that the beating is almost over, I'm glad I went slowly and tested the fit many times.
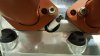
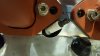
Following up to show clearance on #1 tube and the header flanges and spark plugs. I'll have to cut several of the flange "tabs" and grind smooth before coating.
Attachments
Similar threads
- Replies
- 40
- Views
- 3K
- Replies
- 11
- Views
- 2K