Help with body work

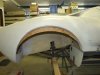
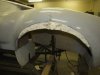
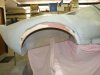
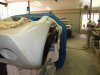
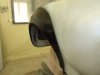
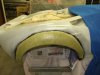
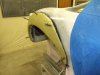
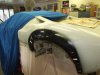
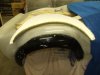
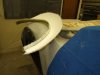
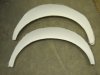
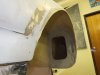
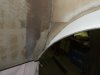
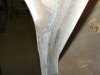
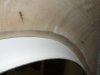
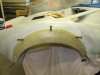
I'm trying to extend the rear wheel arches by 45mm so I can make a mold from them, but I'm having a bugger of a time sanding the compound curve.
I'm really good at turning hills into hollows......

Whats your trick to sanding a compound curve ??
The best I've come up with is using a 8 - 10mm thick rubber block.

Any help appreciated.

Clayton
 
Clayton,
Not sure what you are sanding, filler? I find the easiest way is to use a wooden block, 2"wide x 1/2" tall and as long as the sheet of paper is and just rap paper round the block. I don`t think there is any secret to it just the way you do it!! ;-)
When "feeling" the arch for bumps and hollows use the palm, forget using the fingers, you will find that with "bumps" you can sand away and find you end up with a hollow all around the bump and just make it worse! If using filler make sure it is an "easy sand type" It will come with practice.
I have seen peeps make curved blocks etc for compound curves to try and get the shape right, this might be worth a try although never tried it myself!
 
To sand a concave (inwards) curve I would use something with a radius smaller than the one you are working on as a sanding block - a round section of wood, PVC pipe or similar.

Flat blocks work well on outside (convex) curves.

Some very good tips in the link below

Block Sanding Techniques

Cheers

Fred W B
 
Thanks guys
I'm using car bog over a foam core (bog is around 3/8" thick) could of gone thinner I suppose, but didn't wont it to flex, crack, more etc.
Started off with a hard cork block which worked good, but there was a few waves I couldn't get out. Fill it, sand it, fill it, sand it........:veryangry: you get the idea.
I was using my finger tips to check and found it hard to find the small bumps and hollows (as you've said). After trying the large rubber block (3" x 6" x 3/8") in the palm of my hand, the bumps were easier to find, but the rubber wasn't hard enough to remove the bumps only.
So it seems I only need more practice with a flat block.
Thanks for the link.
Here's a few pics of the progress.

Clayton
 

Attachments

  • body 25.11.10 028.jpg
    body 25.11.10 028.jpg
    55.2 KB · Views: 284
  • body 25.11.10 031.jpg
    body 25.11.10 031.jpg
    46.4 KB · Views: 294
  • body 25.11.10 065.jpg
    body 25.11.10 065.jpg
    56 KB · Views: 275
I'd be worried about durabilty with only filler (that thick) over foam, and that it's going to eventually show a crack along the line of the original wheel arch. I would suggest you put a layer of glass fibre matt /resin over the foam, then once it is hard get it roughly right with 36/80 grit, then put the filler over the top of the GRP to get the final finish.

Grind the surface of the original materail just above the arch back a little, so that the mat you add laps onto the original material and is far enough back so that you can restore the original contour with filler.

When sanding back a black guide coat from a rattle can helps a lot to find the lows.

Cheers

Fred W B
 
Last edited:
Clayton, for something like that I would definitely use a longboard sander.

The longboard will help avoid random dips and bumps. Use steady motion, and alternate at 90 degrees periodically.

A longboard can certainly work a concave shape (they're flexible). And, by using the edge only, you can work a very acute concave shape. Where it won't work is a compound concave shape, but that shape is pretty rare on a car - most concave shapes are also convex somewhat on the other axis.

Refine and perfect your technique with the longboard and you'll never use anything else.

http://www.jamestowndistributors.com/userportal/show_product.do?pid=4
 
Hi Fred
The foam and bog is only there as a plug. I'll pull a mold off it, then cut out the extension plus a little of the original guard. Make up a replacement section from inside the mold and graft it back into the rear clip. And as you said, I'll taper the joint to a feather edge and lay in strips of glass. Hopefully that will work.

Thanks Cliffbeer2
I'll see if I can track one of these down locally. If not, I'll use the link.
cheers
Clayton
 
No probs Fred
I've stuck with it and tried the suggestions above. Got it to a point that I'm happy enough to start glassing.

Clayton
 

Attachments

  • body 26.11.10 002.jpg
    body 26.11.10 002.jpg
    62.7 KB · Views: 238
  • body 26.11.10 003.jpg
    body 26.11.10 003.jpg
    66.4 KB · Views: 231
  • body 26.11.10 006.jpg
    body 26.11.10 006.jpg
    37.2 KB · Views: 252
Thanks Randy

Added gel coat and mat over the last few days.
Cant wait to see if it worked .

Clayton
 

Attachments

  • body 02.10.10 002.jpg
    body 02.10.10 002.jpg
    60.1 KB · Views: 235
Looks good Clayton!

What a lot of people forget with bodywork and tidying up filler patches is that initially one should use an agressive sandpaper (80 grit, or even 40 grit in extreme circumstances) as these heavy grades don't tend to follow existing contours, which means that you will avoid just following flats and peaks, as these heavy grades will eliminate them.

If you are then heading down the route of using a high build primer, then you can finish with a 120 or 180 grit paper and the primer will easily cover the scratches.

Cheers,

Graham.
 
Thanks Graham
I ended up using 80 grit for most of it and finished off with 180. Started with 180 and just got frustrated.

Removed the molds today, which was fun.......
Didn't turn out too bad, only had a bit of paint transfer which cleaned up easily.
Now to cut the extension off and glass in a new piece.

Clayton
 

Attachments

  • body 02.10.10 004.jpg
    body 02.10.10 004.jpg
    54.3 KB · Views: 252
  • 06.12.10 001.jpg
    06.12.10 001.jpg
    64.3 KB · Views: 208
  • 06.12.10 004.jpg
    06.12.10 004.jpg
    52.3 KB · Views: 257
  • 06.12.10 006.jpg
    06.12.10 006.jpg
    47.6 KB · Views: 253
  • 06.12.10 008.jpg
    06.12.10 008.jpg
    46.8 KB · Views: 253
Thanks Graham

Removed the bogged section and original lip return from the clip. Ground the inside to a taper. The plan is to skin pin the mold back on the clip and lay up the glass one time.

Clayton
 

Attachments

  • 08.12.10 007.jpg
    08.12.10 007.jpg
    44.7 KB · Views: 227
  • 08.12.10 011.jpg
    08.12.10 011.jpg
    43.4 KB · Views: 213
  • 08.12.10 016.jpg
    08.12.10 016.jpg
    52.6 KB · Views: 199
  • 08.12.10 020.jpg
    08.12.10 020.jpg
    31.3 KB · Views: 201
  • 08.12.10 022.jpg
    08.12.10 022.jpg
    54.4 KB · Views: 219
Back
Top