
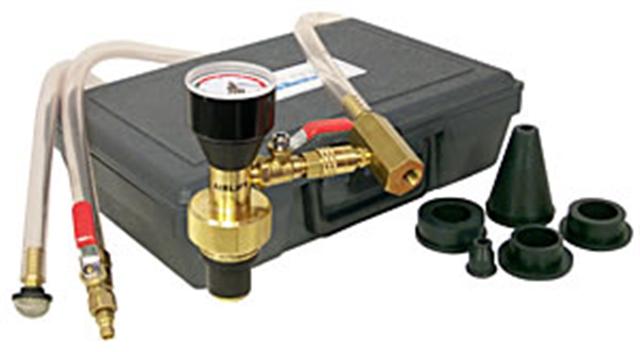
This “How To” describes a simple and effective method for purging the air from your cooling system. It also provides for a solid cooling system leak check after an initial installation. It uses a tool called the Uview (UV 550000) Airlift Cooling System Leak Checker and Airlock Purge Tool Kit. These retail for about $170 but can be had on the web for around $90. I got mine from Automotive Tools, Air Tools, Robinair A/C Equipment at ToolTopia.com for $91. The photos are from a SPF GT40 install but this equipment and technique applies to any car. I would like to thank Mike Evangelo of Dynamic Motorsports for turning me on to this procedure.
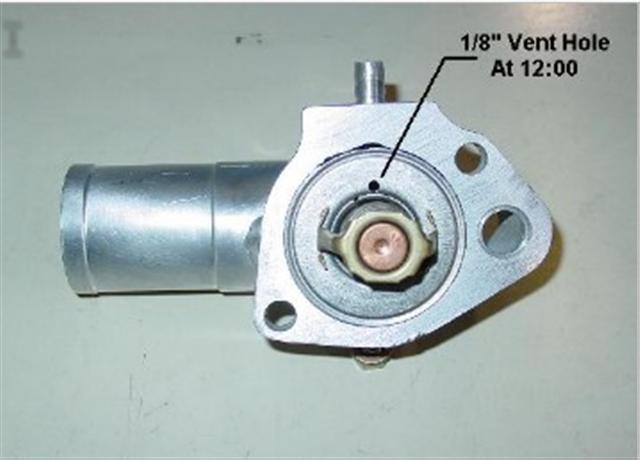
You may want to drill a hole in your thermostat as shown below. This is not entirely necessary as long as you are willing to get the engine up to operating temp and ensure that the thermostat is open as you do this process. I prefer the hole in the thermostat technique because I dislike working on a hot engine. Drilling the hole should be done during the initial engine installation if possible since it is not trivial to get to the thermostat once the engine is in place. I didn't have a better picture but I would also suggest drilling the hole closer to the top of the thermostat rather than near the center as shown, Just stay away from the edge where it makes a seal. This hole allows trapped air to escape the engine even when the thermostat is closed.
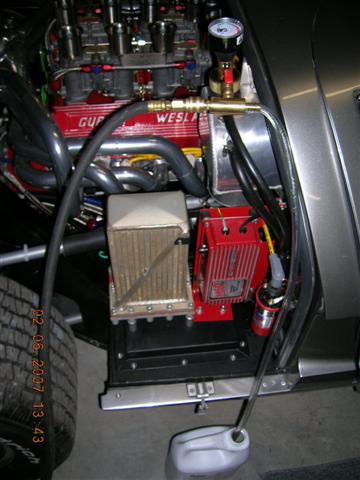
The photo below shows the air bleed tool in place on my car. The large black hose is from my air compressor and the clear hose goes to an overfill jug on the floor. The way this works is the high pressure air from the compressor flows past an orifice in the valve at the overflow tank creating a vacuum in the entire cooling system. If you ever drained a water bed you know exactly what's happening here. Once you've pulled a vacuum, you close the valve and watch the gage for leak down. After you are convinced there are no leaks (because the vacuum is being held) you open the valve the other way and it sucks cooling fluid up from the jug on the floor into the tank. Technically you are done at this point but being somewhat anal, I do the entire procedure again. Then I run the car up to full temperature to make sure there are no captured bubbles. Then I do the vacuum pull one more time after the engine has cooled a little. Doing this process with all the extra steps I take still only requires about 30-45 minutes.
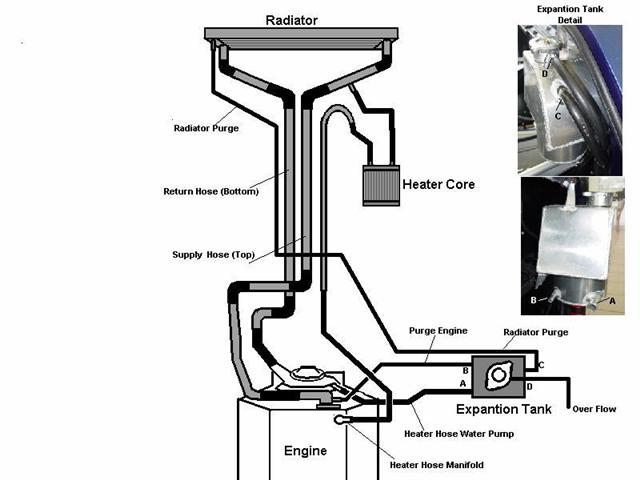
The drawing below shows the coolant plumbing for an SPF GT40.
You may want to drill a hole in your thermostat as shown below. This is not entirely necessary as long as you are willing to get the engine up to operating temp and ensure that the thermostat is open as you do this process. I prefer the hole in the thermostat technique because I dislike working on a hot engine. Drilling the hole should be done during the initial engine installation if possible since it is not trivial to get to the thermostat once the engine is in place. I didn't have a better picture but I would also suggest drilling the hole closer to the top of the thermostat rather than near the center as shown, Just stay away from the edge where it makes a seal. This hole allows trapped air to escape the engine even when the thermostat is closed.
The photo below shows the air bleed tool in place on my car. The large black hose is from my air compressor and the clear hose goes to an overfill jug on the floor. The way this works is the high pressure air from the compressor flows past an orifice in the valve at the overflow tank creating a vacuum in the entire cooling system. If you ever drained a water bed you know exactly what's happening here. Once you've pulled a vacuum, you close the valve and watch the gage for leak down. After you are convinced there are no leaks (because the vacuum is being held) you open the valve the other way and it sucks cooling fluid up from the jug on the floor into the tank. Technically you are done at this point but being somewhat anal, I do the entire procedure again. Then I run the car up to full temperature to make sure there are no captured bubbles. Then I do the vacuum pull one more time after the engine has cooled a little. Doing this process with all the extra steps I take still only requires about 30-45 minutes.
The drawing below shows the coolant plumbing for an SPF GT40.