GT40 Australia #27

Peter Delaney

GT40s Supporter
Hi All,

I thought that it was about time that I posted some info & pics of progress to date. Some history :

I bought the car from a DRB dealer about 30 months ago - a previous owner had started (engine, trans, suspension roughed in) but ran out of time. He ended up buying the dealer's own completed car & as part of the package, gave the dealer back ol' #027.

This sat in the dealer's factory for a year or so until I rang them to ask what sort of lead-time would apply for delivery of a rolling chassis - the answer was "About 5 minutes - we have one sitting here for sale" ! After picking myself up off the floor, I told them that I would have to sell my '89 Corvette to raise the funds, so I couldn't do anything immediately. The dealer said "An 89 Vette - I've been looking for one of those" - at that point, I felt the hook sink in !!

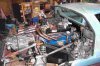
The dealer (DC&O) make 8-stack inlet manifolds & throttle bodies for SB Fords (used on most Oz-built EFI GT40's) & was looking for a test-bed for the GM version. Two weeks later, I drove the 'Vette down to DC&O and came back in a tilt-tray truck with the '40 on the back - a straight swap !

Two & a half years later, it is nearly finished & I am struggling with the bureaucratic nightmare associated with getting it registered - about the only bloody thing they don't want is a crash test !!

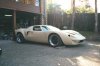
I'll try to post some progressive pics & comments, starting with the "raw material", through to the present time.

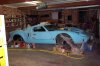
This first pic shows the car pretty much as I got it, but with lights, latches, etc roughed in :
 

Attachments

  • 24910-1-Starting Point.jpg
    24910-1-Starting Point.jpg
    94.6 KB · Views: 1,464

Peter Delaney

GT40s Supporter
This next pic shows the engine bay with most components test-fitted - note the rust everywhere !
 

Attachments

  • 24911-2-Engine Mock Up.jpg
    24911-2-Engine Mock Up.jpg
    81.3 KB · Views: 1,499

Peter Delaney

GT40s Supporter
At this stage, I have most of the body prep done - there is about 10metres of chopped-strand-mat over various parts in order to get panel gaps & curvature right (& about 6 months of glassing/sanding/glassing/sanding) !!

The previous owner had kindly covered the whole of the inside front & engine bay with bitumen paint - this took some 2 months to fully remove so that "real" paint could be laid on (this was not a fun time - permanently black hands & clothes, & a wife nearly ready to have me certified) !!
 

Attachments

  • 24912-3-Engine Out .jpg
    24912-3-Engine Out .jpg
    80.3 KB · Views: 1,407

Peter Delaney

GT40s Supporter
Nearly all the body-work is finished here - I didn't like the idea of "eyebrows" pushing the door tops down in the centre of the roof, so decided to "fix that". Six months later, I had reglassed & machined back the underside edges of the door tops, tilted the doors inwards about 5deg, built up the outer parts of the door tops & leading frame edges, & fixed all the scoop alignments. Eyebrows would have been much simpler !

This pic shows the car after all this & painted with grey Spies Hecker "Raderal" - a spray polyester resin filler that looks after pin-holes & provides a nice even base for the final flat-stick sanding.
 

Attachments

  • 24914-4-Primer-Filler.jpg
    24914-4-Primer-Filler.jpg
    87.8 KB · Views: 1,372

Peter Delaney

GT40s Supporter
This pic shows the car in the final Spies Hecker "Vario" primer, after flat-stick sanding ("blocking back" in Oz-speak)down to 400 grade dry.

Simmons FR17 wheels have finally arrived, along with Falken tyres.

Most of the wiring has been done by this stage, with the dash completed via a set of plug/sockets so it could be easily removed for the final body painting (& afterwards if required). Ready for painting - at last !
 

Attachments

  • 24917-5-Final Primer.jpg
    24917-5-Final Primer.jpg
    92.2 KB · Views: 1,370

Peter Delaney

GT40s Supporter
After doing the polyester resin filler & the primer, I decided that the 2-pack clear-over-base was going to be out of my league, so the car went off to a professional. "Not too bad a job for an amateur" he says - then we go on to run a guide coat over the car & spend 70 hours filling over 200 small defects that this revealed ! After touch-ups with the primer & a final smooth-over with 800 grade dry, we hit the painting - Scott did the spraying & I did the paint mixing / gun cleaning, etc. 12 hours later, we had 4 coats of base colour & 4 coats of clear on.

At this point, I was so glad that I didn't try to do the final paint myself !

This pic is just after painting, with some of the lights, latches back on :
 

Attachments

  • 24918-6-RHS After Paint.jpg
    24918-6-RHS After Paint.jpg
    75.9 KB · Views: 1,309

Peter Delaney

GT40s Supporter
Now we are in the final stage of getting the engine set up. In order to meet the registration requirements, we need to meet some fairly stiff emissions tests here - so I engaged an expert in the field to help.

The stock '95 Mustang engine now has a new cam, AFR heads, a DC&O-based 8-stack setup, etc - all designed to meet the emissions tests (at least, that is the plan) ! To get better fuel delivery into the heads, we have reversed the throttle bodies so that the injectors are on the inside (like the TWM setup) - now that was a challenge to squeeze the fuel rails, injectors, linkages down the middle of the throttle bodies. We are nearly there, & the following pic shows the overall setup :
 

Attachments

  • 24919-7-8-Stack 1.jpg
    24919-7-8-Stack 1.jpg
    89.4 KB · Views: 1,329

Pete McCluskey.

Lifetime Supporter
Looking good Peter, congratulations. It must be frustrating dealing with petty officials who seem to do everything they can to put obstacles in the way of registration. I guess that comes from having a Premier who does not drive.
 

Howard Jones

Supporter
Peter I'm at the begining of the sand forever stage. Can you offer any advice on pannel shutline fit that might save me mistakes you learned the hard way. What kind of materials, grit of sandpaper, power tools that might help etc. I am going to try and do what you did, most of the prep and then let a pro finish up. What might I avoid to save the pro from fixing my mistakes? How about a couple of more shots of the vent area/shut line behind doors, leading edge of door opening around the upside down "L" area, and the lower edge in front of the windshield or anywhere you had to add a lot of material. Your car looks great! I hope I can do as well.
 

Peter Delaney

GT40s Supporter
Thanks Pete - Yeah, the RTA are real pain in the A ! As for our State Premier, Bob Carr, who can't even drive one - what can I say (except that I didn't vote for the bastard !). No wonder all the good motoring events are in QLD, VIC or TAS.

Howard, the tool that I used more than anything was a simple Dremel, fitted with 60grit sanding drums - my first Dremel lasted until about a month ago, so now I am on No2 - worth their weight in gold ! They are perfect for trimming back the overhanging rough edges of glass that you have added to door edges, etc. (Some of these were up to 1/4" thick - no fun by hand).

Panel gap work will depend on how good or bad things are now. I found that the gap between the vertical front edge of the door & the front clip was the driver - it needed to be nearly 1/4" to allow clearance as the doors are opened. This meant that "Lexus Gaps" of around 1/16" would have looked out of place elsewhere, so I just made them all about the same as those front door edges. I also found that the bigger gaps allowed for having to shut the doors somewhat "firmly" to overcome the resistance of the door rubbers - at one stage I had 1/8" gaps around the door tops, but found that the "give" in the rubber allowed the doors to hit the roof before relaxing back to the correct position. Gaps of around 1/4" solved this problem.

If you need to build out door edges, etc, I found that the best way was to square off the edge with the Dremel, run one layer of glass over the edge (with about 1/4" overhang on each side), let it set & provide a wide base for the next layers, then run up to 6 layers at a time over this. I first tried 4 layers in one hit & ended up with them all falling on the floor ! If you need to build up an edge, and also the adjacent flat panel surface, I found it best to do the edge first, machine off the overhang, & then lay glass on the panel surface so that it crosses the new edge build-up - this way you get some "cross bonding" that adds a lot of strength to the bonds.

For rough body filing like shaping large areas of raw glass add-ons on panel faces, I started with 32grit on a flat stick or piece of exhaust pipe (for concave curves), then on to 80grit to get rid of the big scratch marks, then on to 120grit. All of this needs to be done with long diagonal strokes around the curves - never to-&-fro in the one area. I found that because of the flexibility of f/glass, I had to have the rubber seals in place around the doors & rear clip, and latches tensioned down, to hold everything in its final place while doing the body filing across the panel gaps.

With all that done (how easy were those words to write !), it is probably best to run a fairly heavy coat of spray polyester filler over the whole car. I made the mistake of running 4 light coats on & paid the price when we found hundreds of tiny pin-holes later on - I should have really wacked it on. The stuff is quite easy to sand back (nowhere near as bad a raw glass of gel-coat) & a 400grit finish is all you need before priming.

An important tip I learned from my Corvette expert is to never use water in the sanding processes on filler or primer - always use dry paper. The tiniest bit of water can stay in pin-holes for months, & will result in a humidity bubble in the final paint. The only downside to this is DUST - there will be bucket loads of it on you, the garage, the house, the neighbours, etc !! I figured that I put about $1,000 worth of filler over the car, & ended up with half of that floating around as dust.

My other big mistake was to wait for the expert to run a very light guide coat of GM Flat Black over the car - this is what showed up all the pin-holes, minor lumps & bumps, etc which are impossible to see when the car is in flat primer. If I had done that myself, I would have saved big bucks.

The car is up at the engine builder's now, so I can't get any pics until next week - I try some shots of the gaps as requested.
A whole weekend without the '40 to work on - I might have to re-learn how to start a lawn-mower !!!

More pics to follow next week.

Kind Regards,

Peter D.
 

Howard Jones

Supporter
Thanks peter that was very helpful. I was unsure on how wide the gaps should be, now I know. I will do the door gaps next and then match the rest.

Thanks again Howard
 

Peter Delaney

GT40s Supporter
Throttle linkages & fuel rails are now made up & test fitted - should go on permanently in the next day or two.

Engine wiring harness is finished - all we are waiting for is the ECU.

Headers are ceramic coated & final-fitted (see pic).

I was going to run the standard Ford dizzy - however, with the injectors & fuel rails up the middle of the stacks, the front injector fouled the top of the dizzy. @*&%#@ !!

We therefore are running a cut-down Ford dizzy with dual trigger rings / sensors in the lower part of the body, 4 x dual coil packs & 4 x igniter modules. About $600 more expensive than the standard dizzy approach, but will give more accurate control of spark (and it fits !).

Another couple of days of bit & pieces, and we should see a start-up - man, have I been hanging out for that !!!

After basic tuning at the shop, we will put it on the dyno for final tweaking
 

Attachments

  • 25595-Headers 2 small.jpg
    25595-Headers 2 small.jpg
    92 KB · Views: 1,311

Peter Delaney

GT40s Supporter
Thanks for the nice comments guys - they make a big difference when you are at that frustrating stage of racing against time, just so that you can go head-to-head with the RTA bureaucrats !

In view of the time constraints (have to pass all RTA tests this year, if not actually have it registered), lots of "nice" things have been postponed - carpet, interior trim, stripes, lots of bits painted instead of ceramic coated, etc. When (if) it gets registered, I'll drive it for a while to get the initial crazies out of my system, then go back & do all the short-cut / omitted things.

The paint needs a cut-back with 2000grade & a buffing - if I'm not happy with this, it will get a final flow-coat of clear again. Once the paint has settled, I'll put white side stripes on, then think about centre stripes. Bill Bayard's car is a similar colour to mine (with side stripes) & he has done a mock-up for centre stripes - they really do look good, so I am leaning that way.

Thanks guys.

Kind Regards,

Peter D.
 
Peter great work and beautiful finish. I wish I had the magic touch and skill that you have. /ubbthreads/images/graemlins/cool.gif
 

Peter Delaney

GT40s Supporter
Thanks guys - the paint colour is Honda Marine Blue from the last Prelude series, made up in 2-pack by Spies Hecker with a little touch of pearl in it.

As to "skill" - there's not much of that around here. All it takes is patience, bloody-minded persistance & vast clouds of sanding dust! Anyone could take the body finishing process through to the primer stage - I think the secret is to add f/glass as required (I went through about 10m of chopped strand mat & 6 litres of resin), do a reasonable block-back with 80 grit, then coat the whole thing with a very generous layer of sprayable polyester resin/filler (eg. Spies Hecker's "Raderal"). This fills all pin-holes (hundreds of them appear if you just run primer over bare f/glass) & gives a uniform surface for the final block-back with 120 grit, then 400 grit. The final trick is to run a light "guide coat" of black over everything & block it back with 400 grit again - this shows up tiny imperfections which you just can not see in primer.

Kind Regards,

Peter D.
 

Peter Delaney

GT40s Supporter
A pre-Christmas update (or perhaps it should be called a "down-date" ! ) :

Got the car running, had lots of trouble bleeding the cooling system, then onto the dyno last week - all was going ok for half an hour or so, then clouds of steam - it popped a hose down near the water pump inlet. A couple of hours cooling, re-bleeding & re-bleeding & we started up again, only to see the water temp go too high very quickly - instant shut-down. Then we see steam coming out of one of the exhaust pipes - back to the workshop !

The engine was a stock '95 Mustang 5L & the previous "engine builder" (& I use those words very loosely) had checked everything, installed the AFR heads, new cam, & passed it on to the EFI experts.

When we pulled off the heads, there were the culptits - one head gasket on the wrong way (blocking off the rear water ports), head not tensioned down right at all, etc.

By that time, total lack of confidence had settled in, so we pulled the rest of the engine down. Cam not correctly degreed in, a couple of very suspect main bearings, etc.

The whole lot has now gone off to a highly reputable race-engine builder for the works - all necessary machining, crack testing, balancing, etc.

Due to the time constraints of trying to get the car through the RTA emissions testing before the end of this year, the whole original engine approach was a calculated gamble. As with all of my previous attempts at gambling, it did not pay off !

We should have the engine back in the car by the end of next week, so I'll keep you all posted.

I was telling Bill Bayard about the fun & games, & how all the things that I was going to do later have now been brought forward. He has urged me to share my theory on building GT40's - it goes something like this :

Quote --------------

Its all to do with Einstein's "General Theory of Relativity" :

- I was a stationary observer in space, happy & stable

- The "trigger event" : GT40 purchase

- Planned future events are brought into the present at an ever increasing rate

- The rate at which they are brought forward is directly proportional to the square of their cost

- I see my money move away at close to the speed of light

- Other observers (suppliers, etc) see my money approaching them almost at light-speed

- Because money is travelling at near-light-speed, time is dilated or compressed as appropriate, depending on which observer is the reference point :

- From my perspective, time is always being fore-shortened
- From other observers' perspectives, time is stretched

In short, E=MC^2

E = Exasperation experienced by GT40 Owner
M = Mass of problems descending on said Owner
C = Speed of departure of money

Given some time, I am sure that I could make it all fit with the "Unified Theory Of Relativity". This would add an element of Quantum Mechanics (which I think has something to do with the "Uncertainty Principal" & that sure as hell has something to do with this project !!!)

Unquote-------

That theory was developed the night after the tear-down & the full extent of the challenge was revealed. It was also refined over 4 or 5 stiff Scotches ! It seemed to make sense at the time, but when you have been battered from pillar to post by bloody Murphy & his bloody Law, then take solace in a drink concocted by his sworn enemies across the Irish Sea, what do you you expect !!

Kind Regards,

Peter D. /ubbthreads/images/graemlins/confused.gif
 
Back
Top