

You are using an out of date browser. It may not display this or other websites correctly.
You should upgrade or use an alternative browser.
You should upgrade or use an alternative browser.
Radiator grille protection
- Thread starter Veek
- Start date
Veek
Two places to get the material are McNichols co, they have a large selection of perforated metals, also McMaster has a lot, both are on line.
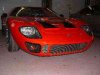
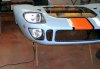
Personally I didn't like the look of a screen in the grille opening and put some perforated metal with hexagonal holes in front of the radiator to hide it somewhat...being black it virtually disappears, and does the job as well
Phil
Two places to get the material are McNichols co, they have a large selection of perforated metals, also McMaster has a lot, both are on line.
Personally I didn't like the look of a screen in the grille opening and put some perforated metal with hexagonal holes in front of the radiator to hide it somewhat...being black it virtually disappears, and does the job as well
Phil
Lynn Larsen
Lynn Larsen
Veek,
I used McMaster-Carr part no. 92725T42 in all openings. The thing that really drew me to this was the 79% open area.
Type.............Perforated Metal
Material.........Alloy 3003-H14 Aluminum
Form.............Sheets
Width............36"
Length...........40"
Open Area......79%
Center-to-Center Spacing .281"
Thickness..... .032"
Hole Diameter .250"
Hole Shape.....Hexagonal
Hole Pattern...Staggered
Gauge...........20
Lynn
Pegasus sells a couple of different size stainless steel wire meshes to protect radiators and oil coolers. But the max width is 3'.
http://www.pegasusautoracing.com/group.asp?GroupID=SCREEN
http://www.pegasusautoracing.com/group.asp?GroupID=SCREEN
The stainless steel mesh I used was #4 from Racer Parts Wholesale 24x36" for 29.95. All you need is wide enough for the grille which is about 29". It is a little difficult to cut with wire cutters. Make up a template with cardboard. Take a piece of wire or two and attach the cardboard to the mesh screen so it doesnot move during the cutting. When done trial fit and then trim as needed. My opening had recesses around the opening so I added fiberglass filler(bondo etc.) and smoothed out. I then used stainless screws to attach it to the body.


For those of you that are interested, I did cutouts for all the vents as well to keep leaves and other road debris out of the various openings, especially the air vents to the rear hatch. Here are some pics or those.

These were made the same way as the grille. There are 2 ways of doing them. The first is like the originals. They are attached with metal tabs that are attached to the body. I will have pics of one next weekend when I visit one of the road cars. The second which is the way I, Bill Bayard and some others have done. That is To use vacumn tubing to hold the mesh in place. Do a cardboard cutout. Make it about 1/8 to 3/16" smaller than the opening. Get some 3/8" vacumn hose from your local parts store. Cut it to lenght, slice it along its axis on one side. Insert the stailnless mesh and press fit into the opening. Use some silicone sealer to hold in place. If you have a dark color, you can use the black silicone. With a little fiddling it will work. A sheet of 24x36" will give you enough to do all the openings including the rear radiator vents(oil and trans) and have a little left over.
There are a few tricks to doing this right.
1. Cut the stainless a little smaller than the opening(except the front radiator).
2. Slice the tubing at 90 degrees through one side of the tubing. More on why in a minute. I fabricated a jig for cutting mine out of a block of wood that was just the size of the tubing. I then cut a notch out of the drilled out hole as a gude for cutting. This held the tubing in place for the cut. Then I just pulled the tubing along the trough and cut some more. It held the tubing firmly in place for the cut.


As you can see, the placement of the hole in the wood is such that the razor blade doesn't cut the bottom of the tubing.
3. Take the tubing, and this is inmportant, and stretch it until the support thread in the tubing breaks. all or most tubing has a support thread in it to keep it from collapsing when bent. Do this all along the lenght of the tubing. Now when the tubing is bent with the cut edge in the center it will not pucker out like this.

Instead it sill look like this.

If you have any other questions, I would be glad to answer them.
Bill
For those of you that are interested, I did cutouts for all the vents as well to keep leaves and other road debris out of the various openings, especially the air vents to the rear hatch. Here are some pics or those.
These were made the same way as the grille. There are 2 ways of doing them. The first is like the originals. They are attached with metal tabs that are attached to the body. I will have pics of one next weekend when I visit one of the road cars. The second which is the way I, Bill Bayard and some others have done. That is To use vacumn tubing to hold the mesh in place. Do a cardboard cutout. Make it about 1/8 to 3/16" smaller than the opening. Get some 3/8" vacumn hose from your local parts store. Cut it to lenght, slice it along its axis on one side. Insert the stailnless mesh and press fit into the opening. Use some silicone sealer to hold in place. If you have a dark color, you can use the black silicone. With a little fiddling it will work. A sheet of 24x36" will give you enough to do all the openings including the rear radiator vents(oil and trans) and have a little left over.
There are a few tricks to doing this right.
1. Cut the stainless a little smaller than the opening(except the front radiator).
2. Slice the tubing at 90 degrees through one side of the tubing. More on why in a minute. I fabricated a jig for cutting mine out of a block of wood that was just the size of the tubing. I then cut a notch out of the drilled out hole as a gude for cutting. This held the tubing in place for the cut. Then I just pulled the tubing along the trough and cut some more. It held the tubing firmly in place for the cut.
As you can see, the placement of the hole in the wood is such that the razor blade doesn't cut the bottom of the tubing.
3. Take the tubing, and this is inmportant, and stretch it until the support thread in the tubing breaks. all or most tubing has a support thread in it to keep it from collapsing when bent. Do this all along the lenght of the tubing. Now when the tubing is bent with the cut edge in the center it will not pucker out like this.
Instead it sill look like this.
If you have any other questions, I would be glad to answer them.
Bill
Now, where have I seen those before? /ubbthreads/images/graemlins/grin.gif /ubbthreads/images/graemlins/tongue.gif
Bill et al,
A Dremel cutoff wheel makes the job a LOT easier than using
dykes. About 1/10th the time too! I was weaned off the
dykes after cutting and installing a defective sheet of SS
wire(It rusted!)! The job with the Dremel did require a
number of cut off discs(whole pack), but the savings in
time and pain, were well worth the extra $10!
In addition to what Bill has done, I added "air filters"
to the induction holes. They are made of 3 layers of A/C
filter media, cut to shape, and dyed black. They are
virtually invisible to the naked eye from both inside and
out, and can be easily removed to wash out any accumulated
road dirt.
BTW, the increase in engine temperature, due to the
screens, was negligible.
Bill
Hi Patrick,
We have the Grilles in stock for CAVs. The center openning has a molded edge to protect the body and the brake duct grilles attach from behind. Makes a huge difference to the cars (and your peace of mind), does not affect cooling. Standard finish is Satin Black. We also do the rear grilles which let a lot more air (and heat) out of the back, matching molded edge, very slick")
We have the Grilles in stock for CAVs. The center openning has a molded edge to protect the body and the brake duct grilles attach from behind. Makes a huge difference to the cars (and your peace of mind), does not affect cooling. Standard finish is Satin Black. We also do the rear grilles which let a lot more air (and heat) out of the back, matching molded edge, very slick

Nice job on both counts.
[ QUOTE ]
A Dremel cutoff wheel makes the job a LOT easier than using dykes. [...] The job with the Dremel did require a
number of cut off discs(whole pack)
[/ QUOTE ]
If you're using a Dremel tool with a cutoff disk, get the fiberglass cutoff disks. They're infinitely more durable than the regular cutoff disks. Sideways torque doesn't cause the disks to shatter.
Veek, Since you asked The front set of 3pcs is 159.00 The side scoops behind the doors are 40.00 pair and the rear grilles are 109.00 for the large pair with the small vents above the tailights going for 40.00 pair.
Molded edges are provided to improve finish or protect hands from very sharp metal.
Templates are supplied for the vent cutouts above the tailights. These grilles should fit CAV, GTD and most other KVA based bodies. Tremendous response so far, thanks.
The front set of 3pcs is 159.00 The side scoops behind the doors are 40.00 pair and the rear grilles are 109.00 for the large pair with the small vents above the tailights going for 40.00 pair. Molded edges are provided to improve finish or protect hands from very sharp metal.
Templates are supplied for the vent cutouts above the tailights. These grilles should fit CAV, GTD and most other KVA based bodies. Tremendous response so far, thanks.
Do you guys realise just how much airflow even the most simple grille cuts out, do the calcs and then forget it. In all the years I have been involved in 40s I have not seen direct stone damage to a radiator, but I have seen drastically overheated engines because of grille fitting
Frank,
get a hold of yourself! we are not fitting these grilles to prevent stone damage. Do you know how much air a possum or armadillo on the radiator blocks? Even at 200MPH u wouln't make it to the next town without overheating. I purchased the honeycomb like ford uses on its truck grilles from McMaster Carr for about $36 a sheet 36"x48".
Oh, if u dont have those critters in Sussex, image a small badger or red fox in a missionary position on your radiator
Similar threads
- Replies
- 19
- Views
- 1K
- Replies
- 17
- Views
- 902
- Replies
- 124
- Views
- 5K
- Replies
- 4
- Views
- 644