Listen to your car -

otherwise known as "this will curl your toes"....

Hi all -
I have been looking through some old pictures we have which I thought some of you may be interested in. They detail what was some 'early experimental' designs that we no longer use, but highlight why you should check and check again if something does'nt feel or sound right.... bear with me..

The first two pictures concern a problem that first showed some years back when Roy and I visited the Isle-of-Man for the 'Three Hill Challenge' - 3-days of organised hill climbs across the island and some general fun testing on their open roads (that still have no speed limit) out of town. [if you visit - please drive safely!!]

Sometime during/after the third day - which ended with the Creg-ny-Baa event, we noticed that there was a soft brake pedal - and a rubbing noise on full lock. Since we only used full lock when performing 3-point-turns and loading / unloading from the trailer, we gave it little thought at the time and figured we'd check it on return to the mainland...

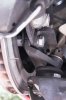
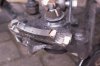
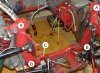
On return, with an event at Goodwood looming the following week, we had a look at what was causing the 'knock-back' on the brake pads, and hence the soft brake pedal. See below.
 

Attachments

  • 54856-hub1.JPG
    54856-hub1.JPG
    28.8 KB · Views: 327
The picture above shows that the disc had been rubbing the bottom arm and the hub had developed a crack (open) where a bolt hole passed through. It had in fact cracked on both the lower bolt holes and once we dismantled the hub we were left with the following picture.

The pad knock-back should have altered us perhaps earlier but I suspect we completed the 'bumpy' Creg event with a broken bottom joint - which as we cross the finish at apporx 100mph, could have really spoilt the day!
 

Attachments

  • 54858-hub2.JPG
    54858-hub2.JPG
    28 KB · Views: 272
We had pad knock back again shortly afterwards but it was caused by the other side, and this time it was the bearing support cartridge flange that had failed. The weld held good but the flange let go, again allowing the disc to run not centered in the caliper and hence the knockback.

NOTE - these were early designs that were not used elsewhere and have been subsequently replaced with better stronger items that have given no problems at all in several years hard driving. I post them to hightlight the fact that the car was trying to tell us - with the knock-back, we just did'nt initially listen to it.

Final of Hub
 

Attachments

  • 54860-hub3.JPG
    54860-hub3.JPG
    30.5 KB · Views: 320
Last one! but more recent this one....

I'm a great one for checking chassis rails etc for cracks etc etc and one occasion (late 2003) I noticed a crack on the rear of Roys chassis, on the cross-member marked 'C' below. On removing the engine, we found the crack passed through three walls of the box section passing between points 'B' and 'B'. The box section was cranked and moved forward of its normal position to enable us to lower the engine and gearbox further in the chassis. On closer inspection it was noted that the welder, despite getting a good weld on the section, had been a little over zealous with a grinder and taken much of the strength out of the newly made part which subsequently partially failed.

Note that the picture below does not actually show the part that failed (don't have a pic) but shows the replacement fitted and where the failure occurred (point 'C'). It also highlights the very high loads that affect the chassis rear between points A-A and B-B. In fact many of you will have noticed that if you remove the upper cross-member (on your GTD), the upper chassis turrets do move together slightly and will generally require the chassis being lifted to allow the retaining bolts to be re-fitted. NOTE - do not leave the upper member out with engine on place (for long periods) without supporting the chassis elsewhere or a 'permanent set' may occur.

Hope this is of interest... Anyone else got anything they care to tell us about.... /ubbthreads/images/graemlins/grin.gif
 

Attachments

  • 54861-ChassRear.JPG
    54861-ChassRear.JPG
    54.2 KB · Views: 355
One last thought - if you want to hear better what is going on when you drive.... wear earplugs!

Whilst a 40 sounds glorius inside, it can be boody LOUD and you'll better distinguish mechanical noises (especially engine) if you fit earplugs.

An added benefit is on track, you'll be faster too (doh!) proven by many club members and also a friend of mine who won the 600cc AMA series? last year (Yamaha) who was very sceptical until he tried it - was consistently 0.5 to 1.0+ seconds faster per lap! /ubbthreads/images/graemlins/grin.gif
 
Hi Paul

Nice photo its amazing just how much load those points between A-A and B-B take?

It especially demonstrates the stresses in the chassis between B-B.
You can imagine how the car might handle if that area of chassis had failed altogether.

Regards

Chris.
 
Excuse my ignorance, not being an engineer, but seeing the MDA pictures on the forum, this chassis member appears to be missing in parts. Does this affect it greatly? or can it be removed safely in designs similar?

Brett
 
Hi All -

I posted this info as I figured it might be of interest to others - especially if they are considering modifying their chassis but please note the following -

My knowledge is entirely based around the GTD owned by Roy Smart that I am lucky enough to be involved with. My background is Electronics/iT with engines/injection being another passionate interest. Roy Smart on the other hand, having spent most of his life in engineering has no doubt forgotten more mechanical knowledge than I could ever hope to learn. (yes I do see him as a bit of a Guru)

Roys GTD chassis was factory supplied (Poole/Ray Christopher) and constructed using thinner walled tubing than standard (at Roy's request) in an attempt to keep overall weight down. This lightness has made his vehicle somewhat unique in several ways - for example, when we jack the front up, we spread the load whilst jacking because the cross struts below the radiator are lighter than standard and will flex too much if simply jacked in the centre.

Also - the rear sections have been modifed several times over the years and if Roy were building again - he would not use the 'lighter' tubing in this area as he considers it an area of high stress.

Chris - IF the cracking brace I referred to above had failed completely, I guess (and it is a guess!), that it would have led initially to a 'rear-wheel-steer' condition. Something both Roy I have experienced before at varying speeds when other parts have started to 'give a little' or we have 'gone a bit too far' with susppension settings. I see the brace being generally in compression during the high load cornering we put it through when on slicks, so even a complete break would still have transferred load from side to side, although I suspect the rear suspension geometry would have been affected to some degree. On the straight during acceleration, this would I presume be in tension and hence possibly have more of an effect?? - If there are any engineers out there (on the forum) who care to comment re setup we have - please feel free to do so.

Brett - all my experience relates to Roys GTD and I do not have either the necessary experience or knowledge to comment in relation to other manufacturer's chassis or components, so I won't.....
 

Trevor Booth

Lifetime Supporter
Supporter
Paul,
A fundamental issue with the rear crossmember is that the members are on different planes, with lots of "nooks and crannys" This creates a staggered load path and lots of stress concentrations at each change of direction. The top suspension arm is overhung a long way from the vertical member creating a torsional load in the member. The bottom member may not necessarily be in compression when cornering. You have two loads one being the vertical load thru CL of wheel (static mass + mass transfer) the other being a horizontal load at ground line (static mass + mass transfer x coeff of friction). It is a matter of calculation to determine whether tension or compression load and depends to a large degree on the wheel CL offset to pivot points on the upright. The vertical load will induce tension, the horizontal load will induce compression. Have a look at photos of the original cars and you will note that the rear crossmember (sometimes known as the horse collar) is a single plane. You will also note that there were two tubular struts from the top inner arm pivots up to the top gearbox mounts. These take care of the torsional load issue.
Cheers
 
Hi Trevor - and thanks - I knew there must be someone out there with an understanding of what is actually going on.

I guess that by taking measurements, the various stress points and loadings could be both identified and calculated - but presumably only for a static, i.e. stationary, condition. A model that allowed for all conditions including 3-axis acceleration + cornerweights etc etc would be a mathematical nightmare. /ubbthreads/images/graemlins/confused.gif
 

Trevor Booth

Lifetime Supporter
Supporter
Hi Paul,
Not really much of a mathematical nightmare , accurate data is the nightmare. Dynamic situation is no more difficult than static to calculate. Tyre slip angles are a bit tricky as they vary. These days I no longer hand calc this sort of thing, modern day 3D modelling software and FEA programs simplify the design process and with a greater degree of accuracy than could ever be calculated.
It is probable that should you decide to reconstruct the "horse collar" on your car some handling benefit would be gained. Your wheels will only do what they are supposed to do if the "bits" to which they are attached dont flex etc.
Cheers
 
Listen to yourself as well...

(which is kind of what you were also saying)...

Two things I learned working on SCCA formula cars -

1) Use safety wire

2) Don't get narrow minded when trying to setup the car in track testing - making changes like springs and shock settings assumes the chassis is fine. Sometimes it's not.

We chased an oversteer problem on a car all day at Pocono once and it wasn't until the end of the day when we went over the cars (as a daily routine) that we found the back of this car was coming off! Several bolts were missing and the few that were left were backed out. He had only a few laps left before the car would have come apart! We drilled and wired, cleaned and Loctited ALL fasteners having anything to do those components.

Lesson - the car was telling us something by the way it was behaving (or not behaving). We thought we were just behind on the setup, but were ignoring the fundamentals.
 
Re: Listen to yourself as well...

Hi Chris -

"Don't get narrow minded and don't assume all is ok" - you're absolutely right there!

Roy and I a few years back - could not get a good time at Brighton (check 2000 results here) we spoke to each other - discussed the problem - looked at the data logging - just would'nt go quick????

Of course - we had assumed the engine was running just fine, until a few weeks later at Longleat hill climb - when we dropped another cylinder - another?? - yes, we had run at Brighton on 7 cylinders and assumed the problem was with us not launching correctly - despite the fact that we both were within 4/100ths of each other on the quarter!.

Since then (and after a road testing session), we now know that when we plant the right foot fully, within a very short space of time we should be 'hanging on for dear life' or at least be worried - if we are not, then the motor ain't running right!

I know - no excuse for not realising earlier, but with the amount of power available from the motors we all use - it can be easy to not notice a small drop in performance straight away. (i'm sure we're not alone on this point?)

As you rightly point out - NEVER ASSUME ALL IS OK - it might not be just a performance issue - it might be a SAFETY ISSUE that could affect not just your day, but that of others too.
 

Malcolm

Supporter
Re: Listen to yourself as well...

This is why clean racing cars should be cleaned all over after each event. Allows a good look see of parts you would not normally see just getting in and out of the car.

Not that I am one to preach on cleaning cars but oily rags....
 

Ross Nicol

GT40s Supporter
Re: Listen to yourself as well...

Good advice Malc.After a race meeting I return my car to the factory/garage, put it up on stands , remove the rear clip and wheels.Safety inspections are carried out and there's always something to do including cleaning.During these inspections I have found- cracked rear rotors,broken bell housing to transaxle bolts, worn spherical bearings in suspension etc the list goes on.The best listen to your car experience I had was a tappet coming loose.Driving down the straight with this tappet getting louder in my ear, lucky I stopped before it caused a major problem.Inspection proved the lock nut sitting in oil under the rocker cover and tappet screwed right out. Close call.
Really good thread Paul.
Ross
 

Dave Bilyk

Dave Bilyk
Supporter
Re: Listen to yourself as well...

Today I started the engine for the first time this year. Before doing that, I removed the spark plugs and cranked the engine over to circulate oil. Then I prepared to start the engine. When I switched the fuel pumps on, I listened and heard a hissing noise, so I got out to take a look, it was fuel spraying at a T piece. Strange since it has never been touched since I got the car.
The reason for the leak was that one of the hoses was 3/8" bore, the others and T piece 1/4" very naughty. Now replaced with correct size.
Just as well I had been reading this thread, and was reminded to be observant and do things step by step. In future I will look as well as listen before actually starting. If I hadn't heard the leak..?
Other bad news, radiator leak needs repair, but good news cold cranking oil pressure was 50psi, and compression test cold was 130 to 138 psi.

regards
Dave
 
Re: Listen to yourself as well...

I would guess you are not using 1/4" supply lines are you? Most vehicles should use atleast 3/8" to 1/2". Good luck and way to go finding the leak before a fire.
 

Dave Bilyk

Dave Bilyk
Supporter
Re: Listen to yourself as well...

Yes Gary, the pipes from the pumps to the Malpassi regulator are 1/4". I think the regulator might be 1/4" although the pump outlet may be 3/8". I will check these and the other sections to see what has been used. I will change them all in time as they are old enough to need replacing.
regards
Dave
 
Back
Top