
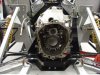
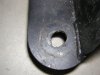
I spoke with Robert last night (my time), and I think I have the gearbox mount configured correctly, but would like a second opinion. I suppose I should add that it is the Audi 016 3U box using all the supplied RF hardware. I think I will have to mill out some of the mounting holes as it looks like my assembly sits just a tad forward. It also appears slightly cocked right to left, but that should be very minor.

You are using an out of date browser. It may not display this or other websites correctly.
You should upgrade or use an alternative browser.
You should upgrade or use an alternative browser.
Gearbox Mount
- Thread starter patbarry
- Start date
Ron Earp
Admin
That looks right for a stock piece Pat. But, I think you can actually do better by leaving out the lower mount, ditching the rubber block, and simply bolting down both top ears to the chassis with some small bushings. What this does is tilts the engine back toward level (in your configuration you'll find the engine tilted forward) and lowers the tranny backside about 1.5", and simplifies things. I'm pretty sure Hershals is like that and it works fine and looks better than the stock setup. He might have some pictures.
Ron
Ron
Pat / Ron,
I'm glad you brought this up. I know Ron was planning on mounting the trans the way he described to you before he sold it to me. I have just begun to look at this and while I still do not have a engine block to bolt up to my 016, it looks to me that the cross brace will have to be modified to clear the trans, which is no big deal. Also, the ears were cut off of my cross brace and I was wondering what was planned to stabilize the engine and trans. (one of the big reasons I wanted to go to the Run & Gun) Maybe Herschal can chime in here.
I'm glad you brought this up. I know Ron was planning on mounting the trans the way he described to you before he sold it to me. I have just begun to look at this and while I still do not have a engine block to bolt up to my 016, it looks to me that the cross brace will have to be modified to clear the trans, which is no big deal. Also, the ears were cut off of my cross brace and I was wondering what was planned to stabilize the engine and trans. (one of the big reasons I wanted to go to the Run & Gun) Maybe Herschal can chime in here.
Ron Earp
Admin
Dan,
That cross brace was modified to fit a set of headers from George (long story, don't ask) because my RF kit did not come with crossover headers, it was not an option back in the day. However, even though the cross brace was modified they still didn't fit George's headers, so, in the end I was going to end up making a new cross brace. I think you will too, unless your headers will make it but I don't *think* they will because I thought I remember fitting those up.
IMHO those headers you have are one of the best sets I've ever seen for a RF - they are vrey tight to the block/valve covers and run low so as to not interfere with the back deck at all (Hershal had that problem with his headers due to one or two pipes being high). Still, that brace didn't work but I think you can make a brace that goes OVER the headers - sounds crazy, but those headers are very low and tight.
Ron
I was considering making this exact change but if you remove the lower mount and rubber block, you will need to check clearance with the cross member that sits just under the gearbox at its fwd end (near the adaptor plate that mates to the motor). I think from memory this will need modification as well to allow the box to lower.
A bit late for me now as the car is finished.
Cheers,
RV
A bit late for me now as the car is finished.
Cheers,
RV
Guys,
Here is what I did....
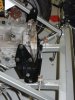
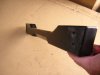
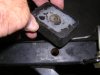
Eliminate the two trans axle bracket mounts. I then used the two brackets that bolt to each side of the transaxle. I spaced those brackets up off the frame using polyurethane blocks one inch thick two inch diameter with a hole drilled in the middle. The hole in the frame is already there but the bracket holes will need a slight amount of oblonging to get the bolt to drop through. I purchased longer bolts that would pass through the bracket, the urethane, and the frame. Use a washer at each end and a nyloc nut. The engine mounts should be removed one at a time then drill a hole into the middle of the rubber sandwich by using the hole that is there already on one side. Drill through the rubber and out the steel on the other side. Install a 1/4" X 2 1/4" bolt with nut and washer. This prevents the engine from torqueing severly. It's really just a an old street rodders trick for solid mounts. This system prevents unnecessary engine and trans movement. If you run a distributor it allows for more room between the cap and the crossbar under the bulkhead glass. Depending on the type of headers, you may have to alter the crossbar that connects the cradle above the transaxle. Thats easy too if you have access to a portable band saw and a mig welder.
This does not lower the front part of the engine and it does not lower the engine and trans deeper into the frame. It basically changes the angle that they sit. By doing this they will sit more level. Mine has been this way now for 3yrs with no problems.
Hersh /ubbthreads/images/graemlins/smile.gif
Here is what I did....
Eliminate the two trans axle bracket mounts. I then used the two brackets that bolt to each side of the transaxle. I spaced those brackets up off the frame using polyurethane blocks one inch thick two inch diameter with a hole drilled in the middle. The hole in the frame is already there but the bracket holes will need a slight amount of oblonging to get the bolt to drop through. I purchased longer bolts that would pass through the bracket, the urethane, and the frame. Use a washer at each end and a nyloc nut. The engine mounts should be removed one at a time then drill a hole into the middle of the rubber sandwich by using the hole that is there already on one side. Drill through the rubber and out the steel on the other side. Install a 1/4" X 2 1/4" bolt with nut and washer. This prevents the engine from torqueing severly. It's really just a an old street rodders trick for solid mounts. This system prevents unnecessary engine and trans movement. If you run a distributor it allows for more room between the cap and the crossbar under the bulkhead glass. Depending on the type of headers, you may have to alter the crossbar that connects the cradle above the transaxle. Thats easy too if you have access to a portable band saw and a mig welder.
This does not lower the front part of the engine and it does not lower the engine and trans deeper into the frame. It basically changes the angle that they sit. By doing this they will sit more level. Mine has been this way now for 3yrs with no problems.
Hersh /ubbthreads/images/graemlins/smile.gif
Rick,
It's easier to do with the engine in. All you have to do is support the trans with a jack from underneath then take off all those bottom cross braces and that rubber mount. Then take the poly blocks with the holes in them and set them under those ears of those brackets that are bolted to the side of the trans. Shove a bolt in and tighten.
I also forgot to mention that this method also eliminates the need for that turnbuckle that attaches to the cross bar and the trans.
Hersh /ubbthreads/images/graemlins/smile.gif
Hi Hersh
How much has your drive shaft angle change at full bump with lowering of the trans ?
When I spoke to a HSV tech, he told me that the Holden CV's could go up to 18 degs at 2000 rpm.
I'm not game to lower my trans any more (still 2.5 degs up)with a CV angle of 16 degs at full bump.
Not sure how true the 18 deg is though, have not seen it in print.
regards
Clayton
Clayton,
This is something that I was concerned about before I did the modification. The drive shafts are in the middle between the trans and engine mounts. As I lowered the tail of the trans I noticed that the drive shafts hardly even moved. The total movement of the drive shafts was about a 1/2". It's been like this now for over three years and I haven't noticed any abnormal behavior or tire wear.
Hersh /ubbthreads/images/graemlins/smile.gif
Thanks Hersh
As I have never had a set of the factory gearbox mounts, I cant say how much I've lowered it from std.
At the moment there is 5/16" clearance between the bottom cross member and the gearbox case. I also added 1/2" spacers between the engine mounts and block to raise the front to get it closer to level.
After all this it still runs downhill by 2.5 degs.
Atleast the CV's should last /ubbthreads/images/graemlins/laugh.gif
Clayton
going back to Hersh's comment about the engine mount, it sounds like you are describing a stop - you allow a certain amount of twist, but only so much. Kind of like a door stop to keep the doorknob from punching a hole in the wall?
Regarding the gearbox, as my assembly sits about 3/4" to 1" forward of where the frame holes are located, I have quite a bit of oblonging to do. May be best to weld on an ear to the mount plate and drill a nice hole. Any idea on where to source the urethane blocks?
Regarding the gearbox, as my assembly sits about 3/4" to 1" forward of where the frame holes are located, I have quite a bit of oblonging to do. May be best to weld on an ear to the mount plate and drill a nice hole. Any idea on where to source the urethane blocks?
Similar threads
- Replies
- 3
- Views
- 967
- Replies
- 9
- Views
- 11K
- Replies
- 5
- Views
- 5K