Jeff's RCR40

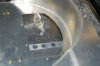
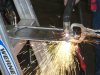
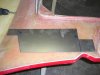
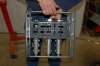
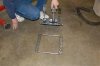
Well here is my new build thread. The wife is 5"2" and the pedals wouldn't work for her where I wanted them. I have a friend with a vertical mill and he can use it. After much debate he copied a shelf I had in the garage. The rod in the rear will be cut out after it is mounted.


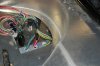
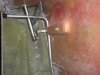
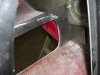
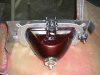
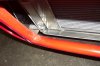
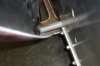
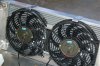
I got the fans mounted. I ground down a 1/4" bolt head and slid it into the mounting tab on the top of the fan. I bent aluminum flat stock to fit over the radiator and then drilled one hole in it to hold it on. The bottom is fastened with the mounts that came with the fan and 3/16" rivits.
 

Attachments

  • DSC_0021.jpg
    DSC_0021.jpg
    34.3 KB · Views: 1,465
  • DSC_0002.jpg
    DSC_0002.jpg
    62.7 KB · Views: 1,451
  • DSC_0018.jpg
    DSC_0018.jpg
    41.8 KB · Views: 1,453
Last edited:
After setting the motor in I needed 3 1/16" spacers from the rear cross member to the adapter plate. This also required longer bolts (5/8" bolt 10" long) that Ace had in stock.
 

Ron Earp

Admin
What sort of transmission are you planning for your build? Just interested as I tried a 016 but the spacer sizes you mention are not close to what I ended up with on that application. Are you using a 930 or G50? Good to see another builder on the forum!!!
 
I decided to run the harness in the tunnel. I wanted to protect the wires as much as possible. I used 3/4" plastic pipe and 3 tees. The rear lighting harness and the motor harness would not fit in 1 tee. I ran the lighting harness in the rear tee and the motor harness in the middle tee. The rear light harness is longer than the motor harness so after you get the lighting harness pulled part way I inserted the motor harness and pulled them together. It gets tight in the 3/4" tube. I used the front tee for the front harness. After I got it all in I drilled the tunnel (while holding the pipe up to the top) and ran a bolt under the pipe.
 

Attachments

  • DSC_0028.jpg
    DSC_0028.jpg
    39.9 KB · Views: 1,414
  • DSC_0026.jpg
    DSC_0026.jpg
    28.7 KB · Views: 1,378
  • DSC_0025.jpg
    DSC_0025.jpg
    35.1 KB · Views: 1,368

Sandy

Gulf GT40
Lifetime Supporter
Jeff -

That an interesting way to get the wires into the tunnel. I have done the dash with all the electrics are mounted in it/to it so a couple of large connectors through the front bulkhead into the opening to the tunnel. This is a very interesting approach!

Sandy
 

Chris Kouba

Supporter
Holy crap Jeff! I just checked your photo page.

Your motor's installed? You're working on your wiring? I noticed lots of little things that are done already. Don't forget to enjoy your build... Fran said you picked it up only last Friday (that's about 5 days ago)?

I thought I was OCD, you're the new champ!

Keep posting the pics, they look great, and get back to work.
 
On the Cobra builds we use a gas cap that has a flapper door in it. This lets you put fuel in without removing the cap. I wanted to use these on the GT40. I used the top part of a fox body Mustang filler neck and 2 inch exhaust pipe with a 60º bend. I still need to weld it up. Well I can't get the pictures to work but they are cimg0114 0115 and 0125.
Yahoo! Photos - GT40
Jeff Hamilton
 
Door handles and latches are installed. I built several different ways that didn't work. I then applied the KISS method (Keep It Simple Stupid). I cut the door where the pivot bolt needed to be with a die grinder. I used about 18" of 3/8" fuel line. Measure from the bottom of the door to the handle and mark it. Slid the handle on the tube where it is going to ride then put my cordless drill on it and spin it until it spins freely. Bend a 90 in the tube about 1" over the handle. The tube is strong enough to hold it in position but if you really yank on the handle it will bend a little to fit the opening. I used 2 mounting clamps (one at the bottom that you can't see in the pic) and a tail pipe hanger. I don't think you need the tail pipe hanger but I was going to use it for the pivot for the inside handle. The wife came up with the idea of using a push button for the inside release. I used 1/2" SS tube now I need to find a button for the top.
 

Attachments

  • CIMG0821.jpg
    CIMG0821.jpg
    30.1 KB · Views: 1,192
Headlight install.
I found some 1993 Ford Escort headlights in the basement and stole the adjusters off of them. These are simple little adjusters but work well. I used 16 gauge (6"x18") and with some cutting and bending made it fit the car. Then I mounted half of the adjusters to it. I used the kit supplied aluminum to mount the other half of the adjusters to. Pictures are worth a thousand words.
Well i will try again
Jeff Hamilton
 

Attachments

  • Cutting.jpg
    Cutting.jpg
    355.5 KB · Views: 1,086
Last edited:
This is just a heads up for you guys installing your fuel sending units. My senders are mounted up-side-down. The sending unit with the RCR gauges (Classic) should be 250 ohms empty and about 27 ohms full. I just flipped them and they read correctly now.
Jeff Hamilton
 
I stole Chris K's idea. I changed it a little and I'm not done yet. I like the his idea of the tilt front end. I drilled a 7/16" hole in front of the radiator and went all the way through the front end. I had the front adjusted exactly where I wanted it. I then cut some pvc pipe to make spacers. Works like a charm except I need to make it adjustable. I will replace the spacers after I find out how long they need to be.
 

Attachments

  • CIMG1344.jpg
    CIMG1344.jpg
    47.5 KB · Views: 834
  • CIMG1345.jpg
    CIMG1345.jpg
    42.6 KB · Views: 797
  • CIMG1346.jpg
    CIMG1346.jpg
    21.8 KB · Views: 819
  • CIMG1347.jpg
    CIMG1347.jpg
    41.4 KB · Views: 871

Dutton

Lifetime Supporter
Slick idea for the hinge, Jeff. Two questions for you:

1) Any reason to be overly concerned about the weight on the bolts/pivots?
2) What did you mean by "...except I need to make it adjustable?"

Thanks in advance,

T.
 
I'm going to make a plate for the inner fender but it feels great just like it is. The inner fender is not flat at the mounting point. This makes the right front a little low and it shows at the spider. I want to mount a cage nut in the plate that will be mounted to the inner fender. That is the plan anyway.
Jeff Hamilton
 

Randy V

Moderator-Admin
Staff member
Admin
Lifetime Supporter
Nice work Jeff! I have this modification in my plans as well...

I am curious if the rearward portion of the front clip rubs against the doors or get's too close as you are lifting/closing the front end?

I recall a tilt front end that a friend had on his car years ago that you had to spread the bottoms of the fenders as you lifted/closed the front end so it would not tear up the paint on the doors. This car (57 Chevy) had fenders that went all the way down to the rocker panels though..
 
Back
Top