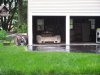
Biessman XLR-917

Hi Guys and Gals,

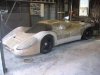
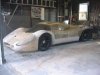
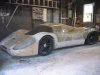
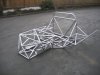
I desided I couldn't afford to build anyone's kit car for track days so I picked the car that was my favorite, the 917K or LH (can't make up my mind which), and build one from the ground up.

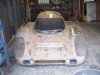
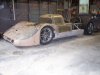
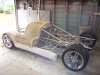
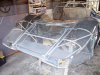
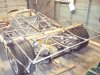
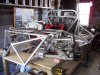
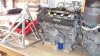
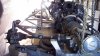
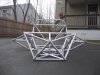
The chassis is all aluminum tubing, (had to have aluminum), and the drivetrain and suspension are from a 2004 Cadillac XLR that I purchased on ebay with only 2400 miles on it. The "Ford" name on the engine is a joke as I was going to use it as a "Cosworth" for a 6 wheeled Tyrrell that I designed but it would have cost too much.

I am having a race shop do the welding and I designed the engine and transaxle connection pieces that I'm having a mechine shop make and modify.

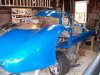
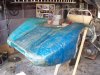
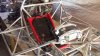
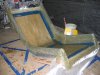
The seat was my first try at fiberglass work and the experience is valuable as I am making the body myself.

I'll send more pics as work proceeds.

Enjoy,

Jack
 
For some "Security" reason the photos didn't go through. I'll try again.

Sorry,

Jack

Here's one. I think they're too big.
 

Attachments

  • 100_0006.jpg
    100_0006.jpg
    63.6 KB · Views: 1,253
Looking good! Let's have more as things progress. Almost changed my RCR SL-C order last year to the RCR 917 but practicality won out. Very pleased with the SL-C, still building.
 
Here are three more photos.
 

Attachments

  • 100_0103.jpg
    100_0103.jpg
    41.7 KB · Views: 726
  • 100_0108.jpg
    100_0108.jpg
    50 KB · Views: 721
  • 100_0111.jpg
    100_0111.jpg
    45.7 KB · Views: 789
and a few more!
 

Attachments

  • 100_0107.jpg
    100_0107.jpg
    47 KB · Views: 699
  • JanFeb 2009 069.jpg
    JanFeb 2009 069.jpg
    34.5 KB · Views: 658
  • JanFeb 2009 064.jpg
    JanFeb 2009 064.jpg
    40 KB · Views: 658
  • JanFeb 2009 065.jpg
    JanFeb 2009 065.jpg
    46.8 KB · Views: 563
  • JanFeb 2009 072.jpg
    JanFeb 2009 072.jpg
    54.4 KB · Views: 580
I stepped back, took a look and said, "Looks good to me!" I just made it look like race car geomotry and the race shop that's doing my welding will do an alignment and road race setup and I'll do skid pad and testing. There's a lot of adjustment and I can always change anything on the car.

Jack
 
From one Jac to another, great to see you thinking 'outside' the square, its stuff like this that helps keep this site alive and gives others the courage to have a go themselves- Raphaels comment about 'no money' doesnt recognise the different currency known as 'sweat equity':). Keep on doing it 'your' way- nice work.

[ Bet your one of those people that hates it when someone says ''' you cant do that, it wont work ''' :):)]
 
Hi Guys,

It's been a long time but I had password problems and I've been busy.

I've always dreamed of lying between the front tires of a Long Tail Porsche 917 hurtling down the Mulsanne Straight at 236 mph. (Kind of an escape from life). I sat in the car, on the ground for the first time, this morning and started to experience that feeling.

As you can see from the photos, the chassis is done and the body is pretty far along except for the tail. Notice the "Ground Effect" tunnels on both sides. They are for directing under car air to radiators attached to the triangular tubes in front of the rear tires and I will have NACA ducts on top of the tail. The roof had to be 3" taller to accomodate my 6' frame and extra large head with helmet. The nose is designed after the LH with a K air exhaust, the waste and cockpit are from the K car and I will make a shorter long tail to better accomodate it's end use.

At this point 9 months of unemployment is catching up with me and I don't want to borrow any more money for the steering, coilovers, fuel cell, radiators, exhaust system, etc. I will be focusing on finishing the body, interior, door hardware, lights and electrics in the front of the car.

I've desided to build the car for the street and try to register it with "Antique" plates. I probably won't get enough seat time trailering to track days or hillclimbs.

I'll send more pics when it goes to primer.

Jack
 

Attachments

  • Body framework 280.jpg
    Body framework 280.jpg
    55.3 KB · Views: 643
  • Body framework 267.jpg
    Body framework 267.jpg
    45 KB · Views: 830
  • Body framework 270.jpg
    Body framework 270.jpg
    39.9 KB · Views: 826
  • Body framework 262.jpg
    Body framework 262.jpg
    50.5 KB · Views: 768
  • Body framework 284.jpg
    Body framework 284.jpg
    47.6 KB · Views: 823
Interesting. Please keep us up to date, with pic's of course.
Great job to tackle a project of this magnitude.
 
Outstanding job. I really like the effort of "Do it yourself". Your doing a great job and really hope to see the progress so keep us posted. Mine has fell to the back burner as I bought a new house and had to move my machine shop so things have been to hecktic. But now with a 5 car garage and the room to work I think the pace will pick up.
 
Here are the latest photos of the car.

Jack
 

Attachments

  • Jack's car 008.jpg
    Jack's car 008.jpg
    42.4 KB · Views: 600
  • Jack's car 011.jpg
    Jack's car 011.jpg
    40 KB · Views: 568
  • Jack's car 002.jpg
    Jack's car 002.jpg
    41.8 KB · Views: 806
Hi Jack...I'm impressed as is every body who has viewed your build, I interested in your method of construction for your body. Correct me if I'm wrong, but it would appear to me that you are hand laying over a stucture that is the shape you want and then finishing the final shape and smoothing it out with body filler. You don't appear to be taking the body from a Mould as such. If this is right, what are you forming the shape of the body with and does it become part of the body or is it removed once the glass is cured. The reason I am making this assumsion is the surface on the body looks like raw layered glass and not the finished gelcoat you would expect if they had been pulled from a mould. The other reason I ask is I have to make a body for my scratch built project in the future and I'm always looking for good/economic ways of construction.
Cheers Leonmac.
 
Hi Guys,

I was thinking of painting the car a dark gray with a lighter gray "Gulf" stripe down the middle and around the sides. It will probably wind up Porsche "Grand Prix White".

All you have to do for the widshield is bend a piece of Lexan over the frame, scribe it and cut it. Haven't figured out how I'll attach it yet.

The attached photos show how I formed and layed up the body. It was quick to a shape but massivly time consuming to finish.

Notice the "Naca" ducts to cool the radiators on both sides and the Fin I formed today.

See ya,

Jack
 

Attachments

  • Body framework 021.jpg
    Body framework 021.jpg
    70.3 KB · Views: 639
  • Body framework 030.jpg
    Body framework 030.jpg
    52.9 KB · Views: 661
  • Body framework 098.jpg
    Body framework 098.jpg
    59.3 KB · Views: 620
  • Body framework tail 019.jpg
    Body framework tail 019.jpg
    60.9 KB · Views: 666
Back
Top