buck building fun

Hello Everyone, I havent posted anything in some time as my job keeps me very busy so work on my project has been painfully slow. I have made some progress though and wanted to share some pictures and get peoples input on the best way to proceed.

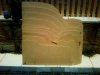
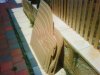
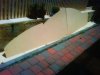
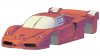
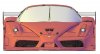
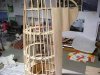
I designed a sports racer on Rhino3D and had got to the point where it was time to start building the body. So I made full size drawings for templates on a big printer from my cad files. I jig sawed out the templates from 1/8th inch hardboard and arranged the on a 1/2 inch mdf backbone, like an egg crate. Inbetween i filled the gaps with styrofoam which made for a very solid base. Now I'm in the process of finishing the plug to make fiberglass molds from. Therein lies the problem. My original plan was to coat the foam with 2 part epoxy resin then cover the epoxy with bondo to make a hard surface i could sand to a fine finish. Problem is the bondo does not readily stick to the resin surface. I need to build the surface up about another inch across the whole body but I'm not sure which way to go now.

Was thinking about using plaster. Any ideas???? Thanks for reading.

Having trouble uploading all my pictures but heres a few of them.
 

Attachments

  • l_35f7595540ea2839d44b88085cf3a643.jpg
    l_35f7595540ea2839d44b88085cf3a643.jpg
    24.5 KB · Views: 672
  • IMG_0976.jpg
    IMG_0976.jpg
    131.9 KB · Views: 803
  • IMG_1835.jpg
    IMG_1835.jpg
    131.6 KB · Views: 899
Last edited:
Here's a rendering of the car I designed. Nothing radically new, just a tribute to race cars gone past
 

Attachments

  • 551.jpg
    551.jpg
    293.1 KB · Views: 1,179
Hi Bill

Quick reply:

If you have to add another inch you have lost the benefit of the wood former shapes.

To add that much you will have to glue more foam over the whole pattern, then to get a hard skin cover with a good layer of fiberglass and then go with filler over that.

But you can't put resin onto styrofoam. If you use polyurethane foam, which is fine with resin, for the extra layer you can get a much better surface on the foam if you sand to shape, rather than hacking bits off.

I have done the same thing, see this thread

http://www.gt40s.com/forum/lola-t70-lounge/19604-canamsa-sa-stratch-build.html

I did use househould plaster filler over the foam, under the glass skin in some areas and you could maybe use this to add the bulk and also seal the surface, but you will need a lot and will need to reshap by hand, with templates etc

Comment on the rendering, are you happy you will have enough space between the back of the headlight bucket and the front wheel with lock on?

Cheers

Fred W B
 
Last edited:
You can use epoxy resin on styrofoam, Like Fred mentioned above try to get it as close to your desired finish shape in styro before you lay a f/glass cloth layer with epoxy over the whole thing, make sure that you fill all voids/joins with epoxy before you start to apply your bondo finish layer as the polyester resin/catalyst will eat the styrofoam, scratch the epoxy/cloth surface to give the bondo something to key into, or if you want to get hi-tech use a perforated plastic sheet over your epoxy to leave a rough surface once cured...epoxy doesnt adhere to the plastic.
 
Hi Fred

Thanks for the response. I'm actually planning on building the surface back up to the edge of the wood formers and not past so I should still be able to keep things symmentrical without using any additional templates.

As far as the resin goes its a 2 part epoxy resin that doesnt attack the styrofoam. I've actually already applied it to the right side of the buck. No problems whatsoever. The problem is getting the bondo to stick to the resin. The resin makes such a smooth surface when completely dried. Even in the rough areas the bondo pulls away from the hard coat epoxy resin that its not a good enough of a connection to base the rest of the finished surface on.

Maybe as you suggested adding a layer of glass over the resin then bondo over the glass may be the way to go. One thing about bondo I'm not to keen on though are the fumes. I'm wearing a respirator but the other people in my house can smell it. I'd love to be able to use a material that had less stink to it.

I have examined your thread in pretty good detail and I must say its been a real inspiration!

What type of plaster did you use on the foam? ie The specific product?
I dont really know anything about plaster.


About the rendering..... I've done some pretty exhaustive studies on the clearance behind the headlight bucket. The closest the tire comes to it is a little over an inch. Which isnt much but, there's also an aluminum bulkhead that makes up the front half of the wheel well and separates the tire from the headlight. Also supports the body in that area too btw.

Thanks for the input!

Bill
 
You can use epoxy resin on styrofoam, Like Fred mentioned above try to get it as close to your desired finish shape in styro before you lay a f/glass cloth layer with epoxy over the whole thing, make sure that you fill all voids/joins with epoxy before you start to apply your bondo finish layer as the polyester resin/catalyst will eat the styrofoam, scratch the epoxy/cloth surface to give the bondo something to key into, or if you want to get hi-tech use a perforated plastic sheet over your epoxy to leave a rough surface once cured...epoxy doesnt adhere to the plastic.

"a perforated plastic sheet over your epoxy" Hmmmmm didnt know that was a possiblity. Do you have a specific product in mind?

Thanks!

Bill
 
If you could do it, get the foam above the hieght of the stringers now somehow. And then use a grinder, a cheesegrater and then rough sandpaper on a block or longboard to form the body shape. Like said before, shape the body to a better finished shape using the foam. In this manner you will use WAY less plastic filler and get it done way faster. I think it's worh the work to shift around the foam and splice some pieces in if needed to make it happen. In the long run you will finish much faster by taking a few steps back now.
 
Hi Bill

If you or your family have a problem with the bondo fumes just wait untill you get into the fiberglass work......

The plaster I used was ordinary filler sold in any hardware store for filling holes in domestic walls etc before repainting, that you mix with water. The SA brand name I used is "Polyfiller".

I'm not sure why your bondo is not sticking to your surface. You are keying the surface with 36 grit paper before you apply the filler? Have you tried asking the supplier/manufacturer of the product you are using? Are you using a quality bondo? I used U-Pol brand "lightweight" filler. Don't dick around with a local hardware/car parts store as a supplier, find a place that supplies the automobile collision repair trade. They will be cheaper as well.

As the others have endorsed, try to get the surface shape/contour as good as you can before you go to resin/bondo. Much harder to work, and the materials are much more expensive. I learnt the hard way.

If you are bringing the foam up to the same plane as the top of the wood, and the top of the wood is at the same plane as your surface I think you will need a good layer of fibreglass over the whole thing to stop the ribs "printing through" the later surface. I learnt the hard way.

Thanks Jac for the reminder that epoxy resin will work on styro, I was thinking of poly resin.

Cheers

Fred W B
 
Bill, you really should get the foam up to and maybe a little past your stringers like Mesa said. Saves LOTS of work later. I have used drywall mud for a surfacer and
any bondo will stick to it okay. Duratech makes a spray-on filler that can be built up really fast too but again, some $$$ involved there. Get the best finish that you can on your plug before taking any molds.
 
Just an idea....

You have fairly long lines there in your design w/o a lot of hard turns and edges (looks good). You might want to try utilizing some inset stringers - this is a standard technique in wooden boat construction and other fabrication process from scatch where the 3D measurements are important either for a buck or for the finished shape.

If you use a lot of inset stringers you could actually apply a surface from the underside (fiberglass, for example) and use this as the support for the external skin.
 

Attachments

  • stringers.jpg
    stringers.jpg
    7.8 KB · Views: 710
"a perforated plastic sheet over your epoxy" Hmmmmm didnt know that was a possiblity. Do you have a specific product in mind?

Thanks!

Bill

'Perforated release sheet', you can buy it from composite material suppliers, but for your purposes I suggest that you make your own from some 2/ or 3/ mil hardware store polyethylene which you perforate with a home made nail board, BTW Im not the clever clog that dreamed all this stuff up...
Buy the following book ...ISBN 0-9642828-1-X.... "Understanding Aircraft Composite Construction, by Zeke Smith''... published by Aeronaut Press" its only around US$30.00 & will save you many times that during your body building exercise..:).... yes it even tells you how to make the nail board..

Normally the perforated sheet is used in vac bagging, but in your case you would use it by simply lay it on top of your cloth epoxy layer, then it will leave a rough surface for the bondo etc once removed after epoxy cures.
 
Just a side note, if anyone else would like to try building a body without the heartache of having the shape CAD cnc cut, I have a Ferrari Enzo / FXX ready to go :)

The skeleton is set up that the profiles are 200mm apart, and the central ribs tie them all together (both left and right sides, of course). I planned to use 200mm strips of polyurethane foam between ribs for ease of shaping, and polyester resin compatability.

I was originally going to have the complete buck cut on a 5 axis CNC, but the cost was prohibitive, even doing it as individual car panels such as doors / reac clip / nose cone / etc.

I even have the windscreen!

Too many projects, not enough time...
 

Attachments

  • body1.jpg
    body1.jpg
    158.9 KB · Views: 717
  • body2.jpg
    body2.jpg
    178.4 KB · Views: 566
  • body3.jpg
    body3.jpg
    160 KB · Views: 586
  • fxx1.jpg
    fxx1.jpg
    78.8 KB · Views: 601
  • fxx2.jpg
    fxx2.jpg
    59.3 KB · Views: 625
  • fxx3.jpg
    fxx3.jpg
    110.3 KB · Views: 496
Thankyou Everyone

I think I’m going to, as everyone has suggested, rebuild the surface higher to save on work and expense. I was trying to use the wooden formers as my guide to know how high the final surface was. It seems to me when you cover the templates you loose good control over the shape. ie how thick is the bondo in this area vs that area. My plan was to build up the surface to the top or just past the top of the wooden former then go back and fill in those gaps created by the formers.

To get the bondo to stick I think I need to rough up the surface more, as Fred had suggested, or use the perforated plastic sheets like Jac Mac said. Molleur Yes I will definitely be trying to perfect the shape in the plug phase, and I’m looking more into the Duratech.

Thanks for compliment Cliff of Sandpoint ID. I actually have had lots of family up and around that area. Originally I’m from Spokane. My dad lived around there for many years, and Ive been there many many times. Yes I will definitely be reinforcing the final body with some formers.

Didn’t see this coming but the fumes are a real factor here. Amazingly the 2 part epoxy resin has no smell at all. Maybe I’ll try and use that in my fiberglass construction instead of polyester resin. I know its more expensive but my roommate and the old lady living downstairs will appreciate it.


Terry Oxandale

Skinny Man
I've fabricated about 3/4 of the body on my car (starting with a similar shape, then removing and adding fabricated panels up to the point were a minor portion of the body is still original. I use floral foam or aluminum sheet to create the shape I need, then covered it with about 4mm of fiberglass, sanded to the proper shape, and then sprayed either resin or gelcoat to get a final finishing coat. The photos below are one of the doors I built. The better you get the foam to a final shape, the better the chance of simply spraying resin or gelcoat only as a finishing layer. In the case of the door, I sanded the foam down by the amount of a thickness of a good layer of fiberglass, laid it up, and then finished it as the body panel itself.

standard.jpg


standard.jpg
 
Last edited:
Just a side note, if anyone else would like to try building a body without the heartache of having the shape CAD cnc cut, I have a Ferrari Enzo / FXX ready to go :)

The skeleton is set up that the profiles are 200mm apart, and the central ribs tie them all together (both left and right sides, of course). I planned to use 200mm strips of polyurethane foam between ribs for ease of shaping, and polyester resin compatability.

I was originally going to have the complete buck cut on a 5 axis CNC, but the cost was prohibitive, even doing it as individual car panels such as doors / reac clip / nose cone / etc.

I even have the windscreen!


Too many projects, not enough time...

I too looked into getting the work done on a 5 axis cnc machine but yea its not cheap! I then thought of getting stations like yours cut out with a cnc router. Guy down in Florida said he could do the whole job for less than 100 dollars If I supplied the material. Well now i live on Long Island NY. Couldn't find anyone that said theyd do it for less than 100 dollars a sheet! so Id be looking at about 2000 just to get the stations cut. So I printed out full size drawings and cut the stations myself. Cost was 100 bucks to print the full size drawings. Took some time but they came out quite well. Your templates look great!
 
I've fabricated about 3/4 of the body on my car (starting with a similar shape, then removing and adding fabricated panels up to the point were a minor portion of the body is still original. I use floral foam or aluminum sheet to create the shape I need, then covered it with about 4mm of fiberglass, sanded to the proper shape, and then sprayed either resin or gelcoat to get a final finishing coat. The photos below are one of the doors I built. The better you get the foam to a final shape, the better the chance of simply spraying resin or gelcoat only as a finishing layer. In the case of the door, I sanded the foam down by the amount of a thickness of a good layer of fiberglass, laid it up, and then finished it as the body panel itself.

standard.jpg


standard.jpg


Looks great!!! Nice Naca duct. When you fiberglassed the part did you have to create a barrier between the foam and FRP materials?
 

Doug S.

The protoplasm may be 72, but the spirit is 32!
Lifetime Supporter
... My original plan was to coat the foam with 2 part epoxy resin then cover the epoxy with bondo to make a hard surface i could sand to a fine finish. Problem is the bondo does not readily stick to the resin surface. I need to build the surface up about another inch across the whole body but I'm not sure which way to go now.

Was thinking about using plaster. Any ideas????

Not sure what form of epoxy you're using, but if it is a 50/50 mix, check out the microspheres from Glen-L Marine. They are little bubbles that you mix with the regular resin to create a "whipped cream" texture "bondo" replacement. Once you get it down to size/shape, skim coat it with their talc powder, also mixed with the same epoxy used with the microspheres. Because the same epoxy mixture (a 50/50 in my case) is used for all steps, there is no problems with not sticking.

Epoxy boatbuilding resins & supplies

One of the benefits is that the microsphere mixture is lightweight, but stiff enough when cured that it can be shaped. B/c it has no cloth in it, the product can also cheesegrated and power sanded like bondo, so you work it at the same "stages" as bondo.

I found it useful to just buy everything from Glen-L Marine...that way I had no questions if it would perform as represented. If it's not convenient for you to order from Glen-L, try a marine repair facility to see if they have the microspheres. As long as you use the same glue for all of the stages, you're set to go.

Cheers!

Doug
 
Last edited:
Thankyou Everyone Didn’t see this coming but the fumes are a real factor here. Amazingly the 2 part epoxy resin has no smell at all. Maybe I’ll try and use that in my fiberglass construction instead of polyester resin. I know its more expensive but my roommate and the old lady living downstairs will appreciate it. [/FONT][/SIZE][/COLOR]


Dont lead yourself into a false security here, the dust from epoxy resin & the fumes can play havoc with some people, and its not safe to assume because its not affecting you that it wont affect your roommate or the old lady downstairs, only use the stuff in a non-attached & well ventilated area & keep away from food prep areas etc, some homebuilt composite aircraft builders get such a bad reaction from epoxy that they cannot bear to actually sit in the aircraft & fly it once completed...
 
Not sure what form of epoxy you're using, but if it is a 50/50 mix, check out the microspheres from Glen-L Marine. They are little bubbles that you mix with the regular resin to create a "whipped cream" texture "bondo" replacement. Once you get it down to size/shape, skim coat it with their talc powder, also mixed with the same epoxy used with the microspheres. Because the same epoxy mixture (a 50/50 in my case) is used for all steps, there is no problems with not sticking.

Epoxy boatbuilding resins & supplies

One of the benefits is that the microsphere mixture is lightweight, but stiff enough when cured that it can be shaped. B/c it has no cloth in it, the product can also cheesegrated and power sanded like bondo, so you work it at the same "stages" as bondo.

I found it useful to just buy everything from Glen-L Marine...that way I had no questions if it would perform as represented. If it's not convenient for you to order from Glen-L, try a marine repair facility to see if they have the microspheres. As long as you use the same glue for all of the stages, you're set to go.

Cheers!

Doug

Hi Doug,

Thanks for the idea. I've been using CABOSIL to thicken up my resin to keep it from flowing. It seems the microspheres may make resin into more of a putty type substance? It also increases the volume of resin? I read somewhere on the internet of a gentleman who said if he had to build his buck over again he'd use these microspheres.
 

Terry Oxandale

Skinny Man
Looks great!!! Nice Naca duct. When you fiberglassed the part did you have to create a barrier between the foam and FRP materials?

No. That's probably the biggest reason why I use it. It sands extremely well (almost too easily), and is resistant to resins and solvents (at least everything I've tested it with).
 
Back
Top