

I'm learning all kinds of stuff building an SLC!
Like: A regular automotive store (read: cheap) flaring tool does a crap job of flaring stainless steel brake lines.
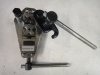
The first tool in the picture below is one I have had for years and does a great job with aluminum. However, it makes lopsided flares in harder materials, like stainless. You can see in the picture the tool is marked 45 degrees, which is the standard automotive flaring angle. Aviation angle is 37 degrees. AN hardware is aviation angle, so most of the fuel system (at least on my car) is aviation angle with only a single flare required. The brake lines, however, are automotive double flare.
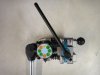
My SLC came with brake lines that were about 2 feet too short to make it to the fitting holes at the front of the footwell. This might be normal, or it might be because my car has an extended footwell (an option for abnormally tall people like me). In any case, it was necessary to make up some new lines using 3/16" stainless steel ($39.97 for 20' Summit Racing SUM-220236) along with the associated couplers ($1.97 Summit Racing EDD-123300) and fittings ($5.97 Summit Racing SUM-220137). Fortunately, a friend loaned me a higher quality double flare tool (Eastman - around $300), which did a great job. Unfortunately, he went out of town and didn't leave any instructions. After several trials and error, I discovered it really is a pretty simple tool (which is a good thing - any more trials and I would have run out of brake line") ).
).
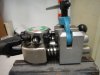
To use this tool, you set it in a vice (you must have a vice; according to my wife, I have several), place the 3/16" square die in the tool, clamp it loosely and insert the brake line. With the rotating dies set to "0", push the brake line into the tool while rotating the tool handle (this takes two hands). This ensures that the brake is flush with the end of the die. Now, using a third hand, tighten the clamp. With everything in place, rotate the die to position #1 for 3/16" and pull the handle to make the first flare. Then rotate the die to position #2 and pull the handle again to make the second flare. Loosen the clamp, remove the line and presto! Guess who forgot to put the fitting on the tube before flaring? I'm embarrassed to admit I did this more than once. Good thing I bought 20' worth of tubing . . .
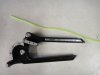
A pipe cleaner is handy for making templates before bending the expensive stuff and the bending is easy using a cheap bending tool ($6.99 Harbor Freight Tubing Bender - Save on this Manual Tubing Bender).
Stainless steel tubing is pretty hard stuff. My tubing cutter wouldn't cut it, so I used an angle grinder with a cutoff wheel. This required dressing the cut end with a file, scotchbrite wheel and appropriately sized drill bit before each flare. There's probably a better way to cut this, but it worked for me and the flares look nice and shiny, with smooth walls and no rough edges.
Like: A regular automotive store (read: cheap) flaring tool does a crap job of flaring stainless steel brake lines.
The first tool in the picture below is one I have had for years and does a great job with aluminum. However, it makes lopsided flares in harder materials, like stainless. You can see in the picture the tool is marked 45 degrees, which is the standard automotive flaring angle. Aviation angle is 37 degrees. AN hardware is aviation angle, so most of the fuel system (at least on my car) is aviation angle with only a single flare required. The brake lines, however, are automotive double flare.
My SLC came with brake lines that were about 2 feet too short to make it to the fitting holes at the front of the footwell. This might be normal, or it might be because my car has an extended footwell (an option for abnormally tall people like me). In any case, it was necessary to make up some new lines using 3/16" stainless steel ($39.97 for 20' Summit Racing SUM-220236) along with the associated couplers ($1.97 Summit Racing EDD-123300) and fittings ($5.97 Summit Racing SUM-220137). Fortunately, a friend loaned me a higher quality double flare tool (Eastman - around $300), which did a great job. Unfortunately, he went out of town and didn't leave any instructions. After several trials and error, I discovered it really is a pretty simple tool (which is a good thing - any more trials and I would have run out of brake line
).To use this tool, you set it in a vice (you must have a vice; according to my wife, I have several), place the 3/16" square die in the tool, clamp it loosely and insert the brake line. With the rotating dies set to "0", push the brake line into the tool while rotating the tool handle (this takes two hands). This ensures that the brake is flush with the end of the die. Now, using a third hand, tighten the clamp. With everything in place, rotate the die to position #1 for 3/16" and pull the handle to make the first flare. Then rotate the die to position #2 and pull the handle again to make the second flare. Loosen the clamp, remove the line and presto! Guess who forgot to put the fitting on the tube before flaring? I'm embarrassed to admit I did this more than once. Good thing I bought 20' worth of tubing . . .
A pipe cleaner is handy for making templates before bending the expensive stuff and the bending is easy using a cheap bending tool ($6.99 Harbor Freight Tubing Bender - Save on this Manual Tubing Bender).
Stainless steel tubing is pretty hard stuff. My tubing cutter wouldn't cut it, so I used an angle grinder with a cutoff wheel. This required dressing the cut end with a file, scotchbrite wheel and appropriately sized drill bit before each flare. There's probably a better way to cut this, but it worked for me and the flares look nice and shiny, with smooth walls and no rough edges.
Attachments
Last edited: