My fuel tank passed its pressure test today (yaaay!).
Before pressure testing, I washed it out. I'm glad I did this, as a couple of tablespoons worth of metal shavings came out. After multiple washings, I let it dry for several days and then looked inside with a flashlight and mirror and still saw bits of metal shavings stuck in the nooks and crannies. I was able to get these out with a shop vac, using a 3/8" fuel hose stuck up the nozzle of the vacuum cleaner and wrapped with duct tape to bridge the gap and seal it. I cut an angle on the end of the hose, so the tip could be used to scour into the cracks a little better. The hose was fed into the fuel filler and fuel sender holes. There are still other parts of the tank I couldn't get to or see, so I'll need to check the fuel filters frequently for the first few hundred miles after the car starts running.
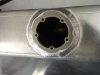
The fuel level sender mounting holes needed to be tapped for 10-32 screws. It would have been smarter to do this before cleaning the tank, but I'm not very smart. However, I did tip the tank onto its back so that any shavings would just fall down right beside the sender opening, making it easy to vacuum out the bits. The sender holes are not symmetric; there is only one way it can be mounted so that the holes all line up.
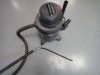
To pressure test, I did the following:
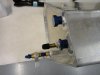
1) Closed the fuel valve at the bottom of the tank
2) Put a plug in one of the upper holes
3) Attached a tire pressure valve to the other upper hole with an AN912-3D adapter
4) Installed the fuel level sender
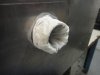
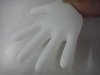
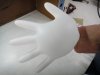
5) Wrapped a rubber (Nitrile) glove around the fuel filler with an elastic band
6) Pumped up the tank/glove with a bicycle pump
7) Laughed at the funny inflated glove for 30 minutes (I am easily amused).
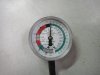
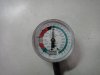
A properly vented fuel tank doesn't operate under much pressure, so very little is needed for testing. In fact, there have been cases of tanks rupturing because too much pressure was accidentally applied. To prevent this, it's important to have something which can expand and/or easily blow off (like the rubber glove). Using a bicycle pump provided added insurance to make sure things didn't get out of hand.")
Here's a parts list of the temporary testing stuff I used:
- 3/8" NPT plug: $2.97 Summit: http://www.summitracing.com/parts/ear-993303erl/overview/
- 3/8" to 1/8" AN912-3D NPT adapter: $4.85 Aircraft Spruce AN912 BUSHING, PIPE THREAD REDUCER from Aircraft Spruce
- Fuel Tank Test kit (threaded valve stem): $6.00 Vans Aircraft Van's Aircraft - Parts and Accessories
- Nitrile glove: $5.50 box of 100 on sale at Harbor Freight: 3 Mil Nitrile Gloves Powder-Free, Large, 100 Pc
- Bicycle pump: Snitched from the neighbor kid's bicyle.
It only took about an hour to set up the tank, pressure test it and then put it back in the car. Much easier to do this now, than when it is on the road!
Before pressure testing, I washed it out. I'm glad I did this, as a couple of tablespoons worth of metal shavings came out. After multiple washings, I let it dry for several days and then looked inside with a flashlight and mirror and still saw bits of metal shavings stuck in the nooks and crannies. I was able to get these out with a shop vac, using a 3/8" fuel hose stuck up the nozzle of the vacuum cleaner and wrapped with duct tape to bridge the gap and seal it. I cut an angle on the end of the hose, so the tip could be used to scour into the cracks a little better. The hose was fed into the fuel filler and fuel sender holes. There are still other parts of the tank I couldn't get to or see, so I'll need to check the fuel filters frequently for the first few hundred miles after the car starts running.
The fuel level sender mounting holes needed to be tapped for 10-32 screws. It would have been smarter to do this before cleaning the tank, but I'm not very smart. However, I did tip the tank onto its back so that any shavings would just fall down right beside the sender opening, making it easy to vacuum out the bits. The sender holes are not symmetric; there is only one way it can be mounted so that the holes all line up.
To pressure test, I did the following:
1) Closed the fuel valve at the bottom of the tank
2) Put a plug in one of the upper holes
3) Attached a tire pressure valve to the other upper hole with an AN912-3D adapter
4) Installed the fuel level sender
5) Wrapped a rubber (Nitrile) glove around the fuel filler with an elastic band
6) Pumped up the tank/glove with a bicycle pump
7) Laughed at the funny inflated glove for 30 minutes (I am easily amused).
A properly vented fuel tank doesn't operate under much pressure, so very little is needed for testing. In fact, there have been cases of tanks rupturing because too much pressure was accidentally applied. To prevent this, it's important to have something which can expand and/or easily blow off (like the rubber glove). Using a bicycle pump provided added insurance to make sure things didn't get out of hand.
Here's a parts list of the temporary testing stuff I used:
- 3/8" NPT plug: $2.97 Summit: http://www.summitracing.com/parts/ear-993303erl/overview/
- 3/8" to 1/8" AN912-3D NPT adapter: $4.85 Aircraft Spruce AN912 BUSHING, PIPE THREAD REDUCER from Aircraft Spruce
- Fuel Tank Test kit (threaded valve stem): $6.00 Vans Aircraft Van's Aircraft - Parts and Accessories
- Nitrile glove: $5.50 box of 100 on sale at Harbor Freight: 3 Mil Nitrile Gloves Powder-Free, Large, 100 Pc
- Bicycle pump: Snitched from the neighbor kid's bicyle.
It only took about an hour to set up the tank, pressure test it and then put it back in the car. Much easier to do this now, than when it is on the road!