

The Vintage Air evaporator supplied with my kit came with four mounting lugs, but only two mounting brackets, both of which were discarded.
The two supplied brackets are slotted, which would allow the evaporator to move out of position, and I couldn't see how it would be possible to mount them in the space available and still be able to remove the evaporator for any future service.
Here is what I did to mount the evaporator:
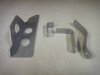
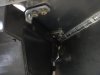
Using some 3/4" x 1/8" flat bar stock and some 1 1/2" X 1/8" angle from the performance car aisle of Home Depot, four brackets were made as shown. The three flat stock ones use the existing mounting lugs but the fourth lug (front driver's side) is not used. Instead, the angle is used to support the evaporator in this area.
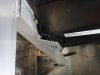
The passenger side brackets are simple 90 degree bends. The one in front has room for two holes to mount it against the upper footwell, but the rear one has room for only one hole.
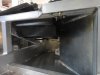
The rear driver's side is bent in a kind of "s" shape and does not mount against the upper footwell; instead, it runs down from the mounting lug and mounts against the square tube support between the driver and passenger.
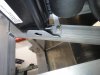
The front driver's side is made from the angle. It makes a kind of shelf for the bottom of the evaporator to sit on. It is shaped so that it does not protrude beyond the front of the evaporator (so you can't catch a knee on it).
The brackets are all mounted to the frame with holes drilled and tapped to 1/4-28. I used a combination drill and tap found on Amazon, which makes this quick and easy.
The large holes in the angle bracket are just to keep it light (yes, I am anal retentive, and proud of it).
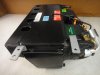
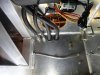
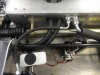
A firewall fitting was used for the two air conditioning lines. The heater hoses just go through rubber grommets.
The pictures should hopefully explain how it all came together.
The resulting installation is held firmly in place and should stand up to being kicked by inebriated passengers and excited children. All of the mounting bolts can be undone from inside the footwell, if you don't mind standing on your head.
Not shown in the pictures is the weatherstripping which is laid down in a big rectangle around the vent holes drilled in the top of the evaporator and seals the evaporator against the upper footwell.
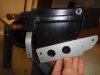
One of the pictures shows a 90 degree hose fitting on the back of the evaporator, which is the fitting that came with the Vintage Air kit. This was replaced after the picture was taken with a 90 degree E-Z clip fitting; all of the hoses were replaced with E-Z clip ones, as these can be cut and crimped at home with a $20 tool.
Here is a list of parts:
1) 1/2" x 1/8" flat stock $4.28 Crown Bolt 3/4 in. x 36 in. Aluminum Flat Bar with 1/8 in. Thick-44710 at The Home Depot
2) 1 1/2" x 1 1/2" x 1/8" angle $14.67 Crown Bolt 1-1/2 in. x 36 in. Aluminum Angle with 1/8 in. Thick-41990 at The Home Depot
3) 1/4-28 Combination drill and tap $15 [ame=http://www.amazon.com/Champion-DT22HEX-1-4-28-Combination-Drill/dp/B001TRF27O/ref=sr_1_1?s=industrial&ie=UTF8&qid=1387634859&sr=1-1&keywords=combination+drill+and+tap+1%2F4-28]Champion DT22HEX-1/4-28 Combination 1/4 - 28 Drill and Tap Hex Shank - Amazon.com[/ame]
4) Heater hose grommets part no. RG1375-32-8 $0.66 ea. Mouser Electronics - Catalog Viewer Mouser is a pretty good source for small numbers of larger grommets at reasonable prices.
5) Firewall fitting $40.97 http://www.summitracing.com/parts/vta-382600-mba/overview/
The two supplied brackets are slotted, which would allow the evaporator to move out of position, and I couldn't see how it would be possible to mount them in the space available and still be able to remove the evaporator for any future service.
Here is what I did to mount the evaporator:
Using some 3/4" x 1/8" flat bar stock and some 1 1/2" X 1/8" angle from the performance car aisle of Home Depot, four brackets were made as shown. The three flat stock ones use the existing mounting lugs but the fourth lug (front driver's side) is not used. Instead, the angle is used to support the evaporator in this area.
The passenger side brackets are simple 90 degree bends. The one in front has room for two holes to mount it against the upper footwell, but the rear one has room for only one hole.
The rear driver's side is bent in a kind of "s" shape and does not mount against the upper footwell; instead, it runs down from the mounting lug and mounts against the square tube support between the driver and passenger.
The front driver's side is made from the angle. It makes a kind of shelf for the bottom of the evaporator to sit on. It is shaped so that it does not protrude beyond the front of the evaporator (so you can't catch a knee on it).
The brackets are all mounted to the frame with holes drilled and tapped to 1/4-28. I used a combination drill and tap found on Amazon, which makes this quick and easy.
The large holes in the angle bracket are just to keep it light (yes, I am anal retentive, and proud of it).
A firewall fitting was used for the two air conditioning lines. The heater hoses just go through rubber grommets.
The pictures should hopefully explain how it all came together.
The resulting installation is held firmly in place and should stand up to being kicked by inebriated passengers and excited children. All of the mounting bolts can be undone from inside the footwell, if you don't mind standing on your head.
Not shown in the pictures is the weatherstripping which is laid down in a big rectangle around the vent holes drilled in the top of the evaporator and seals the evaporator against the upper footwell.
One of the pictures shows a 90 degree hose fitting on the back of the evaporator, which is the fitting that came with the Vintage Air kit. This was replaced after the picture was taken with a 90 degree E-Z clip fitting; all of the hoses were replaced with E-Z clip ones, as these can be cut and crimped at home with a $20 tool.
Here is a list of parts:
1) 1/2" x 1/8" flat stock $4.28 Crown Bolt 3/4 in. x 36 in. Aluminum Flat Bar with 1/8 in. Thick-44710 at The Home Depot
2) 1 1/2" x 1 1/2" x 1/8" angle $14.67 Crown Bolt 1-1/2 in. x 36 in. Aluminum Angle with 1/8 in. Thick-41990 at The Home Depot
3) 1/4-28 Combination drill and tap $15 [ame=http://www.amazon.com/Champion-DT22HEX-1-4-28-Combination-Drill/dp/B001TRF27O/ref=sr_1_1?s=industrial&ie=UTF8&qid=1387634859&sr=1-1&keywords=combination+drill+and+tap+1%2F4-28]Champion DT22HEX-1/4-28 Combination 1/4 - 28 Drill and Tap Hex Shank - Amazon.com[/ame]
4) Heater hose grommets part no. RG1375-32-8 $0.66 ea. Mouser Electronics - Catalog Viewer Mouser is a pretty good source for small numbers of larger grommets at reasonable prices.
5) Firewall fitting $40.97 http://www.summitracing.com/parts/vta-382600-mba/overview/
Attachments
-
 DSC04909.jpg80.2 KB · Views: 281
 -
 DSC04914.jpg114.9 KB · Views: 296
 -
 DSC04912.jpg120.9 KB · Views: 252
 -
 DSC05036.jpg97.7 KB · Views: 296
 -
 DSC05037.jpg109.1 KB · Views: 264
 -
 DSC05039.jpg98.9 KB · Views: 260
 -
 DSC05040.jpg105.1 KB · Views: 268
 -
 DSC05042.jpg143.8 KB · Views: 275
 -
 DSC05047.jpg132.6 KB · Views: 266
Last edited: