Steering wheel install questions

PeteB

GT40s Supporter
So installing the steering wheel should be easy right? Ugh, I can't figure it out.

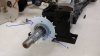
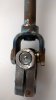
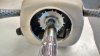
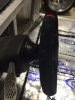
So there's four pieces: steering wheel, quick release hub, quick release shaft, and a threaded adapter that screws onto the steering column:


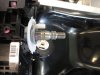
Adapter screwed onto column:


So, the steering wheel bolts to the quick release hub, the adapter is welded to the quick release shaft, but does the adapter also have to be welding onto the column? If not, what stops the adapter from unscrewing when I turn left?
 
Pete I would have to look at mine in the morning, but am almost 100% certain it is tig welded in place..............m
 
The small threaded part screws on to the steering column, and then is welded in place to keep it from unscrewing. I've read where other builders have tried to drill and pin it, but the pin would break off.

Then the larger splined part fits around the threaded part and the two are welded together. If you use the parts as is, the steering wheel will set back quite a ways. You may want to consider cutting the length of the threaded and splined parts to get a closer fit.

I did the above cutting and fitting on my quick disconnect, but I just couldn't make myself weld it to the column.

After careful examination, I concluded that the quick disconnect was not needed with the adjustmentable column. I'm 5'11" and there is plenty of room to slip into the stock SLC seat without pulling off the steering wheel.

That left the question of an alternate adapter to mount the steering wheel. The unfortunate reality is that there is only 1 adapter on the market and its pricy. Pfadt sells a C6 steering adapter for about $150. If you go in that direction, you will also need the following:
  • Special nut to secure the adapter to the column. Go to a Chevy dealer and ask for a Corvette C6 steering wheel nut, PN:11609659. It's about $12.
  • The adapter has a 6 screw steering wheel mount, so you will need an adapter for the stock SLC steering wheel or a different steering wheel.

1131014_swadapter_b.jpg


Pfadt - Steering Wheel Adapter - C6 Z06 Corvette - 1131014 | JDP Motorsports
 
Last edited:

Fran Hall RCR

GT40s Sponsor
There is a lot of adjustability when using the parts we supply...
As each and every driver requires a different position the splined section of the quick release can be shortened by an inch, the threaded adapter can be shortened by and inch also.
So there is a +/- of two inches and then the range of motion of the power steering column too....

That's one of the reasons we don't weld the threaded adapter to the column.

Another is that some guys actually use a conventional steering wheel and not the quick disconnect at all...
 

PeteB

GT40s Supporter
Anyone tried the hub from NRG?

https://www.getnrg.com/products/short-hub/srk-177h

At little cheaper than the Pfadt hub: [ame=http://www.amazon.com/NRG-Short-Steering-Wheel-Adapter/dp/B008FT5ZLW/ref=sr_1_1?ie=UTF8&qid=1389970405&sr=8-1&keywords=SRK-177H]Amazon.com: NRG Short Steering Wheel Hub Adapter (Boss) Kit - Chevrolet Corvette (2006+) - Part # SRK-177H (Black): Automotive[/ame]
 
I think the NRG hub is a new product! I spent hours looking for an alternative to the Pfadt hub back in mid 2013 and didn't see this hub.

From the PIC, the NRG looks shorter and has an integrated dress-up bezel to meet the column cover. If I had to do it over again, I think I'd try the NRG.

The Pfadt hub is longer than I prefer, and the open design meant I had to fabricate a cover to hide it.

SRK177H.jpg


41185c8i93L.jpg
 
I am trying to connect the factory-supplied steering wheel to the factory parts and am not sure whether I have it right or not . . .

Below are three pictures:

One shows the bare steering column stub

Two shows the threaded fitting screwed onto the steering column stub

Three shows the adapter fitting for the quick disconnect on the steering wheel.

Am I supposed to weld around the circumference of each of the threaded fitting and the adapter fitting where the two blue arrows are in picture three? If so, is there a trick to welding this area without melting all of the plastic around it? If further disassembly is required, can anyone point me to some instructions on how to do so?

I'm assuming that each of the threaded fitting and the adapter are intended to be welded approximately in the position shown?
 

Attachments

  • one.jpg
    one.jpg
    112.7 KB · Views: 363
  • two.jpg
    two.jpg
    104.8 KB · Views: 369
  • three.jpg
    three.jpg
    114.1 KB · Views: 469
The adapter sleeve is quite a bit longer than the threaded fitting. I assume the bottom end of the adapter sleeve (opposite the splines) is where most of the length would need to be cut off in order for the threaded fitting to protrude through the top of the adapter sleeve . . .
 

Fran Hall RCR

GT40s Sponsor
Dave, you can trim both the sleeve and the splined coupler and get two inches more distance for the guys with the longer arm driving position...
Of if you are like me and want the steering wheel closer then I can leave both portions long and be able to sit back in the cabin but still reach the steering wheel comfortably.
 
On mine, the seat is installed all the way back, so having the steering wheel closer (full length) is more comfortable.

To do this, I will need to leave the fittings full length as Fran suggests, which will mean welding the "bottom" end of the adapters.

Dave
 
I'm getting the Steering column ready for the adapters to be welded on to it and am trying to remove the plastic bits so they don't melt in the process.

In order to remove plastic doohickey A (in attached picture), it looks like part B needs to be removed. It's hard to see, but it looks like B is retained by a snap ring that has no ears or obvious ways to get ahold of it to remove.

Can anyone tell me how this part of the steering column comes apart? I'm assuming part A won't survive welding if it is left in place . . .
 

Attachments

  • IMG_20140620_152107388.JPG
    IMG_20140620_152107388.JPG
    120.7 KB · Views: 378

Mark B.

Supporter
The metal plate is held in place by a heavy spring from the back that holds it against the retaining clip. So you have to push it back to free up the retaining clip. You can use a large washer under a nut threaded to the shaft with a couple sockets or small blocks.

The spring is pretty strong, so unfortunately you can't just push it in with your hand while you remove the clip.
 
Thanks, Mark - I'm glad I asked. I would never have guessed that.

After much messing around, I found a nut that fits over the end of the steering column and using a steering wheel puller, was able to get the ring out and the pieces disassembled - only to realize that it will be impossible to get them back on again over the threaded adapter when it is welded in place; the hole in the metal "cup" (Part B in the above picture) is a smaller diameter than the outside of the threaded adapter and you can't drill out the cup or it won't grip the splines of the steering column shaft.

So - it looks like this is not a necessary step in modifying the steering column to get it to work with the SLC. It's a bit frustrating to have the parts supplied in the kit, but no reference to those parts in the manual. . .

Can anyone chime in as to what they did here? Do you just weld with the plastic doohickey installed and hope it doesn't melt?
 
It looks like there are two options here: Drill and install a roll pin, or weld the end and hope the doohickey doesn't melt.

A fellow builder replied directly and told a story about how his roll pin broke on the track, leaving him with no steering. Fortunately, no harm was done, but if this happened on the street, it could be pretty serious.

So . . . I took the column down to a local welder, who welded it up nicely and didn't melt the doohickey. Unfortunately, I didn't clue in that the doohickey is only useful with the plastic steering wheel cup installed, and there is no way to get the cup back on once the adapter is welded in place . . . so now I have a perfectly useless, unmelted plastic doohickey . . .sigh . . .

Hopefully there will be another way to get the horn button on the steering wheel to work without the plastic bits in the middle.
 

Attachments

  • Bottom End.jpg
    Bottom End.jpg
    43.9 KB · Views: 335
  • Steering Column.JPG
    Steering Column.JPG
    93 KB · Views: 360
I'm using the NRG short hub for C6 Corvette and a NRG standard length quick release hub with mine.
 

Attachments

  • image.jpg
    image.jpg
    77.5 KB · Views: 343
Hi Aaron,

What did you do to get your steering column housing black?

I have been thinking about spray paint vs. some kind of dye. I'm a bit concerned about paint wearing off . . .
 
It looks like there are two options here: Drill and install a roll pin, or weld the end and hope the doohickey doesn't melt.

A fellow builder replied directly and told a story about how his roll pin broke on the track, leaving him with no steering. Fortunately, no harm was done, but if this happened on the street, it could be pretty serious.


Double pin at 90* apart - look at attached specs for sheer load. I'm using 3/16" roll pin @ 4,150lbs.
 

Attachments

  • roll-pin info.jpg
    roll-pin info.jpg
    306.6 KB · Views: 3,629
Last edited:
Back
Top