M20 Dreaming

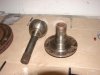
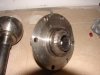
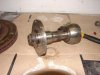
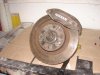
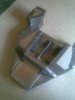
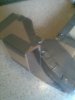
Hi, this the first post of my M20 McLaren scratch built build log. to start I will tell you this is a Budget Build and I will be doing as much of the fabricating and machining as posible myself and what I can't will be done at local machine shops here in New Plymouth. The start point for me is the suspension and uprights for which I'm using R33 Skyline front hubs that will be mounted into fabricated uprights that I will try to make look as close to the original thing as posible I will also be using R33 brakes on all corners as they are big alloy 4 pots with 300mm rotors which I will crossdrill as this was the practice of the era. The rear uprights will foiiow the same path but using Nissan Patrol CVs, axles, hubs and stubs. I have already started on these and will post Photos as soon as they are done.
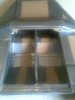
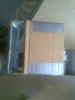
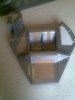
The tub will be alloy and will follow the same design as per original and will have the engine/trans as a stressed member carrying the rear suspension. The diamensions and scale of the car will as close as possible follow the original in respect of track,wheel base and overall body size. The buck for the body will be built by myself from ply and foam and then a mould taken from it. This like most of the cars built he is a labour of love with no time retraints, so don't expect things to happen quickly and please feel free to offer advice and critisize where I need it. I look forward to the challenge and the help I know I will recieve. Especially from the Kiwi contingent of Russ, Haroo, Russel K and Jac Mac.
Cheers Leonmac
 
I'm sitting in Oman for five weeks and I'm thousands of miles from my garage and I'm thinking what can I do here that will help speed things up when I get back. So I started to draw up in full scale, the patterns for my front/rear uprights, I then transferred these to good strong cardboard and asembled them to see if the patterns were workable in the Steel/Alloy form. I am quite pleased with my findings and from this some what crude exercise I have finalized the way I'm going the fab the rear up rights and going straight from the patterns made here. The thing that I found by doing this is that it actually going to be better to cast the fronts. as I asembled the front upright it became very clear this was going to be hard to fab in alloy so I have completely asembled it and will take it home and finish it with a layer of Glass Fibre and filler and then take castings from it. I think time very well spent.
The second thing I was looking for and wondering how to go about it in the most economical way was the body. A huge task no matter what,anybody who has checked out Feds CANAMSA lola T70 can apreciate the tim and effort put in. So I was looking for another way. In the past I have fabbed body panels from pre made flat Glass sheets and have had great success. But to do a whole care is a different kettle of fish. So to test this theory I decided to mak a 1/8th scale model of the body useing (you gest it ) Cardboard and the result is not bad and in doing this I have discoverd a method wereI will make a mould without making a plug, I think that this is possible because the M20 has a quite flat top surface and very little side panel at all. I would in no way try this with a car like the T70 as you need to see the round panels for real and trying to doit from the reverse would be a nightmare. Anyway thats my theory Wish Me Luck. cheers leonmac
 
I just tried to edit the bad spelling but apparently there is a time limit so sorry. Spelling is not my strong point. Leonmac
 
Hi Guys....I have been home now 2 weeks, I have finished the mould's for both front and rear uprights. I made the decission to have the rear uprights cast as well as the fronts after talking to to the guys who are doing the casting and the finish will be much closer to the original look at if they are cast. As I said in the last post I had made mock ups at work, so when I got home I finished the front of with glassfibre and body filler added steering arms to both sides to save making 2 moulds as I figured to make 2 exactly the same would be hard so this way I just remove the unwanted arm from the finished upright and I know they are the same same dimensions and weight. I spent about 10 hours shaping and sanding the mould for the front then I looked at the paterns I made for the rear and got some 4" and 2" plastic pipe and then assembled the rear with ductape and the same glassfibre and body filler as the front. the rear was not as tricky as the front and about 6 - 8 hours had it done I have dropped them to the casters and hope to have the raw castings back in about a week. I'm now starting on the suspension arms and links. also being cast at the same time is the side flanges for my transaxle. At this point we are looking at using Aerospace 5008 or (UK) LM 25 alloy for the casting, looking at the specs they both have good Mechanical properties, but the LM25 casts better, but the 5008 doesn't require heat treating and age hardens over a period of 21 days. (Arrow wheels use 5008 for their wheel centres) Can anybody give me some guidence here as I hope to give the casting guys the go ahead this week. I will try to get some photos up as soon as I get my camera soughted. Cheers Leonmac
 
Hi again.....I have had another day on the rear hubs in prep for the uprights. As said in earlier post I am using Nissan Patrol Stubs and CVs, I'm using the stub axle as the hub and mounting the bearings that normally run the hub in the upright, so the flange that normally bolts to the swivel housing become's the wheel bolt face. I then turned down the Internal drive drive gear from the free wheeling hub and welded it into the centre of the new hub, the CV then runs though the centre of the hub and drives on the spine and is retained by the standard snap ring. If this sound complexed, it isn't and one of the things that it does is every part is readly availible and minimal machineing is required, all the bearings and seals are standard Nissan parts. The CVs and axle is Short side Nissan Patrol, very stong and if you need more strenght Crome-moly ones are availible. I will post some photos and it will all make sence. I'm trying to achieve two things with these parts, A super strong drive train for a realistic price.
Cheers Leonmac.
 
Hi... more suspension work this week, I had some bosses turned up to take the 5/8" spherical joints that will conect to the front upright, they are captured buy circlip on one side and a lip machined on the boss on the other. I'm waiting now for the tubing to turn up. I looked at going the chrome moly way but have opted for a 1.6mm wall seamless tube that is used for motorcycle frames. I was going to then Mig/Tig the bosses and stubs for the 1/2'' Rod ends, but now after looking around and Mainly at Russ Noble's work may concider brassing or Easyflow on the stubs and some of the other parts of the "A"arms etc. Probably won't get much more done for a while now as I'm back to Work this time next week and have some other jobs to get done. Can't figure out why the 5 weeks home never lasts as long as the 5 weeks at work!!!!! The good thing is that My uprights will be well age hardened by the time I get home again. Cheers Leonmac.
 
Hi.....this is my first attempt at getting some photos of the drive hub set up for my car, the drive spline as told in earlier post is from the inside of a free wheeling hub, it was then welded into the hub using Low Hydrogen Tig process pre heated to reduce shrinkage. the discs and caliper are R33 Nissan Skyline and the CV is Nissan Patrol. I'm trying to stick to 1 make for donor parts to make it easier to remember for replacing parts in the future
DSC01168.JPG
 
Hi... let see if this works
 

Attachments

  • DSC01168.jpg
    DSC01168.jpg
    35.6 KB · Views: 965
  • DSC01169.jpg
    DSC01169.jpg
    37.3 KB · Views: 942
  • DSC01170.jpg
    DSC01170.jpg
    37.9 KB · Views: 994
  • DSC01171.jpg
    DSC01171.jpg
    45.8 KB · Views: 1,047

Russ Noble

GT40s Supporter
Lifetime Supporter
Very ingenious Leon.

Somehow I missed your latest posts. Full marks for innovation, I like that setup. Any idea on weights?

How are your castings coming along?

Cheers,

Russ
 
Hi Leon, just wondered what the spline count & dia is on the shaft on LH pic of post #10 above . The 89>300zx rear half shafts use a similar looking dia spline plus its stud pattern is 5 on 4.5" pcd, ame as most aussie fords etc. Can get pic if you need it.
 
Hi Russ/Jacmac.......Glad to see you guys commenting as I have a lot of repect for your opinons
Jacmac: not quite shore of the spine count so will check and get back to you, the 300z is close but the brake rotors are smaller and the stud pattern is Ford and I may use the US pindrive kit if I don't make my own.
Russ: about 10kg rear and 6 kg front for the raw casting but a lot of material will come off with Machining etc so will weigh when finished. Haven't seen them yet as they were not done before I left, will post pics of the raw casting and then the finished item. Cheers Leonmac
 
Hi Russ/Jacmac.......Tried giving you some more info last night but the Network over here is terrible and kept dropping me out if I took too long to write. so back to you Jacmac, the wrecker I got the R33 stuff did have a complete 300z rear that I looked at, but the haft shafts were smaller than the Patrol axles and too long for the application when I do the transaxle, originally I was going to use Patrol CVs at both ends as the CV spline fitted the Patrol diff and it ment No special axles needed to be made.
Russ: I had another weekend in Brisbane and called into DRB Cars to check out the 917 they have there at the moment, Now that is a Small Car, It mad the 2 GT40s that were either side look like 4x4s and the cockpit is for a bloomin Midget!! But it is very nicely built. Didn,y have a camera so sorry NO pics.
How is Lim and Leon getting on with their cars. and looking forward to seeing more on your car. Cheers Leonmac.
 
Well Guys.......Here I'am again sitting in Oman playing with cardboard and Ductape. as mentioned in earlier posts, this is how I made what became the moulds for my front and rear uprights and the end result was very pleasing. I also used this to test some ideas about how to construct the body by building a 10th scale model on my last hitch and it also gave me some very usefull knowledge about patterns and how they conect with each other to give the desired end result. This time I have made a 1/5th scale of the Mono Tub and the side pods that hold the radiators. The thing I found most interesting about this process was how as I added the sides, Bulk heads and the contured seat frame panels the stiffness was increasing far greater than I expected it to and when the top panels and the dash cross brace were put on the whole thing became very solid indeed, especially the torsional strenght. I had considered making a space frame and paneling it to look like a mono but after doing this model I'm covinced that a full mono tub will be the way to go and so much more like the original. I will try to take some photos of the mock up, but keep in mined this is built in my room with no more than a pair of sicors, and a roll of duck tape.
Cheers Leonmac.
 

Russ Noble

GT40s Supporter
Lifetime Supporter
I will try to take some photos of the mock up, but keep in mined this is built in my room with no more than a pair of sicors, and a roll of duck tape.
Cheers Leonmac.

Good. We're still waiting for photos of the uprights..........No pressure! LOL

That's excellent use you're making of your spare time in Oman. I used cardboard, masking tape and spaghetti cans for my upright mock ups. I'd really love to see a detailed build thread for an alloy mono. Especially light weight riveted instead of heavier welded! Or were you planning on steel and spot welding? That would be so wrong for an M20 if you don't mind me saying so. An alloy clad space frame would be better but a lightweight alloy mono would be just the muttz nutz.
 
Hi Russ.....Your'e right an alloy mono is the only way to go and I have found the gauges of alloy used on the original cars and will be using the same although the metric equivalent which is 1.6mm and 1.2mm or what was 16 and 20 gauge in there day. I did look at a paneled space frame because I felt it might be easy to handle, but now I will go with the full Mono, rivetted and bonded just as the original was. the other thing McLaren did on some of the cars was to Laminate bollser wood between the alloy sheets which made them exstremely strong and Lite, I will also do this but using Ceder which is also lite and if you run the grain the right way very strong. I will do this for the sides of the cockpit and the bulk heads out to the side panels. I may also run ply on the floor, if only under the seat area as the thought of only 1.6mm alloy between the track and my bum at 180mph does not install confidence. About the photos of the uprights, will have to wait untill I get home as they were not finished when I left but the guy said he would be shore to have them done by the end of the month, I get home 14th Aug. I have all the timber at home ready to make my Chassis table which will be 2.4m x 3.6m and I will be able to build the whole rolling chassis on it and will have it on casters so I can still get my other cars in the garage and just stick them outside when I'm working, Boy I'm going to be busy this time home. When are we going to see this car of yours making noise and tearing up Ruapuna ???? Cheers leonmac
 
Hi Guys.....I'am going to have another go at getting some pics of the model tub that i have built
 

Attachments

  • Jgmgtg.mtgmdtpdp003.jpg
    Jgmgtg.mtgmdtpdp003.jpg
    19.4 KB · Views: 1,406
  • Jgmgtg.mtgmdtpdp015.jpg
    Jgmgtg.mtgmdtpdp015.jpg
    16 KB · Views: 1,229
  • Jgmgtg.mtgmdtpdp016.jpg
    Jgmgtg.mtgmdtpdp016.jpg
    16.1 KB · Views: 1,104
  • Jgmgtg.mtgmdtpdp013.jpg
    Jgmgtg.mtgmdtpdp013.jpg
    15.1 KB · Views: 1,032
  • Jgmgtg.mtgmdtpdp014.jpg
    Jgmgtg.mtgmdtpdp014.jpg
    18.5 KB · Views: 1,108
The diamentions may not be perfect as I did this soly from memory as all my drawing etc are at home but I believe its pretty close the main part of the tub is a mere 10'' high with the cockpit 32" across the rear and narrowing to 25" at the front bulkhead. If you look closely at the 4th image you can see the air splitter so the air is directed both sides of the rear tyre, this intake houses the radiator and an oil cooler which is duplicated on the other side, the only steel in the chassis is a rear bulk head which hold the engine and rear trailing arms and the roll bar the front steel bulkhead as in the Ds and Fs is not used in the 20 and the front suspension is attached with steel brackets rivetted into the tub. Now I just need to make it 5 times bigger and I Alluminum and Bobs your uncle, one M20 tub. sounds easy if you say it fast or as Bruce McLaren said " Wooosh Bonk and its Done" Cheers Leonmac
 
Back
Top