
That is a great idea for the inner door parts. Sure looks nicer than the piece of wire I have in my door.

You are using an out of date browser. It may not display this or other websites correctly.
You should upgrade or use an alternative browser.
You should upgrade or use an alternative browser.
Keith's RCR GT40 Mk I Build
- Thread starter K.Wilson
- Start date
Keith
Lifetime Supporter
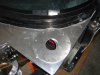
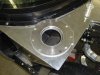
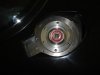
Fuel Caps:
After finally getting the front clip in a "real close to final alignment" position I decided to install the fuel cap/fuel filler assemblies. I trial fit the cap assemblies and the spacer plates provided by Fran and ended up removing a small amount of material off the flange on the spider to get clearance for the spacer (the photo is of the right side, almost no material was taken off the left). Once I was happy with the alignment I transfer punched the holes in the spacer to the chassis and drilled and tapped them to 10-32 for the stainless fasteners. I had to "open up" the center hole in the spacer to the diameter of the fuel filler with the locking cap. I then installed the spacer with two temporary screws and marked the chassis so that I could make the cut-out in the chassis match the spacer plate. After making the cut-out I again installed the plate with two screws and set the fuel filler in place. Again using a transfer punch, I marked the screw holes for the fuel filler. The holes were drilled to the tap drill size for 10-32 and the spacer was removed and the holes in the spacer were drilled out to 3/16 and the holes in the chassis were tapped to 10-32.
I reinstalled everything and was very happy with the way they looked. I spent a lot of time tapping holes and I am not too sure that I may not have been better off just drill them to 3/16 and using nuts on the bottom side but it sure was nice not having to get all twisted up under the dash to put the nuts on.
Keith
Attachments

Keith
Lifetime Supporter
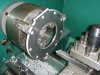
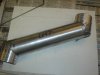
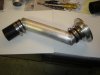
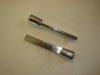
Fuel Filler Tubes:
The fuel filler tubes were a little more difficult than I had expected. I had purchased two lengths of "flexible fuel tube" that was used in 60's and 70's GM trucks. Unfortunately my definition of flexible was somewhat different than their definition. As a result I decided to fab some fuel filler tubes from two inch OD, 1/8 inch wall, 6061 aluminum tube.
I made a crude pattern from a coat hanger and a few measurements. For those RCR builders out there the right tube ended up 7/16 longer than the one for the left but I am sure all cars will be different as the filler caps are installed where they best fit the front clip. I machined groves in the area where the hose would clamp the tube and cut the angles on the band saw (approximately 60 degrees) and sanded them too fit on the belt sander. I was able to get a piece of 2" ID fuel filler hose from the local Carquest Auto Parts and I cut the four connector tubes (two 1.5 inches and two 3.5 inches) from that.
I trimmed 3/4 inch off the fuel filler necks and added groves where the hose would clamp to the neck. It was assembled and installed thru the hole in the chassis. I put a thin line of RTV under the spacer plate and on each fastener to ensure that if fuel was spilled it would not leak into the interior of the car.
It looks good and appears that the fuel flow will be unobstructed.
Keith
Attachments
Keith
Lifetime Supporter
Thanks Tom.
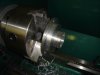
My brother said I should be power tapping them too......... However, I have a long history of power tapping disasters so I usually tap by hand with way to much Tap Magic lube.
I really like the lathe and mill that I got from Grizzly. Others have accused me of trying to find the most difficult way to do things just so I could use the machines. In retrospect they may be right.
Keith
Keith:
Very nice, clean, professional looking fuel filler. The sealant under the spacer plate to prevent any spilled fuel from getting into the cabin is an excellent idea. I had the same thought - about a week after I installed mine. That is now on the "B" list to correct.
You contine to make good progress.
Keith
Lifetime Supporter
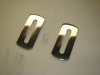
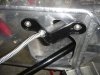
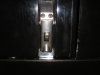
Inside Door Release Handles:
I have been holding off fabricating the inside door release handles as I really could not find something I liked. My son Ryan and I were looking at the new GT40 book he got me for Christmas along with some of the other Gt40 books I already had and we saw a "through the window" photo of one of the Gulf cars that had a handle I liked.
I machined these to look like the one in the photo and I am happy with the result. I used two pieces of 3/4 x 3/4 angle aluminum bonded, then fiber glassed ,to the bottom of the door ledge for the piviot point and made a connector link from 3/4 x 1/8 aluminum bar to connect it to the latch.
It works great and I like the way it looks.
Keith
Attachments
Ron McCall
Supporter
Well...... I WAS happy with the ones I made for my car!!!!!!!!
Well done!
Well done!
")
Keith
Lifetime Supporter
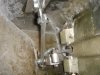
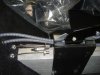
I looked through my photos and I only have one shot of the inner door workings after I installed the inside door latch hardware. I don't believe I will use this spring setup in the final version as I still don't care for the "feel". The door hardware has not been tightened down or in the case of the pivot bolt does not even have a nut on it as it will all come apart prior to body work and paint.
Keith
Keith
Attachments
Keith
Lifetime Supporter
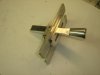
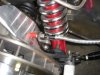
Hand Brake:
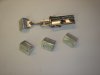
I had been holding off on installing the hand brake as I could not find a good way to terminate the cable housing ends as they came out of the chassis. I had fabricated two versions of an aluminum hollow "end cap" that I had intended to weld to the chassis so that the cable was in line with the capiler. Unfortunately neither one would allow for a method to hold the cable end while the nut was being tightened.
Fran was kind enough to send me two of his new cable brackets. I sent them to powder coat after I had modified them to fit the cable ends. It makes for a very professional looking set up.
I copied Chuck and Ryan and machined an aluminum bushing to help take up the slack at the adjustment point at the handle. I like the way the hand brake system looks and it has the correct feel when applied.
Keith
Attachments
Keith:
Looks very nice. I like that bracket to straighten out the cable. Should help move the cable further away from the tire. Need to get a couple from Fran and retrofit ours.
You may want to consider running the top shifter cable above the brake handle bracket rather than below. it will cause less distortion of the cable and once you get the cover over the brake bracket it will be concealed anyway. Pics on my blog.
Also I discovered that one wants to leave a bit of slack in the cable. If the calipers are is too tight the pads 'kink' and lock the wheel. Not a good thing if the car is moving and you don't want brakes.
Keith
Lifetime Supporter
Chuck,
I actually have two cable clamps (one for each shifter cable) inside the hand brake mount. This holds each shifter cable to the side so that they can not make contact with the hand brake works. The shifter seems to work well, at least with the car on jack stands as does the hand brake. I may have to re-adjust the hand brake when the weight is on the suspension.
The way it is now; I adjusted the hand brake caliper to have .020 clearance between the pucks and the rotor with the lever arm on the caliper all the way to the rear. I have the cables adjusted so that the springs push the lever arms all the way to the rear when the hand brake arm is fully released. The pucks are firmly against the rotor when the hand brake arm is half way through it's range of motion.
With the brackets Fran provided the hand brake cables are about 3/4 inch from the tire when the handbrake is "on" and more than an inch away when it is released (because of the angle of the bracket the cable tends to move away from the tire when the tension is released).
It looks good and it has the correct "feel", I just don't know how it will change when the weight of the car is on the suspension. The good news is that there is a lot of adjustment availlable.
Keith
Keith
Lifetime Supporter
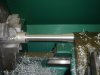
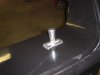
Front and Rear Clip Latches and Dzus Fasteners:
I have spent the last month fitting the body. It is difficult, frustrating and very time consuming at best! None-the-less significant progerss has been made and I should be able to post some photos in the near future.
I pre-fit the stainless latches to the front clip and decided to machine a part that would do away with the need for the lower "catch" for the latch. They were machined from 1"x1" 6061 aluminum alloy. They look good and appear to work as intended.
The two Dzus fasteners for the center of the front clip needed "stand-off" brackets for the dzus wire. I machined these out of 1'x1" aluminum bar stock. They have a hole for a 1/4 x20 socket head cap screw through the center and I drilled and tapped holes in the top bulkhead to attach them.
Keith
Attachments

Keith
Lifetime Supporter
Rear Clip Louver:
Fitting the top louver in the top of rear clip was somewhat of a challenge. The louver is nearly twice as thick as the recess in the clip. I trued-up the area of the clip with a sanding block and 120 grit paper, then I machined the louver so that the outside lip was only .080" thick.
The louver now sits flush with the top surface of the rear clip.
Keith
Attachments
Similar threads
- Replies
- 24
- Views
- 3K
- Replies
- 42
- Views
- 4K