Ken's SLC build thread

Ken Roberts

Supporter
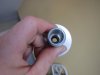
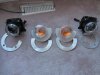
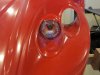
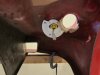
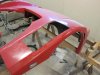
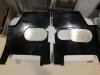
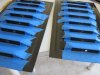
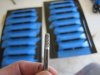
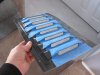
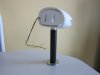
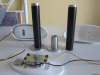
Working on the mirrors now. I'm using carbon fiber tubes with aluminum inserts that will be bonded in at each end. I have shaped the factory low mounted mirrors by removing the arms. I just need to come up with a good way of mounting the upper insert into the mirror housing then I can bond the pieces all together.
 

Attachments

  • 003-4_zps9d5a8422.jpg
    003-4_zps9d5a8422.jpg
    26.5 KB · Views: 252
  • 004-7_zps5f60b8fe.jpg
    004-7_zps5f60b8fe.jpg
    53.2 KB · Views: 245
Last edited:

Ken Roberts

Supporter
To mount to the door panel I installed a hardened steel threaded insert into the bottom bonded aluminum piece. It's called a Gardsert and is similar to a helicoil.
 

Attachments

  • 009_zps60cc5f54.jpg
    009_zps60cc5f54.jpg
    33.9 KB · Views: 272
Last edited:

Ken Roberts

Supporter
Here is a picture of the DRL installed in the inner light position. These are made by Hella.

The bracket needed to be made to locate it correctly in position.
 

Attachments

  • 004-7_zps1889ad23.jpg
    004-7_zps1889ad23.jpg
    123.2 KB · Views: 263
  • 007-3_zps15ed12c0.jpg
    007-3_zps15ed12c0.jpg
    67.3 KB · Views: 239
  • 008-1_zpse68cb609.jpg
    008-1_zpse68cb609.jpg
    60.2 KB · Views: 252
Last edited:

Ken Roberts

Supporter
I have cut out the louver opening in the top of the fenders. The fiberglass pieces that were cut out have been cut into thin sections and will be bonded into the bottom edges of the holes to make a ledge for the louvers to sit in. I also added side position lamps from a Corvette/Cadillac.
 

Attachments

  • 006-2_zps809fc39a.jpg
    006-2_zps809fc39a.jpg
    72.5 KB · Views: 264
Last edited:

Ken Roberts

Supporter
The front wheel well tubs have been modified for use with the race splitter and side marker lamps. If you are planning on adding brake cooling hoses additional holes will need to be made in the tub. I have made aluminum curved panels for servicing the lights. Rivet nuts will be inserted to remove them.
 

Attachments

  • 005-2_zpsbb2a1b87.jpg
    005-2_zpsbb2a1b87.jpg
    57.8 KB · Views: 239
Last edited:
Hi Ken,

Great progress on your SLC. Nice to see a canadian car! How are you finding the process of keeping the car on track for registration in canada/manitoba? aka addition of marker lights, seat belts and so on. Much of a task

Cheers! Keep up the good work
 

Ken Roberts

Supporter
Hello Chris. Manitoba is very strict due to the fact we have "government run car insurance". The hardest part will be installing some kind of front and rear bumbers.

I won't be able to hinge the back end in the traditional manner with the addition of a rear bumber. It will be removable like the SLC race cars with the addition of two more aerocatchs.
 
Interesting...what is really needed for a bumber though, just adding a substantial bar behind the body panels front and back, just like a normal car really? Maybe some 1"x3" aluminum?
 

Ken Roberts

Supporter
Interesting...what is really needed for a bumber though, just adding a substantial bar behind the body panels front and back, just like a normal car really? Maybe some 1"x3" aluminum?

With the SLC it's not so easy. I have the Ricardo transaxle. The back of it is less than an inch from the rear body work. No room for a internal crash bar. In the front nothing can be fit either as the nose is too low and it's divided into three sections. Both front and rear will require external protection unfortunately.

The bumper we are about to build in the back will look similar to a Ford GTs rear bumper.
 
I see, ill probably have to do the same if I get an SLC In BC.

I guess adding bumpers is the hardest part to getting it road legal?
 

Ken Roberts

Supporter
I see, ill probably have to do the same if I get an SLC In BC.

I guess adding bumpers is the hardest part to getting it road legal?

Jay registered his SLC in Southern Ontario without a problem. No marker lamps or bumpers.

I'm going for full emissions as well. Just for the challenge of it. I know BC has the toughest emission laws in canada.
 
I ment to ask Ken, Do you have the wording on the requirements for bumpers in MB? Maybe there is a tricky way to have something good looking and not an eye soar to get by with...
 

Ken Roberts

Supporter
Working on the top fender louvers today. I first marked off the intended cutout pattern then used a special die grinding bit to rough cutout the slots. Start off with a large hole somewhere in the center of each slot. Final finishing of each slot will be with small files and sandpaper.
 

Attachments

  • 003-4_zps75492af4.jpg
    003-4_zps75492af4.jpg
    89.6 KB · Views: 271
  • 004-7_zps35d19b39.jpg
    004-7_zps35d19b39.jpg
    46.9 KB · Views: 282
  • 005-2_zps8ab4dc5c.jpg
    005-2_zps8ab4dc5c.jpg
    95.2 KB · Views: 264
  • 006-2_zps3c704faf.jpg
    006-2_zps3c704faf.jpg
    82.3 KB · Views: 286
Last edited:

Ken Roberts

Supporter
I installed a small window in the firewall.
 

Attachments

  • 001_zps9bd4cd6c.jpg
    001_zps9bd4cd6c.jpg
    42.8 KB · Views: 296
  • 013_zps01a6f614.jpg
    013_zps01a6f614.jpg
    64.9 KB · Views: 317
Last edited:

Ken Roberts

Supporter
Finished off the fuel tank installation with stainless fuel tank straps. The height of the tank was shortened slightly to fit the 2002 Camaro module/bucket. The internal pump was changed out for a Walbro 255 and the internal regulator was gutted and just allows fuel to return to the bucket. A C5 Corvette external filter/regulator is used. I used nylon fuel lines from the fuel pump module to the filter/regulator then stainless braided teflon hose from the filter/reg to the fuel rail. I accomplished the complete fuel system run to the fuel rail without any 90 or 45 degree elbows. I welded a Swagelok fitting on the end of the fuel rail for a transducer so I can monitor the fuel pressure from the drivers seat.

In the bottom middle of the picture you can see the seat belt anchor point for both driver and passenger. It is a 1 1/4" aluminum rod about 6" long with a hole in the middle.
 

Attachments

  • 010_zps33c0e72a.jpg
    010_zps33c0e72a.jpg
    45.9 KB · Views: 297
Last edited:
Back
Top