Tornado GT 40 Build

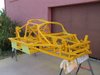
Hello Shaun, we are now beginning with drill and rivet..... After deburring the front aluminium sheet we have coloured the outside with bed liner in black. Also the the part, where the seats are fixing. After compound the sealant we rivet the aluminium sheet.
For saving the colour we have fixed small pieces from wart-sheet for the jack.

33581583gr.jpg


33581584od.jpg


33581585lj.jpg


33581587ht.jpg


33581588az.jpg


33581589le.jpg


33581590ys.jpg


33581591gs.jpg


33581592jv.jpg


33581593iv.jpg


33581662ih.jpg


33581663gx.jpg


33581664js.jpg
 

Neil

Supporter
Franky;

I have never tried that spray-on truck bed liner. I'll have to do a few experiments with it. Aluminum is not easy to paint; the paint tends to flake off after a period of time unless the surface had been well prepared. Here is my process:

1. Rough the surface with an orbital sander and 600 grit or use a yellow or white 3M Scotch-Brite Bristle Disc.
https://www.3m.com/3M/en_US/company...0812+8710951+8711017+8718581+3294857497&rt=r3
2. Clean with denatured alcohol, MEK, acetone, toluene, etc.
3. Etch surface with phosphoric acid & rinse thoroughly with water. Alodine surface passivization is optional.
4. Spray paint two-part zinc chromate epoxy primer. This gives you a hard, durable coating.
http://www.aircraftspruce.com/catalog/cspages/ptiprimers.php?clickkey=59494
5. Topcoat as desired. A two-part polyurethane is recommended.

I did this on my steel tube chassis and aluminum panels and I have been very pleased with the results.

Regards, Neil Tucson, AZ
 

Attachments

  • 451 Rivets a.jpg
    451 Rivets a.jpg
    82.3 KB · Views: 544
  • Chassis Partial Paint.jpg
    Chassis Partial Paint.jpg
    123.9 KB · Views: 572

Shaun

Supporter
Looking good, just off to do some more myself, one of my best tools I got for this build is a rivet spacer, it is spot on every time.

I drill a small hole to set each end then adjust to fit and centre punch each rivet, you can skip and do every other if you like, i think I may be spacing mine a bit close but I sort of like the look...And I guess I must like drilling :)

Spacer.jpg
 

Neil

Supporter
Shaun;

Your rivet spacing won't be too close together unless it is less than 3.5 times the diameter of the rivet shank. For a 1/8" rivet, that would be 7/16" spacing center-to-center!

Regards, Neil Tucson, AZ
 
Convert the dimensions from inch to Millimeter. Deburring all aluminium plates. Cleaning the holes from powdercoating. Cleaning the thread bushings. Assemble the shocks and springs. Colouring the naked parts.

33597016ja.jpg


33597017qd.jpg


33597018dj.jpg


33597021gs.jpg


33597025mj.jpg


33597030my.jpg


33597035nh.jpg


33597039hg.jpg


33597040mk.jpg


33597041vp.jpg
 
Changing the lower waterhole from the radiator to the top...

33686115rd.jpg


33686137jw.jpg


33686116cg.jpg


33686117cm.jpg


Drill a hole in the top of the brakefluid reservoir for the sensor and mount the brake cylinders

33686121nr.jpg


33686122tm.jpg


33686123wh.jpg
 
.....I have a lot of Requests....

i have created the decals in a design programm and ordered via a web shop. If you want a decal i can send you. The big one have a diameter 75mm and the small one have 28mm diameter. It would cost 18 € and 8 € + shipping.
Frank
 
Beginning with the brake lines, instalation the anti roll bar kit in the front, seal the aluminium sheets at the front wheel area......

33898318ah.jpg


33898321xy.jpg


33898322rg.jpg


33898324zu.jpg


33898326nf.jpg


33898328zv.jpg
 
good luck with this nice build. it is really extreme modelling.
I can ensure you at the end of the journey you will have a masterpiece and one of the best investment ever. A friend of mine just finished a wonderful tornado 3 months ago spending around 100k euros. The car is now in Germany he already has a serious offer for 250k euros. 3 months of life car, legally road plated.....good luck.
 

Shaun

Supporter
Looking very nice, I must update my blog, do work most evenings just forget the camera!!! No wi-fi up the workshop either...
Great attention to detail, will keep watching
 
.....I have a lot of Requests....

i have created the decals in a design programm and ordered via a web shop. If you want a decal i can send you. The big one have a diameter 75mm and the small one have 28mm diameter. It would cost 18 € and 8 € + shipping.
Frank

Hi Franky Do you have any of the 75 mm decals left . They look perfect for my Tornado steering wheel .. What size Steering wheel are you useing ?.

Thanks John,,,
 
Last edited:
Back
Top