Help - Superformance lower control arm ball joint play

Markus

SPRF40
Lifetime Supporter
Hello folks,

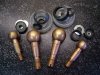
I hope somebody can help. I discovered wear / play in my lower front a-arm ball Joint. I thought that this can be adjusted by turning the bottom cap!?
Now the cap is secured by center punch marks (see pic) – what is the best method to remove those punch marks? Using a drill / center drill?

Please advise. Or do I miss something?

Markus
Lower Front Control Arm Ball Joint.jpg
 
Hi Markus,
I would use a Dremel tool with a small round bit. Just turning the hex in the cap should break most of the punch marks anyway. You might be able to tighten the cap to reduce play in the joint, but more likely you need to replace the nylon cups inside the joint. SPF sells this and it's not too expensive. I would not punch the steel cap when you finish. I've never had mine loosen.
 

Markus

SPRF40
Lifetime Supporter
Hi Dave,
Thanks for your quick response.
I tried to break the cap free but with normal force (torque) I was not able to move the cap. How much force did you use?
I used a regular 1/2" socket wrench - should I use an extension?
 

Jim Craik

Lifetime Supporter
hi Markus, I had this issue a few years ago, I was able to order a complete wishbone with new ball joint and cap already installed. It made for a simple change. It was a few years ago but as I recall the cost was surprisingly low,
 

Markus

SPRF40
Lifetime Supporter
Jim,
That means you also have not been able to move the cap?
If replacing the a-arm is the permanent fix I could use some lever....? Maybe I'm lucky....
 

Jim Craik

Lifetime Supporter
No, I never tried... I called Hillbank to order the replacement kits and they told be about the wishbone deal. I was a little nervous about tolerances and changing them out and this seemed like the better fix.
 
Not familiar with the SPF setup, but are you trying to remove/replace nylon cups 'in situ', ?? Load is carried on upper cup . Is that nylon or coated steel like originals. What Im suggesting is that a small amount of vertical play in the extended 'no load' position may be quite acceptable.
 
Not familiar with the SPF setup, but are you trying to remove/replace nylon cups 'in situ', ?? Load is carried on upper cup . Is that nylon or coated steel like originals. What Im suggesting is that a small amount of vertical play in the extended 'no load' position may be quite acceptable.
Damn, this forum wont edit after 5 minutes! PIc is from Jimmy Macs thread & shows black upper nylon seats, I would imagine the lower ball joint would need to be removed from upright in order to replace without splitting or modification of the black nylon seats. ( 2 inners are lower ball joints ) Rather than center punch you could drill the hex head for lockwire, Dave M suggestion of Dremel rotary burr to remove center punch material will work. Once the hex nut is free you may be able to simply adjust/tighten. Use a single hex impact socket on the breaker bare to loosen/remove, in fact a socket placed on the hex & given a sharp clout with hammer may help break threads free for removal.
 

Attachments

  • attachment2LMTCVEQ.jpg
    attachment2LMTCVEQ.jpg
    51.1 KB · Views: 460
I would agree with JacMac that the actual ball of the joint has to be removed from the upright to replace the nylon cups. However don't do that until you have loosened the cap. I used a 16" extension to loosen my caps and a hammer blow may be necessary.
 

Markus

SPRF40
Lifetime Supporter
Hello Gentlemen,

Thanks for your responses - now I have something to do today.

@ Jim, I'm in the middle of the driving season - I have to try to adjust. Ordering parts from US will take some time from Europe

@ Jac Mac, yes Superformance setup is similar to original. Unfortunately the vertical play is more then just a bit...... and I will give a hit

@ Dave, so I will try to use some more force to break that cap loose and try to adjust the play......

Thanks again for that quick reply - this forum (and the members) is great.

Markus
 

JimmyMac

Lifetime Supporter
Damn, this forum wont edit after 5 minutes! PIc is from Jimmy Macs thread & shows black upper nylon seats, I would imagine the lower ball joint would need to be removed from upright in order to replace without splitting or modification of the black nylon seats. ( 2 inners are lower ball joints ) Rather than center punch you could drill the hex head for lockwire, Dave M suggestion of Dremel rotary burr to remove center punch material will work. Once the hex nut is free you may be able to simply adjust/tighten. Use a single hex impact socket on the breaker bare to loosen/remove, in fact a socket placed on the hex & given a sharp clout with hammer may help break threads free for removal.
Jac,
Those plastic cups of mine are made from graphite impregnated Nylon 66.6 which is pretty tough stuff but machines quite easily.
 

Markus

SPRF40
Lifetime Supporter
Here we go:

I'm done :)

The first side had heavy punch marks so I used a center drill to remove them - with a medium size extension I was able to adjust the cap (more than one turn necessary) - I did thigten them right away and did not try to get them out.
Lower Front Control Arm Ball Joint - center drilled.jpg

On the second side the punch marks have not been too big (no Actions taken here) - with a similar force I was able to adjust as well.

Thanks again.

This is most likely a temporary fix – now I need to see where to get those replacement ball joints – or to get extra lower a-arms like Jim suggested > they are quite corroded anyway – next winter is coming.

Lessons learnt?

We have a saying in Germany:

„Allmächtig ist des Schlossers Kraft wenn er mit Verlängerung schafft“

in English it’s somewhat like this:

“Almighty is the mechanic's power if he uses the extension bar”

or

“The power of the mechanic is almighty when he is using the extension bar”

Though it doesn't rhyme with English (English lessons are welcome)….

However there is the other one:

“Nach fest kommt ab”

“After tight comes off (broken off)”


Markus

SPRF40
Lifetime Supporter
Jac,
Those plastic cups of mine are made from graphite impregnated Nylon 66.6 which is pretty tough stuff but machines quite easily.

James,

I assume your ball joints are "original" type and won't fit Superformance uprights?

Markus
 

JimmyMac

Lifetime Supporter
Markus,
I couldn't say for sure as I have never seen the Superformance spec. but it all looks similar.
The original parts are measured imperial and maybe the SPF donor balls are metric ?.
 

Markus

SPRF40
Lifetime Supporter
From what I know it should be metric (I did not take measurement on the cup but the 17mm socket was correct), At least all chassis threads have been metrical so far....
May I ask where you got yours from?

Markus
 
Back
Top