

You are using an out of date browser. It may not display this or other websites correctly.
You should upgrade or use an alternative browser.
You should upgrade or use an alternative browser.
SteveB MDA MKII Build Diary
- Thread starter SteveBarker
- Start date
It’s time for an update.
Since getting the car on the road I have done over 1000 miles and took in the club AGM at Stoneleigh, Cholmondley Padgent of Power and the Oulton Park Gold Cup. All great events and a chance to meet up with fellow GT40 enthusiasts.
Every journey highlighted things that needed attention some were quite involved others easy to sort out. A number involved gaining extra inches. These are some of the mods.
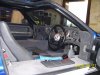
I am 6’ so I needed every bit of space by fixing the pedal box at the most foreward position also tilting the seat back and up at the front followed by sculpting the seat foam to lower my butt. This gained extra head and leg room. I still felt the steering wheel was a bit close, however checking steering column U/J’s the spline sections could be fitted deeper into the U/J. this gained an extra inch. I think that a non dished steering wheel will gain another inch. ‘Every little helps’!
I found the both the foot and hand brakes somewhat disappointing The handbrake was the Brembo type that I had to fit to pass the SVA, which it did ; however in general use it makes hillstarts in traffic either stressful or spectacular as the paddle clutch is quite savage. The HiSpec handbrake is very efficient due to its hydro/mechanical system. I will revert to the HiSpec item when I can find a pair of callipers.
The footbrake pedal effort was just too much for this pensioner!. I could not understand why it needed so much effort. The brake disks are 330mm with fourpot callipers 38.6mm dia pistons front and rear. The pedal ratio is 3:1 to mid pedal. I checked the mastercylinder size with HiSpec who suggested .625” front and .750” for the rear which is what are fitted. The pads are EBC green stuff and all the pistons operate correctly. The wheel size/tyres are 215-60x15 front and 295-50x15 rear. I expected this to be good but its not. I the end I fitted twin servos which has transformed the driving experience and has given a sense of confidence that it will stop on demand.
Suspension and steering have demanded attention. I had a local garage do a full computer/laser readout on the suspension and geometry front and rear. This highlighted odd caster and camber and toe settings. Starting from this data I adjusted the highlighted errors, this resulted in a much improved feel on the road.
On smooth roads things felt OK but sudden dips grates etc were bottoming the suspension. First checks that the ride height was right at 4” front and 4.5” rear, showed I had set it a little low, it looked great but speed humps were a problem plus the bottoming out on the front bump rubbers. Raising the ride helped but it still hit the bump rubbers. On further checking with the car on spacer ride height blocks and the springs removed it was clear there was little free movement. It turned out the shocks were 14 1/2” at full extent but there was only suspension droop to 13” so I could fit a shorter shocker that was also shorter in the body that then gave extra movement to bump rubbers. Proteck were very helpful and supplied a pair at 12 1/2”
I fitted these and road tested again; much improved but I was surprised that the potholes now made a solid knock. What had happened was that as I provided more travel and lifted the car on the spring seats, the springs could go coil bound. Changing the shocks settings made no difference.
Spring rates!!! ??? I asked other owners and searched a lot and ended up very confused. The calcs went past my math skills. I bought and read the Allan Staniforth ‘Competition Car Suspension’ an excellent book that has enhanced my basic knowledge. But what spring rate?
In the end I started from what I had, I knew the amount of compression on each spring to get the car to sit at ‘ride height’ from the available spring seat position I selected a spring that would end up at ride height with only slight pre tension. This changed the springs from 275 lb 8” front and 350 lb 10” rear to 425 lb 8” front and 500lb 10.5” rear. In the end I needed a 15 lb helper to hold the rears at full droop.
A run round my now regular moorland road route shows the car is properly ‘suspended’ and much more fun to drive.
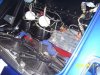
The exhaust developed a persistent rattle, it turned out to be the silencer stuffing that had formed a solid lump that was bumping about like beans in a pair of maracas. The silencers were all welded so I cut some holes to allow them to be repacked
I have fitted number circles and some decals also the number lights as dummies. Also have made and fitted made some Dzus tabs for the nostril panel.
Here are a few pics
Steve
Since getting the car on the road I have done over 1000 miles and took in the club AGM at Stoneleigh, Cholmondley Padgent of Power and the Oulton Park Gold Cup. All great events and a chance to meet up with fellow GT40 enthusiasts.
Every journey highlighted things that needed attention some were quite involved others easy to sort out. A number involved gaining extra inches. These are some of the mods.
I am 6’ so I needed every bit of space by fixing the pedal box at the most foreward position also tilting the seat back and up at the front followed by sculpting the seat foam to lower my butt. This gained extra head and leg room. I still felt the steering wheel was a bit close, however checking steering column U/J’s the spline sections could be fitted deeper into the U/J. this gained an extra inch. I think that a non dished steering wheel will gain another inch. ‘Every little helps’!
I found the both the foot and hand brakes somewhat disappointing The handbrake was the Brembo type that I had to fit to pass the SVA, which it did ; however in general use it makes hillstarts in traffic either stressful or spectacular as the paddle clutch is quite savage. The HiSpec handbrake is very efficient due to its hydro/mechanical system. I will revert to the HiSpec item when I can find a pair of callipers.
The footbrake pedal effort was just too much for this pensioner!. I could not understand why it needed so much effort. The brake disks are 330mm with fourpot callipers 38.6mm dia pistons front and rear. The pedal ratio is 3:1 to mid pedal. I checked the mastercylinder size with HiSpec who suggested .625” front and .750” for the rear which is what are fitted. The pads are EBC green stuff and all the pistons operate correctly. The wheel size/tyres are 215-60x15 front and 295-50x15 rear. I expected this to be good but its not. I the end I fitted twin servos which has transformed the driving experience and has given a sense of confidence that it will stop on demand.
Suspension and steering have demanded attention. I had a local garage do a full computer/laser readout on the suspension and geometry front and rear. This highlighted odd caster and camber and toe settings. Starting from this data I adjusted the highlighted errors, this resulted in a much improved feel on the road.
On smooth roads things felt OK but sudden dips grates etc were bottoming the suspension. First checks that the ride height was right at 4” front and 4.5” rear, showed I had set it a little low, it looked great but speed humps were a problem plus the bottoming out on the front bump rubbers. Raising the ride helped but it still hit the bump rubbers. On further checking with the car on spacer ride height blocks and the springs removed it was clear there was little free movement. It turned out the shocks were 14 1/2” at full extent but there was only suspension droop to 13” so I could fit a shorter shocker that was also shorter in the body that then gave extra movement to bump rubbers. Proteck were very helpful and supplied a pair at 12 1/2”
I fitted these and road tested again; much improved but I was surprised that the potholes now made a solid knock. What had happened was that as I provided more travel and lifted the car on the spring seats, the springs could go coil bound. Changing the shocks settings made no difference.
Spring rates!!! ??? I asked other owners and searched a lot and ended up very confused. The calcs went past my math skills. I bought and read the Allan Staniforth ‘Competition Car Suspension’ an excellent book that has enhanced my basic knowledge. But what spring rate?
In the end I started from what I had, I knew the amount of compression on each spring to get the car to sit at ‘ride height’ from the available spring seat position I selected a spring that would end up at ride height with only slight pre tension. This changed the springs from 275 lb 8” front and 350 lb 10” rear to 425 lb 8” front and 500lb 10.5” rear. In the end I needed a 15 lb helper to hold the rears at full droop.
A run round my now regular moorland road route shows the car is properly ‘suspended’ and much more fun to drive.
The exhaust developed a persistent rattle, it turned out to be the silencer stuffing that had formed a solid lump that was bumping about like beans in a pair of maracas. The silencers were all welded so I cut some holes to allow them to be repacked
I have fitted number circles and some decals also the number lights as dummies. Also have made and fitted made some Dzus tabs for the nostril panel.
Here are a few pics
Steve
Attachments
A New Year and decade so here is an update.
We have been out and about a bit since the last post, still smiling !!
I took the car to the NEC Classic car show, what a good event: the car was on the Enthusiasts Club stand. There as a good display with a MkI in silver ; my MkII a Gulf colours Mirage and a black MkIII . I lost count of the sit in photo shots!
The brakes were much improved by fitting the servos so the drive each way was quite relaxed, though I still felt that brakes could still be improved. The exhaust rattles returned again especially at low revs; on return I found that #3 exhaust had come loose…again. I had talked with lots of 40 builders during the exhibition so had some options to try.
Brakes first. I had HiSpec four pot front brakes and thought that I could do with extra piston area to improve the brake effort. This could have been some new four pots with larger pistons or try to find some six pots that would fit inside the 15” wheels. In the end I found a pair of HiSpec ‘Monster SixPot’ callipers that gave about 30% more piston area and pads. After lots of temporary mounting and measuring I established the dimensions for the calliper mounting brackets and machined up a pair from billet and had them anodised black to match the callipers. I was not convinced there would be clearance for the stick-on wheel balance weights, in the end there was about 10mm clearance at the calliper. I need some track time to get the brake bias just right.
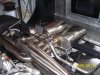
Taking the exhaust was next. I stripped the whole system after noticing that some of the pipes ran very close to each other and were chafing due to harmonic resonance. In fact when removed there were clear rub marks. I tried some twisting and bending without success; so re assembled the system and identified where extra pipe was needed or where a bit removed would result in greater clearance to avoid the pipes chattering.
I decided to replace the manifold bots with the 12point ARP type that allowed a better tightening grip. I also cut individual gaskets out of some specialist packing sheet. It is a three layer material about 1.5mm thick with a thin bronze sheet between two layers of the graphite sheet.
I refitted the system after the pipe adjustments. A major improvement even the engine efi ran smoother due to the better seal!! However in the new relative quietness yet another vibration could now be heard in the silencers. Oh deep joy.
After lots of poking and prodding it was clearly inside the box itself so off it came again. I removed the stuffing and eventually found that when the silencer was built the perforated tube is pushed into the case from the back , the front of the perf pipe is a push fit into the collector end. The rear is welded up to complete the silencer box. What had happened was the perf tube was not a tight fit in the collector end and was vibrating. I could just get the MIG torch in from the open collector end and tack the perf pipe into place.
It all sounds much smoother, the harsh tick over and low revs noised have gone. As soon as the snow and salt go a test drive is in order.
I am getting ready for the Le Mans Classic in good time.
Steve
We have been out and about a bit since the last post, still smiling !!
I took the car to the NEC Classic car show, what a good event: the car was on the Enthusiasts Club stand. There as a good display with a MkI in silver ; my MkII a Gulf colours Mirage and a black MkIII . I lost count of the sit in photo shots!
The brakes were much improved by fitting the servos so the drive each way was quite relaxed, though I still felt that brakes could still be improved. The exhaust rattles returned again especially at low revs; on return I found that #3 exhaust had come loose…again. I had talked with lots of 40 builders during the exhibition so had some options to try.
Brakes first. I had HiSpec four pot front brakes and thought that I could do with extra piston area to improve the brake effort. This could have been some new four pots with larger pistons or try to find some six pots that would fit inside the 15” wheels. In the end I found a pair of HiSpec ‘Monster SixPot’ callipers that gave about 30% more piston area and pads. After lots of temporary mounting and measuring I established the dimensions for the calliper mounting brackets and machined up a pair from billet and had them anodised black to match the callipers. I was not convinced there would be clearance for the stick-on wheel balance weights, in the end there was about 10mm clearance at the calliper. I need some track time to get the brake bias just right.
Taking the exhaust was next. I stripped the whole system after noticing that some of the pipes ran very close to each other and were chafing due to harmonic resonance. In fact when removed there were clear rub marks. I tried some twisting and bending without success; so re assembled the system and identified where extra pipe was needed or where a bit removed would result in greater clearance to avoid the pipes chattering.
I decided to replace the manifold bots with the 12point ARP type that allowed a better tightening grip. I also cut individual gaskets out of some specialist packing sheet. It is a three layer material about 1.5mm thick with a thin bronze sheet between two layers of the graphite sheet.
I refitted the system after the pipe adjustments. A major improvement even the engine efi ran smoother due to the better seal!! However in the new relative quietness yet another vibration could now be heard in the silencers. Oh deep joy.
After lots of poking and prodding it was clearly inside the box itself so off it came again. I removed the stuffing and eventually found that when the silencer was built the perforated tube is pushed into the case from the back , the front of the perf pipe is a push fit into the collector end. The rear is welded up to complete the silencer box. What had happened was the perf tube was not a tight fit in the collector end and was vibrating. I could just get the MIG torch in from the open collector end and tack the perf pipe into place.
It all sounds much smoother, the harsh tick over and low revs noised have gone. As soon as the snow and salt go a test drive is in order.
I am getting ready for the Le Mans Classic in good time.
Steve
Attachments

It's taken till Febuary to get a break in the weather where the roads are free of what little salt our local authority have been spreading.
The drive to checkout the new six pot brakes has given a reassuring result. There is some work to do in fine tuning the bias, but the the brakes now feel very reassuring and positive.
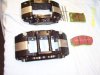
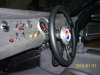
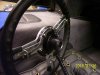
In general driving I have found the need for a headlamp flasher and missed having an intermittent wiper. At night I was too late reaching the headlight switch for a quick flash signal.
I have made up a set of switches behind the steering wheel for main beam flash, wiper single stroke and washers. The wheel is removable so there is a curly cord and plug. It is all wired via relays to allow low current loads and prevent back feed to other systems.
It all works pretty well, here are some pics of the layout
Steve
The drive to checkout the new six pot brakes has given a reassuring result. There is some work to do in fine tuning the bias, but the the brakes now feel very reassuring and positive.
In general driving I have found the need for a headlamp flasher and missed having an intermittent wiper. At night I was too late reaching the headlight switch for a quick flash signal.
I have made up a set of switches behind the steering wheel for main beam flash, wiper single stroke and washers. The wheel is removable so there is a curly cord and plug. It is all wired via relays to allow low current loads and prevent back feed to other systems.
It all works pretty well, here are some pics of the layout
Steve
Attachments
Brett James-McCall
Moderator
Nice Steve!
On the intermittent wiper, just an FYI, I am going to copy Geoff Gear's idea, where he used an old Rover rotary wiper switch that incoprated 2 speed, intermittent and push for wash. The intermittent used a Skoda relay for the timing.
Like your idea on the flash!
On the intermittent wiper, just an FYI, I am going to copy Geoff Gear's idea, where he used an old Rover rotary wiper switch that incoprated 2 speed, intermittent and push for wash. The intermittent used a Skoda relay for the timing.
Like your idea on the flash!
Hi Steve
Thanks for that. I am not sure what is happening but i have set a new email [email protected] tiscali has been letting me down for months so moved to BT
Many thanks for your time and patience.
Richard
Thanks for that. I am not sure what is happening but i have set a new email [email protected] tiscali has been letting me down for months so moved to BT
Many thanks for your time and patience.
Richard
It’s a while since I posted any updates so here are the ups and downs of 2010. The upgrades I made to the brakes and suspension worked great on the road the real test would be some trackdays. This resulted in of the best days driving but also a new list of things to do.
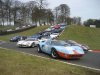
The first track event was a day at Cadwell Park for the Total Kit Car photo shoot. There were sixteen 40’s and after lots of photographic shots and positioning we were let loose on the circuit. What an experience; lots of trepidation, excitement and the challenge of the somewhat tight Cadwell circuit. Some tuition was gratefully received. I enjoyed myself so much I booked for an open pit-lane track day at the next available Cadwell day. This provided some track experience as I was booked for the Le Mans Classis track time organised by the Enthusiasts Club.
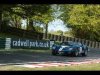
What can I say. The Classic was fabulous, the drive there, the atmosphere the heat! The experience of anticipating then setting out onto the Le Mans track as the light faded to dusk was the fulfilment of the years building the car.
All too soon it was time to head for home. The journey to the ferry raised some issues of which more later, we had an expiring battery/alternator that coughed its last in the ferry port and we had to be towed onto the ferry.
The last track outing was to the Oulton Park ‘Tour Brittania’ event where we had the track in the morning sun before the classic competitors arrived to go for it in torrential rain.
Driving the car over a couple of thousand miles has raised a list of things that needed to be addressed to improve the driveability of the car. Some showed up in the heat of the Le Mans journey others just niggles. In no particular order:-
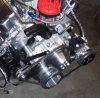
It turned out on the return from Le Mans that a loose internal connection in the alternator was the problem and easily fixed; however when running with lots of electric loads the alternator was always prone to belt slip unless the belt was very tight, so tight I was concerned for the life of the water pump and alternator bearings. My fix for this was to swap the drive belts that had one for the a/c and a second driving the water pump and alternator to a new layout, one belt to solely drive the alternator via a slightly larger pulley and the second belt the w/p and a/c. This has given 45 degrees of extra wrap on the alternator pulley.
The clutch, a ceramic paddle unit has always been heavy savage and prone to judder so I resolved to change it to an organic unit more suited to road use and occasional track days. So the engine may as well come out as well, this allowed me to check the balance as there have been some vibration related problems with stress cracks on the exhaust mounting brackets. It turned out there was a 30+ gram out of balance, hopefully correcting this will be an improvement.
The ZF box has always had quite heavy bias across the shift gate, some changes to the spring rates on the selector shaft and an oil bypass at the blind end housing have made the whole thing easier. So much effort was applied to overcome the spring bias that it loaded whole rod linkage causing more resistance to the shift to engage the next gear particularly the 4-5. When the gearbox is inverted the selector shaft is submerged so the selector shaft end housing fills with oil, when the shaft moves across the gate oil has to be displaced. There is a groove to allow this however the spring presses its retaining washer against the face of the bearing housing covering the groove so the escaping oil has to force its way past: an additional exterior bypass has reduced the effort required.
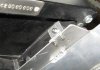
The ali radiator has had a slight leak for some time that has been controlled using leak seal in the coolant. Taking the opportunity of the off-road period I called at the manufacturers to get it checked out, unfortunately when checked with air pressure and the rad under water there was a cracked tube in the core in each outer corner. This is believed to be caused by stress fatigue due to the rad being too rigidly mounted. A new one is on the way but with extra stiffening corner gussets to cut the flexing. I will remake some very soft mounts for the new one and a nice foam cradle for it to rest in.
The headlights have always been a bit dim and when the darkness fell during the LeMans laps I promised myself an upgrade, I fitted the HID lamps from HID City: wow now there is light and it shines for miles!
Following a thread on the forum re roll-cages and a knock or two on the head I have fitted some good quality roll-cage padding just in case.
I eventually found a great guy to set up the efi Edelbrock system on his rolling road this improved the running but highlighted the exhaust backpressure was causing problems at low revs with the Comp cams( XE282HR).
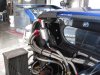
The silencers have been disembowelled and re piped inside and the internal baffles opened up to allow the whole silencer to be reshuffled from one end.
When everything is refitted a rerun on the rolling road for final set up is something to look forward to. John Sleath is a top bloke, he runs a road legal Audi at 7.68seconds for the ¼ mile
http://www.john-sleath.com/rolling%20road%20page.htm
This year I am looking forward to some more trackdays with the Club day at Donnington the first outing.
Steve
The first track event was a day at Cadwell Park for the Total Kit Car photo shoot. There were sixteen 40’s and after lots of photographic shots and positioning we were let loose on the circuit. What an experience; lots of trepidation, excitement and the challenge of the somewhat tight Cadwell circuit. Some tuition was gratefully received. I enjoyed myself so much I booked for an open pit-lane track day at the next available Cadwell day. This provided some track experience as I was booked for the Le Mans Classis track time organised by the Enthusiasts Club.
What can I say. The Classic was fabulous, the drive there, the atmosphere the heat! The experience of anticipating then setting out onto the Le Mans track as the light faded to dusk was the fulfilment of the years building the car.
All too soon it was time to head for home. The journey to the ferry raised some issues of which more later, we had an expiring battery/alternator that coughed its last in the ferry port and we had to be towed onto the ferry.
The last track outing was to the Oulton Park ‘Tour Brittania’ event where we had the track in the morning sun before the classic competitors arrived to go for it in torrential rain.
Driving the car over a couple of thousand miles has raised a list of things that needed to be addressed to improve the driveability of the car. Some showed up in the heat of the Le Mans journey others just niggles. In no particular order:-
It turned out on the return from Le Mans that a loose internal connection in the alternator was the problem and easily fixed; however when running with lots of electric loads the alternator was always prone to belt slip unless the belt was very tight, so tight I was concerned for the life of the water pump and alternator bearings. My fix for this was to swap the drive belts that had one for the a/c and a second driving the water pump and alternator to a new layout, one belt to solely drive the alternator via a slightly larger pulley and the second belt the w/p and a/c. This has given 45 degrees of extra wrap on the alternator pulley.
The clutch, a ceramic paddle unit has always been heavy savage and prone to judder so I resolved to change it to an organic unit more suited to road use and occasional track days. So the engine may as well come out as well, this allowed me to check the balance as there have been some vibration related problems with stress cracks on the exhaust mounting brackets. It turned out there was a 30+ gram out of balance, hopefully correcting this will be an improvement.
The ZF box has always had quite heavy bias across the shift gate, some changes to the spring rates on the selector shaft and an oil bypass at the blind end housing have made the whole thing easier. So much effort was applied to overcome the spring bias that it loaded whole rod linkage causing more resistance to the shift to engage the next gear particularly the 4-5. When the gearbox is inverted the selector shaft is submerged so the selector shaft end housing fills with oil, when the shaft moves across the gate oil has to be displaced. There is a groove to allow this however the spring presses its retaining washer against the face of the bearing housing covering the groove so the escaping oil has to force its way past: an additional exterior bypass has reduced the effort required.
The ali radiator has had a slight leak for some time that has been controlled using leak seal in the coolant. Taking the opportunity of the off-road period I called at the manufacturers to get it checked out, unfortunately when checked with air pressure and the rad under water there was a cracked tube in the core in each outer corner. This is believed to be caused by stress fatigue due to the rad being too rigidly mounted. A new one is on the way but with extra stiffening corner gussets to cut the flexing. I will remake some very soft mounts for the new one and a nice foam cradle for it to rest in.
The headlights have always been a bit dim and when the darkness fell during the LeMans laps I promised myself an upgrade, I fitted the HID lamps from HID City: wow now there is light and it shines for miles!
Following a thread on the forum re roll-cages and a knock or two on the head I have fitted some good quality roll-cage padding just in case.
I eventually found a great guy to set up the efi Edelbrock system on his rolling road this improved the running but highlighted the exhaust backpressure was causing problems at low revs with the Comp cams( XE282HR).
The silencers have been disembowelled and re piped inside and the internal baffles opened up to allow the whole silencer to be reshuffled from one end.
When everything is refitted a rerun on the rolling road for final set up is something to look forward to. John Sleath is a top bloke, he runs a road legal Audi at 7.68seconds for the ¼ mile
http://www.john-sleath.com/rolling%20road%20page.htm
This year I am looking forward to some more trackdays with the Club day at Donnington the first outing.
Steve
Attachments
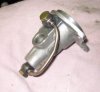
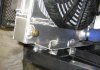
I have just been in touch with Docking the radiator makers. My new item was due to dispatch so I discussed the issues with the mounting and factors causing the stress fractures.
The advice is to keep the mounting minimal and soft so I will use the very light vibration insulators perhaps only one each side at the top and seat the rad on a foam tape bed. The hoses should keep things in place at the bottom
The other thing was to ensure the rad can not be on compression due to expansion as this can load up the core and amplify the stress loading. Ali rads expand quite a lot from cold to max temp.
Basically the rad must not be allowed to flex. However to strengthen my new item Docking are putting a corner gusset in all the outer corners and have also made the new one 10mm narrower to make some clearance for expansion.
As a matter of interest my car has the MkII front clip mounting on bobbins mounted on the sides of the frames the rad is fitted to, rather than the hinging type mount that pivot on the front low chassis extensions. This may be a factor in my case.
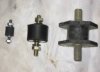
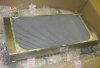
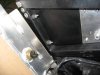
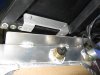
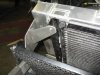
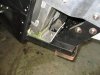
I have done the reinstall of the radiator. It was pretty straight forward.
There is a pic of the mount option,s I used the lightest with m4 studs; the mid item is the Facet fuelpump mount.
The rad now sits on a foam tape bed
When installed I can still move the rad up and down and a little side to side before the rubber and foam beds firmed up, I think that if you can't it is probably too firmly fixed.
Steve
The advice is to keep the mounting minimal and soft so I will use the very light vibration insulators perhaps only one each side at the top and seat the rad on a foam tape bed. The hoses should keep things in place at the bottom
The other thing was to ensure the rad can not be on compression due to expansion as this can load up the core and amplify the stress loading. Ali rads expand quite a lot from cold to max temp.
Basically the rad must not be allowed to flex. However to strengthen my new item Docking are putting a corner gusset in all the outer corners and have also made the new one 10mm narrower to make some clearance for expansion.
As a matter of interest my car has the MkII front clip mounting on bobbins mounted on the sides of the frames the rad is fitted to, rather than the hinging type mount that pivot on the front low chassis extensions. This may be a factor in my case.
I have done the reinstall of the radiator. It was pretty straight forward.
There is a pic of the mount option,s I used the lightest with m4 studs; the mid item is the Facet fuelpump mount.
The rad now sits on a foam tape bed
When installed I can still move the rad up and down and a little side to side before the rubber and foam beds firmed up, I think that if you can't it is probably too firmly fixed.
Steve
Attachments
Hi, It must be time for an update on the car and activities.
Early season preparation went well and I was ready for the first outing to the GT40 Enthusiasts Club trackday and AGM at Donnington circuit. This turned out to be a great day, there were more GT40s than I have seen in one place since the LeMans Classic, I had as much tracktime as I could cope with and track introduction from Dr John.
The car ran well apart from a nonstarting problem that was tracked down to a slack starter solenoid terminal. John Hayman editor of the online track mag Trackdriver took the car out to evaluate what GT40’s are like as a trackday drive, he appeared to like how the car performed. The video is here:-
http://vimeo.com/22904572
Every time I press the car hard something usualy shows up, this time the brakes which have EBC green pads began to fade after several laps in the hands of a regular trackdriving pilot. The speeds he cornered showed up that the rear tyres could be pushed over until the inside tread rubbed the suspension. More on fixing this later.
The following weekend I entered the Manx Classic on the Isle of Man, three days hillclimbing on sections of the Manx TT coarse. Very enjoyable in the company of Mike Pass, Martin Gough and John Bate; I believe there is a Trophy for the fastest GT40 up the hillclimb at Llerghi Frissel, Martin was the last winner but has yet to see the silverware; it turned out that due to Martin having a cam follower problem I ended up with the fastest time. I won’t hold my breath for the Trophy!!
A great event, we hope for more 40’s next year
The list of jobs had some more additions as the sprint starts showed up the clutch was slipping also the marshals were concerned about the exhaust showing intermittent dark smoke. There were no indications from the way it ran what the problem was. We drove home no problem.
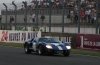
The next trip out was the ‘Octane’ magazine track day at Goodwood. Another great day the sun shone and as there were only 25-30 cars attending the track was clear with as much time as you wish. There were two other GT40’s both Southern GT’s Glen Mason,s very powerful and sorted was on track and very quick!
The bonus was that Mark Hales was available to help and guide me on track and evaluate how the car went. I was keen to have his feedback which was quite favourable. He offered to take me round in my car …. What an experience the car behaved impeccably taking lots of curb without any twitching or darting, full power drifts, corners taken flat without a hint of lift and well over 140mph approaching Goddards. Mark realy is a top bloke, he spent lots of time going through the handling with me. I know now what it can do!
Mark gave me some setup tips and showed me how to get the pedals better aligned to allow ‘heel & toe. The smoke issue was raised again by the marshals, they suspected the oil was too high and were concerned it could escape onto the track; it turned out in fact to be low and the engine had used lots of oil when driven hard. The day also highlighted the need to revisit the gear shift setup.
So we have had lots of fun, here are the various fixes.
The clutch had lost all the clearance and I could not get any more adjustment, so, out with the gearbox. The ZF release and bearing unit were back against the case, however the AP clutch had a bearing face like you would have when using a carbon thrust bearing. The pressureplate I have comes with or without this bearing attached to the diaphragm spring fingers and is not needed with a ballrace type release unit. Some careful work with a fine cutting blade and heypresto we have clearance and lots of bite now it’s back in.
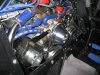
The oil issue turned out to be the crankcase ventilation system. The engine is a Ford Racing crate unit so I had assumed wrongly that I would not need to modify things. I run with a PCV as supplied, however I had previously had an issue with oil seeping out of the rocker cover vent and had fitted a baffle plate behind it to stop the rockers throwing oil at the vent and solved the seepage. Anyway it transpired that the rockercover with the PCV also had no baffle behind it and worse it was at the front of the engine so when the engine was on braking and overrun the oil went forward and the valves and rockers sprayed it directly into the PCV on full suck, that explained the oil consumption and smoke.
I searched through the site, there appear to be two schools on this; Use a PCV and positively ventilate the engine or vent it to a catch tank. I decided on balance the PCV gets rid of more of the products of combustion so revised my system. After fitting baffles in the rockercovers I made a separator that takes in a hose from each side in the form of a swirl pot and fitted the PCV into the top and piped that back to the EFI air / throttle body. In the bottom of the swirlpot I fitted a one-way valve and piped it back to the rocker cover to return separated oil back to the engine. There are some pics, I need to decide on whether to fit an air in filtercap.
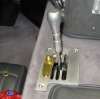
I spent some time re aligning the gear shift and abandoned the gaiter for a more positive ‘H’ gate with a reverse lockout and again tweaked the bias on the selector cross shaft. This must be one of the trickiest jobs on the car, but it does feel better (again)
I had some further thoughts on the Radiator issue and came to the conclusion that the aircon rad hanging on the ally rad could not be a good idea so I have made independent mounting for the aircon rad to relieve any load on the rad frame.
The tyre rubbing issue probably came from meeting the SVA need to have the rims inside the body plan. The 295 x 15 rears were a bit short on rim width so I decided to fit some wider outer rims to draw the tyre over. I had also damaged a front inner rim on a speed hump in France so I sent them all to Image who have rebuilt them wider at the rear and fixed the bent rim at the front. I couldn’t resist going a bit more MkII and had the rims anodised gold, a bit bling but I am getting used to them now.
There is other stuff I have missed but that’s the picture; Ford are having special displays in the dealerships as it’s 100 years and the local dealer asked to include my car so that’s the next outing.
Steve
Early season preparation went well and I was ready for the first outing to the GT40 Enthusiasts Club trackday and AGM at Donnington circuit. This turned out to be a great day, there were more GT40s than I have seen in one place since the LeMans Classic, I had as much tracktime as I could cope with and track introduction from Dr John.
The car ran well apart from a nonstarting problem that was tracked down to a slack starter solenoid terminal. John Hayman editor of the online track mag Trackdriver took the car out to evaluate what GT40’s are like as a trackday drive, he appeared to like how the car performed. The video is here:-
http://vimeo.com/22904572
Every time I press the car hard something usualy shows up, this time the brakes which have EBC green pads began to fade after several laps in the hands of a regular trackdriving pilot. The speeds he cornered showed up that the rear tyres could be pushed over until the inside tread rubbed the suspension. More on fixing this later.
The following weekend I entered the Manx Classic on the Isle of Man, three days hillclimbing on sections of the Manx TT coarse. Very enjoyable in the company of Mike Pass, Martin Gough and John Bate; I believe there is a Trophy for the fastest GT40 up the hillclimb at Llerghi Frissel, Martin was the last winner but has yet to see the silverware; it turned out that due to Martin having a cam follower problem I ended up with the fastest time. I won’t hold my breath for the Trophy!!
A great event, we hope for more 40’s next year
The list of jobs had some more additions as the sprint starts showed up the clutch was slipping also the marshals were concerned about the exhaust showing intermittent dark smoke. There were no indications from the way it ran what the problem was. We drove home no problem.
The next trip out was the ‘Octane’ magazine track day at Goodwood. Another great day the sun shone and as there were only 25-30 cars attending the track was clear with as much time as you wish. There were two other GT40’s both Southern GT’s Glen Mason,s very powerful and sorted was on track and very quick!
The bonus was that Mark Hales was available to help and guide me on track and evaluate how the car went. I was keen to have his feedback which was quite favourable. He offered to take me round in my car …. What an experience the car behaved impeccably taking lots of curb without any twitching or darting, full power drifts, corners taken flat without a hint of lift and well over 140mph approaching Goddards. Mark realy is a top bloke, he spent lots of time going through the handling with me. I know now what it can do!
Mark gave me some setup tips and showed me how to get the pedals better aligned to allow ‘heel & toe. The smoke issue was raised again by the marshals, they suspected the oil was too high and were concerned it could escape onto the track; it turned out in fact to be low and the engine had used lots of oil when driven hard. The day also highlighted the need to revisit the gear shift setup.
So we have had lots of fun, here are the various fixes.
The clutch had lost all the clearance and I could not get any more adjustment, so, out with the gearbox. The ZF release and bearing unit were back against the case, however the AP clutch had a bearing face like you would have when using a carbon thrust bearing. The pressureplate I have comes with or without this bearing attached to the diaphragm spring fingers and is not needed with a ballrace type release unit. Some careful work with a fine cutting blade and heypresto we have clearance and lots of bite now it’s back in.
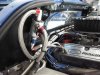
The oil issue turned out to be the crankcase ventilation system. The engine is a Ford Racing crate unit so I had assumed wrongly that I would not need to modify things. I run with a PCV as supplied, however I had previously had an issue with oil seeping out of the rocker cover vent and had fitted a baffle plate behind it to stop the rockers throwing oil at the vent and solved the seepage. Anyway it transpired that the rockercover with the PCV also had no baffle behind it and worse it was at the front of the engine so when the engine was on braking and overrun the oil went forward and the valves and rockers sprayed it directly into the PCV on full suck, that explained the oil consumption and smoke.
I searched through the site, there appear to be two schools on this; Use a PCV and positively ventilate the engine or vent it to a catch tank. I decided on balance the PCV gets rid of more of the products of combustion so revised my system. After fitting baffles in the rockercovers I made a separator that takes in a hose from each side in the form of a swirl pot and fitted the PCV into the top and piped that back to the EFI air / throttle body. In the bottom of the swirlpot I fitted a one-way valve and piped it back to the rocker cover to return separated oil back to the engine. There are some pics, I need to decide on whether to fit an air in filtercap.
I spent some time re aligning the gear shift and abandoned the gaiter for a more positive ‘H’ gate with a reverse lockout and again tweaked the bias on the selector cross shaft. This must be one of the trickiest jobs on the car, but it does feel better (again)
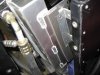
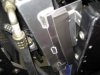
I had some further thoughts on the Radiator issue and came to the conclusion that the aircon rad hanging on the ally rad could not be a good idea so I have made independent mounting for the aircon rad to relieve any load on the rad frame.
The tyre rubbing issue probably came from meeting the SVA need to have the rims inside the body plan. The 295 x 15 rears were a bit short on rim width so I decided to fit some wider outer rims to draw the tyre over. I had also damaged a front inner rim on a speed hump in France so I sent them all to Image who have rebuilt them wider at the rear and fixed the bent rim at the front. I couldn’t resist going a bit more MkII and had the rims anodised gold, a bit bling but I am getting used to them now.
There is other stuff I have missed but that’s the picture; Ford are having special displays in the dealerships as it’s 100 years and the local dealer asked to include my car so that’s the next outing.
Steve
Attachments
-
 IMG_0300LR.jpg74 KB · Views: 580
 -
 IMG_0299LR.jpg73.3 KB · Views: 536
 -
 Gold wheel LR.jpg67 KB · Views: 559
 -
 Gear shift gate LR.jpg30.1 KB · Views: 637
 -
 Rad top soft mount LR.jpg25.1 KB · Views: 555
 -
 AC Rad top mount LR.jpg29.6 KB · Views: 546
 -
 AC Rad top mount LH LR.jpg36.7 KB · Views: 575
 -
 AC and Rad lower LR.jpg26.6 KB · Views: 541
Steve - Sorry to bear bad news but PCV's on competition engines are typically not a good idea unless you have full assurance that no oil vapor will be introduced into the intake tract. Oil vapor in the intake will reduce your effective octane rating of the fuel, introducing not only detonation but potential fouling of the plugs and carbon build-up on the rings and valves..
Brian Magee
Supporter
Try again Steve, Gerrards is the long sweeping first bend at Mallory Park.
Brian.
Brian.
Adrian Starling
Supporter
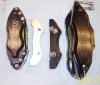
Hi Steve, your seats look really good! I am being very cheeky, could I possibly get/buy a copy of your patterns If you still have them? I am at the same place and want to build my seats myself. Kind regards, AdrianChris , Andy
Thanks for your comments.
The frames are in 3mm ali.
Because my engine gearbox combination is very low and forward there is a bigger bump than normal in the engine cover, so I had to amend the standard seat frame from MDA. I took the route to make a frame that will fit left or right seat and have a beveled sides to accomodate the 'bump'.
Mark at MDA loaned me a standard frame as a guide and I made a cardboard replica with the shaped sides then folded it flat for the patern.
Colours... The dash is grey Alcantara so the door pockets will be the same, carpet set will be the same shade of grey with edge bindings in the seat colour which will be a lighter grey leather in the MDA patern.
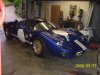
The car will be the Shelby Guardsman blue with the white stripes, hope it will be a good combination.
Anybody know the paint code / ref for the blue and white.
My long running saga to get the S.W fuel guage senders is resolved, the senders are fitted and work correctly
Chris, how do your painting masks and sticker sets work to get the look of the car in the picture of 1031 at the 1966 Le Mans that is in the book 'The Ford that beat Ferrari' page 116? ( if you have it).
Steve
Steve
Similar threads
- Replies
- 80
- Views
- 13K