Kurt H (hoffkm) SL-C build thread

Fenders look awesome! I'd love to see a SLC in a similar color

Del,

Sorry, you will not see my SL-C this color combo. While green is my wife's favorite color mine is red and always has been since growing up around my grandfather. He was the lead mechanic and Deshler Implement and we worked on many red International Harvester tractors together in his shop at home. I will never forget those times

It is funny though that both my 69 Camaro and my wife's 66 GTO were originally red from the factory but they are now different colors. My SL-C has to be RED!

I can't blame you. While I do like the color, not sure if I could commit to it for a whole car.
 
Sorry, but I simply have to share here.....RED is awesome. Check it out!

IMG_2561.JPG
IMG_2562.JPG
IMG_2569.JPG
 

Joel K

Supporter
Dan, your car looks great! I’ve never owned a red car and almost exclusively have had blue sports cars, but seriously considering going with this Alfa Romeo Metallic Red, IMO the SLC does look very good in red. The paint is called Alfa Rosa Competitione. With a name like that, the paint can’t be cheap!

A53D9749-9285-4363-94DD-A04655280D89.jpeg
 
Kurt.....FYI.

I moonlight at a body shop. We used PPG Deltron 1766 scarlet Red. That’s straight up red.....no other color additives. Fair warning about red....it’s one of if not the most expensive color and it takes a lot of coats to get the best coverage. I chose a simple formula in case it gets scratched/damaged it’s easier to blend during repair. Have fun selecting your Red.

Dan,

As of now (still time to change my mind) I plan to go with PPG #75250 which is Ferrari red, Rosso Corsa. It is the brightest, in your face (as if the SL-C needs any more attention grabbing stature) red I can find. The other red in contention is a little darker and that is Volkswagen Tornado Red. I like how deep of a red that mix is.
 
Headers are ready to be Cerakoted.

2020-02-03 19.45.30.jpg
2020-02-03 19.45.26.jpg


I painted my Tesla EPB calipers red using POR15 caliper paint. I have used this on other projects with good success. I plan to apply a Brembo logo to them this weekend followed by a coat of VHT caliper clear coat.

2020-02-06 19.28.01.jpg
2020-02-06 19.27.51.jpg


I have three coats of epoxy laid down on the carbon fiber cloth over the 3D printed coil covers. I will sand and clear coat them this weekend. I will follow that up by applying DEI Reflecta-Cool insulation to the bottom side to alleviate any question of the 3D printed ABS40plus material not holding up to the heat.

I now have a first hand appreciation for SoCal Cam's skills with carbon fiber skinning!

2020-02-06 19.28.25.jpg
2020-02-06 19.28.21.jpg


Cam,

Your build log and blog were both inspirational and informative for my carbon fiber skinning. Thank you!!
 

Attachments

  • 2020-02-05 21.09.31.jpg
    2020-02-05 21.09.31.jpg
    443.7 KB · Views: 278
I received the email from Vicki today that I have been waiting for. My car will be ready this week!! I am going to RCR to pick it up on Friday.

This week is going to drag on forever in anticipation of the big day.

Look for pictures this weekend or early next week.

In the mean time, here is some more progress in preparation for the car coming home.

2020-02-17 18.23.02.jpg


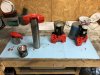
Skinned in carbon fiber, sanded, and clear coated.

2020-02-17 18.23.10.jpg


I covered the underside of the coil covers in DEI Reflecta Kool to keep the heat away from the 3D printed core and the epoxy on top of the carbon fiber fabric. They are clear coated with high temp engine paint clear coat.

2020-02-16 18.42.43.jpg


This side turned out pretty good, the drivers side has some spots where the carbon fabric floated in the epoxy and gave me some issues. If it looks too noticeable once the engine is in the car I will make a second attempt at skinning that side.

You can also see the Cerakoted header in the above picture. Both sides turned out very nice. I love the look and now plan to Cerakote the entire exhaust system including my mufflers which will be visible thru the back side of the rear clam (street tail). My mufflers are single 3" inlet with dual 2 1/2" outlets. I had planned to run chrome tips but love the Cerakote and the chrome tips would be the only chrome on the entire car. I do not think I would like that look so the plans change again.

2020-02-11 12.18.32.jpg


No more Tesla logo. Since this picture I have added Brembo logos and clear coated over them. (not sure why I did not take a pic of that and I am too tired to walk all the way out to my workshop now)

2020-02-05 20.00.43.jpg


Wired up the Holley system and connected everything to a battery to test the Holley CPU, my wiring, and all the sensors. Everything checks out and the engine is ready to be fired up!! Just need to finish setting up my base tune in the software.

2020-02-05 20.00.50.jpg


Test lights on the CPU do not show well in the pic but they are all the correct color!!
 
A big thank you to Fran, Bill, and all the guys at RCR today for their hospitality and assistance in loading up my SL-C today. There are a number of SL-C customer builds in process in the shop and Bill showed me a lot of good ideas for my build. Pictures as promised:

2020-02-20 17.09.18.jpg


Hooked up and ready to go.

2020-02-21 09.40.47.jpg


She was ready and waiting for me as I walked out into the shop.


2020-02-21 09.52.41.jpg

2020-02-21 09.53.00.jpg


The guys in the shop wasted not time loading her up into my trailer.

2020-02-21 13.33.05.jpg

2020-02-21 13.33.37.jpg


Then we packed my truck full of parts. The bed was filled with boxes.

2020-02-21 15.07.34.jpg


My pre-made bucks worked perfectly. The clams are in my trailer for storage along with most of the loose fiberglass parts since the GTO and Camaro are currently being stored for the winter in my shop.
2020-02-21 14.55.55.jpg


Threaded the needle to squeeze her by the Camaro and into the shop.

2020-02-21 17.06.37.jpg


It's like Christmas in February opening all the boxes and checking inventory. Almost done, I'll finish up tomorrow morning.
 
All the tape and residue has been removed. That job is definitely a rite of passage into SL-C ownership.

Applied DEI lava mat to the firewall and frame structure.

2020-02-22 14.12.12.jpg

2020-02-22 14.47.04.jpg


Assembled the pedals and steering wheel. It seems most change out the stock wheel for a custom one, I like the fact that the stock wheel says SL-C on it so I will use it for now at least.

2020-02-22 15.45.36.jpg

2020-02-22 15.46.00.jpg


And for a major feeling of accomplishment this weekend I dropped in the motor!!

2020-02-22 15.40.45.jpg

2020-02-23 11.16.18.jpg

2020-02-23 11.16.11.jpg


Today was the first trip of what I am certain will be many more to the hardware store for grade 8 fasteners to bolt the engine in. It is just resting on the mounts for now. It seems that the LS7 mounts sit a little higher on my LH6 block as the engine is not level in the chassis. It is sitting 2 degrees low in the front. This leaves me with less clearance at the top of the motor for my coolant tubes. A couple of 1/2" spacers on the front motor mount uprights will take care of that. Trigs out that 1/2" will bring it right to 0 degrees.

Everything fits easily in the engine bay. I was worried since I had built up my exhaust ahead of time without my chassis in hand to verify fitment. The tubes are about 1/8 from the rear motor mount bolts on both sides. That was close! That's a mile of clearance compared to how close the headers in my 69 Camaro are to the power steering gearbox. I can get a piece of poster board between them and that's about it!

Next week while my daughter is home from college for spring break we'll get the spider lifted off, the tub pulled out, and I'll start on the coolant tubes, wiring, etc. in preparation for first start of the engine.
 

Joel K

Supporter
Joel,

My goal is 5 hours to 20 hours per week. That is what I put into the GTO (that project took 4 years though).

My guess is you are a bit ambitious in thinking you can complete the build in a little over two years, but go for it! I am pulling for you!
 
My guess is you are a bit ambitious in thinking you can complete the build in a little over two years, but go for it! I am pulling for you!

Joel,

Your probably right but everyone has to have a goal. If it does go out past two years I won’t lose any sleep over it. Only time will tell.
 
Big congrats!! Especially getting all the tape glue off, definitely a right of passage. One of the few things I got to do on mine, lol. Allan told me a tip I wish I knew and even more so relayed to you, send RCR a couple rolls of easy to remove tape prior to shipping.

Man, what are the wheel and tire sizes? That tread pattern on the rear just looks sick!
 
Back
Top