

You are using an out of date browser. It may not display this or other websites correctly.
You should upgrade or use an alternative browser.
You should upgrade or use an alternative browser.
Rufus GT-R
- Thread starter rufusmathewsjr
- Start date
Congrats Rufus it must feel wonderful to get to drive the car even at low speed can’t wait to get there have a blast
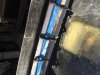
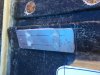
Rufus what size was the aluminum flat bar you used to bond to the hood it looks like 2 x 12 x 1/2 thick
1/2 x 1-1/2 x 10. The length will depend on the length of your hinge.
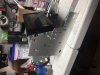
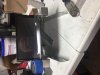
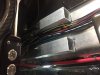
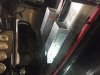
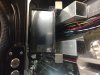
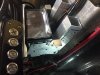
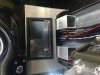
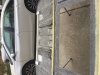
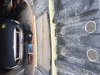
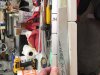
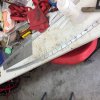
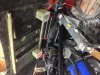
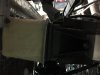
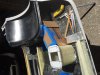
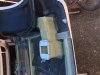
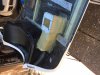
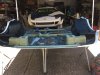
Been busy with my son's F150 Ecoboost truck. Finally back to the GT-R. Made brackets, mounts and trim pieces for the sound system. Continue with body fitment and body work. Front clam and hood are 90% worked and have started on the rear clam fitment. Installed a bow to put more arch in the the bottom portion of the rear window cavity so the glass from H fits much better. Pumped down and charged the A/C system yesterday and got nice ice cold air--20 degree drop across the coil--air ") )
)
)Attachments
-
 IMG_3158.JPG313.4 KB · Views: 477
 -
 IMG_3159.JPG297.9 KB · Views: 460
 -
 IMG_3160.JPG346.3 KB · Views: 438
 -
 IMG_3161.JPG346.5 KB · Views: 423
 -
 IMG_3162.JPG329.2 KB · Views: 443
 -
 IMG_3163.JPG374.6 KB · Views: 476
 -
 IMG_3164.JPG344.9 KB · Views: 442
 -
 IMG_3169.JPG409.6 KB · Views: 431
 -
 IMG_3226.JPG542.1 KB · Views: 427
 -
 IMG_3227.JPG530.9 KB · Views: 454
Rufus great minds think alike your position of your radio unit is exactly where I plan on going I am still fitting the 2016 Mustang Center console but jumped off to do the mods to the front hood
Rufus good morning what was the measurement from the front edge of the hood to the alum mount front edge it looks about two inches or so
Sorry for the hood hinge before you glued it in and I assume that is 3/4 plywood as a spacer
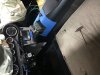
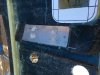
There is a half inch piece of aluminium bonded to the hood that brings the hinge slightly out to the edge of the fiberglass flange you made when you cut out the hood. I drilled and tapped the 1/2 " Al for mounting the hinge to the hood. I used the plywood to keep the Al pieces parallel to the flange not the air scoop side
EPowerSteering has a new website. He is extremely helpful and has great prices. Check him out if you are considering electric power steering. This is who I used.

 epowersteering.com
Store
Welcome to Our New Site! ePowerSteering has a new look! You have landed on the store, so if you want to get straight to business, go ahead and check out our new categories! All the same resources can be found on our
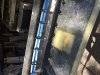
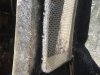
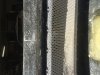
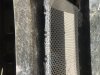
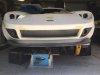
Made AL strips from 3/16 X 1" flat bar and bent it to fit on the back side of the front opening for the radiator bonded the strip to the top and bottom after drilling and tapping holes to 10/24 button head screws. These will hold the AL screen in place. Fit the screen and fastened it down. Oh by the way, I'm not using the brake scoops so I had to buildup the recess for the scoops so the screen would fit flush all the way around.
Attachments
-
 IMG_3289.JPG341.4 KB · Views: 356
 -
 IMG_3290.JPG332 KB · Views: 333
 -
 IMG_3291.JPG542.8 KB · Views: 334
 -
 IMG_3292.JPG561.6 KB · Views: 392
 -
 IMG_3297.JPG330.2 KB · Views: 335
 -
 IMG_3298.JPG459.4 KB · Views: 333
 -
 IMG_3299.JPG552.2 KB · Views: 324
 -
 IMG_3300.JPG560.1 KB · Views: 365
 -
 IMG_3301.JPG589.6 KB · Views: 376
 -
 IMG_3303.JPG346.3 KB · Views: 390
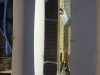
Next was to make the air intake tunnels that connect the upper clam scoops through the upper wheel well liner (from H) to the transitions. Made the transitions using a plastic container I found that worked perfectly. Bonded the wheel well liners to the rear clam after cutting holes for the air to pass through. Closed the clam and located the transitions on top of the stock Ford GT air cleaner and screwed them in place. Made cardboard patterns for the tunnels connection the wheel liner to the transitions. Made a mold to make the tunnel blanks then cut the tunnels to the patterns and bonded it all together.
Cut and bonded 3/16" AL plates to the clam where the lift struts attach to spread the load as not to distort the rear clam.
Cut and bonded 3/16" AL plates to the clam where the lift struts attach to spread the load as not to distort the rear clam.
Attachments
Rufus I sent you a PM please read
Michael Hampson
Supporter
That looks fantastic, Rufus!
Next was to make the air intake tunnels that connect the upper clam scoops through the upper wheel well liner (from H) to the transitions. Made the transitions using a plastic container I found that worked perfectly. Bonded the wheel well liners to the rear clam after cutting holes for the air to pass through. Closed the clam and located the transitions on top of the stock Ford GT air cleaner and screwed them in place. Made cardboard patterns for the tunnels connection the wheel liner to the transitions. Made a mold to make the tunnel blanks then cut the tunnels to the patterns and bonded it all together.
Cut and bonded 3/16" AL plates to the clam where the lift struts attach to spread the load as not to distort the rear clam.
Guys I've been doing some consulting work for the company I retired from. This has slowed down the project. I have been making progress slowly and have been working solely on body work and fit. I am very close to blowing the car apart and start primer and blocking. Will post photos once we start primer and using the blowup paint booth. I hope to have the car painted by Memorial day.
Rufus I know how you feel this work thing keeps getting in the way
I have come quite a ways on the car. It is painted and in final assembly except for the interior. Upholstery shop can not fit it in until March. I will try to do some updating this weekend if possible. Still working the consulting job and has slowed everything down. I fit the door windows and the headlight lenses last week. I had planded on tinting the side windows until I tried to get them tinted. The films will not adhere to the Lexan very well per multiply tinters. I checked the SLC forums and saw where 10 of the guys got together and got with Fran and ordered tinted Lexan windows for their SLC cars.
I contacted Fran and to get tinted windows for the GT-R, we need to place an order for 10 sets minimum. I have asked Fran for a quote and will post as soon as I receive it. If you are interested, start listing your name here and we will see if we can get to the magic number.
I contacted Fran and to get tinted windows for the GT-R, we need to place an order for 10 sets minimum. I have asked Fran for a quote and will post as soon as I receive it. If you are interested, start listing your name here and we will see if we can get to the magic number.
Michael Hampson
Supporter
Hey Rufus; I'd be interested in tinted windows!
Hi Rufus,
I am interested in the tinted side windows as well.
I am interested in the tinted side windows as well.
Hi Rufus,
I'm also interested in the tinted side windows.
I'm also interested in the tinted side windows.
Similar threads
- Replies
- 0
- Views
- 204