
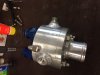
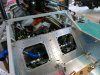
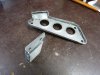
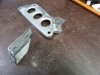
A few more of the thermostat housing, plus the swirl pot and then how it all fits in snuggly.

You are using an out of date browser. It may not display this or other websites correctly.
You should upgrade or use an alternative browser.
You should upgrade or use an alternative browser.
M6B Tragic
- Thread starter Udo Selter
- Start date


Have you guys seen the M8E Randy is building in the Lola T70 Lounge Forum ?
Looks really good, and he has a phone number there to a guy called Bill Mior that I'm assuming built his Tub, who has a M6 GT Tub and other parts for sale.
Why isn't it in this Forum?
Looks really good, and he has a phone number there to a guy called Bill Mior that I'm assuming built his Tub, who has a M6 GT Tub and other parts for sale.
Why isn't it in this Forum?
As always Udo your workmanship is outstanding. I'm still at it slowly but we have now had the engine running on the dyno and have a tune in it on Avgas, 685 ft-lbs @ 5500 and 700hp @ 7000 and it revs freely to 7500. Now assembling the trans and hope to get it in the car very soon. Keep up the good work, I'm still lurking around here. Cheers Leon.
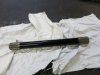
You might want to replace that wood dowel 1/2 shaft.
'Looks like it might be a bit too anemic for the job!
")
Thanks for the heads up Larry. I had second thoughts on that also, so I changed them to steel units.
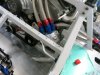
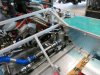
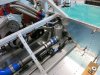
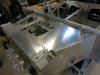
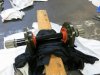
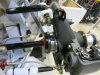
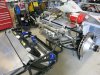
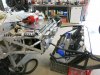
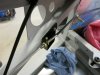
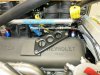
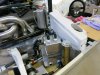
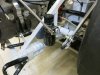
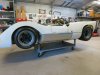
Here are some more progress shots as I chip away.
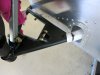
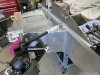
Putting the front panelling on permanently, Added a bracket to the front lower wishbone for the sway bar, sorting out the fuel pump, surge tank, more filters and lines and bolting the front sub frame back on.
Here are some more progress shots as I chip away.
Putting the front panelling on permanently, Added a bracket to the front lower wishbone for the sway bar, sorting out the fuel pump, surge tank, more filters and lines and bolting the front sub frame back on.
Attachments
-
 IMG_1902.JPG321.8 KB · Views: 387
 -
 IMG_1905.JPG225.7 KB · Views: 377
 -
 IMG_1907.JPG348.8 KB · Views: 412
 -
 IMG_1908.JPG438.8 KB · Views: 363
 -
 IMG_1910.JPG230.8 KB · Views: 394
 -
 IMG_1920.JPG276.7 KB · Views: 337
 -
 IMG_1914.JPG311 KB · Views: 399
 -
 IMG_1925.JPG333.3 KB · Views: 409
 -
 IMG_1932.JPG417.2 KB · Views: 413
 -
 IMG_1933.JPG390.1 KB · Views: 399
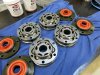
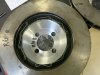
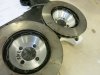
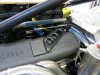
More progress. Lock wire on Disc Top hats, Throttle cable brackets, Expansion tank & overflow, Added a catch can to the Transaxle, and lock wired all the CV joints.
Attachments
-
 IMG_1939.JPG311.9 KB · Views: 355
 -
 IMG_1940.JPG268.7 KB · Views: 362
 -
 IMG_1943.JPG387.1 KB · Views: 358
 -
 IMG_1944.JPG374.6 KB · Views: 380
 -
 IMG_1946.JPG235.3 KB · Views: 356
 -
 IMG_1947.JPG311.2 KB · Views: 336
 -
 IMG_1948.JPG390.4 KB · Views: 343
 -
 IMG_1952.JPG303.6 KB · Views: 345
 -
 IMG_1982.JPG307.3 KB · Views: 378
 -
 IMG_1985.JPG295.9 KB · Views: 421
Hi Udo, looks awesome! Are those Porsche CVs? Where did you get those cover/boot assemblies for them - they look really slick.
Cheers, Andrew
Cheers, Andrew
Thanks Andrew, They are 115mm ( size 18 ) same as 934 Porsche. The dust covers are solid billet steel, anodized and the boots are 100% silicone.Hi Udo, looks awesome! Are those Porsche CVs? Where did you get those cover/boot assemblies for them - they look really slick.
Cheers, Andrew
Sourced from Vintage Engineering, California. Don't hold your breath waiting for an order from Ray. If you don't believe me, have a chat with Leon, I think he ended up cancelling an order for valve covers because he got sick of waiting and listening to excuses.
Anyway, love what you and Leon are doing with the M20's. It would be great to see both of them at the same event. I'd even come over if we can knock this China virus on the head.
Regards, Udo.
Anyway, love what you and Leon are doing with the M20's.....
Hi Udo, thanks for the info. By the way, I'd love to claim the M20 as mine, but I am the other Andrew from Wellington and my rig is a more humble M1!
Cheers, Andrew

Hi Andrew, really sorry about that. I should have realised. Apart from the M1, I love what you're doing with the Wolseley.
Regards, Udo.
Regards, Udo.
Hi Malcolm, You are correct. It's hard to see in these photos, but they do angle forward slightly. If you go to page 4 and look at the picture 3551, you can sort of see the angle I'm talking about. I'm not too worried, because I won't be doing any interstate trips in it. Racing around the track doesn't clock up too many Kms.
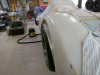
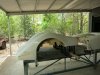
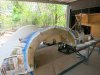
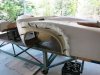
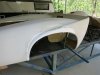
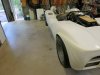
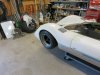
Hi all, It's been a while, but work always takes priority. I have decided to alter the body work. When you look at the original M6B body work, the front guards have a huge gap above the wheels, I checked lots of old photos and they all have it.
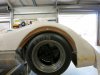
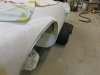
So, I decided to alter mine to close that gap. Also, because I am using wider rear tyres, the opening there didn't quite cover either.
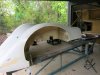
I mocked them up with bog, and took a mould off them.
So, I decided to alter mine to close that gap. Also, because I am using wider rear tyres, the opening there didn't quite cover either.
I mocked them up with bog, and took a mould off them.
Attachments
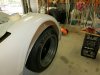
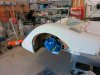
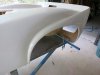
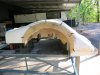
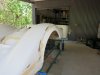
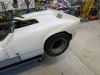
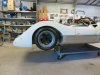
Then cut the original guards away, and glass up the new mould shape, They came out okay I think.
Attachments
-
 IMG_1999.JPG216.1 KB · Views: 254
 -
 IMG_2020.JPG215.5 KB · Views: 233
 -
 IMG_2035.JPG476.4 KB · Views: 227
 -
 IMG_2044.JPG438.6 KB · Views: 250
 -
 IMG_2037.JPG427 KB · Views: 226
 -
 IMG_2039.JPG404.7 KB · Views: 228
 -
 IMG_2041.JPG409.6 KB · Views: 240
 -
 IMG_2046.JPG308.9 KB · Views: 238
 -
 IMG_2048.JPG311.7 KB · Views: 265
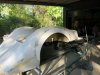
Here's the finished product. I was worried the front guards would look too bulky, But I think they look right.
Attachments
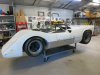
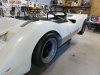
Thanks RodI like the look!
Similar threads
- Replies
- 9
- Views
- 799