CAV - Getting the Horsepower to the Ground - Part V

The GT40 is a demanding mistress.

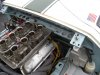
I think the undeniable experience for just about everyone is that: Planning is always easier than the job itself. In October I ended Part IV of CAV-Getting the Horsepower to the Ground with the wildly optimistic expectation that I would just pop the engine in the car and have everything back together in a couple of weeks. Now in February I am thinking that March would be a better estimate. Since October I have just gone slow and tried to do everything exactly right one step at a time. Most of the items modified were obvious and specific to my car and are probably not particularly interesting or useful even to other CAV owners. Three changes however are worthy of a few pictures and comments for Part V.

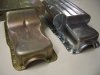
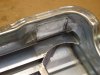
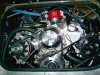
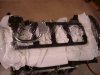
One goal of this project was to lower my engine but keep the bottom of the oil pan above the belly pan of the car. My Roush engine came with a Canton Pan 8 1/2 inches deep that would not allow the engine to be lowered. To fix this, I took Gary Gibbs advice and bought an Armando GT40 style oil pan that is only 6 1/2 inches deep.

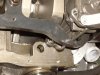
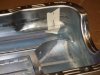
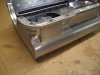
The problem I encountered is already known to some members of the forum. Like I said, the GT40 is a demanding mistress and if you expect her to wear a girdle you have to be firm and insistent.
 

Attachments

  • 74087-ArmandoOilPanMods-1_2.JPG
    74087-ArmandoOilPanMods-1_2.JPG
    174.7 KB · Views: 451

Ian Clark

Supporter
Hi Bob,

Here's one for you... does the Armando pan clear the girdle? I have an Aviad pan and you're one nightmare ahead me on this:)

Also does your pan come with the pickup (oil not the truck!)?

We've sectioned and baffled Canton pans in the past and worked great so there's lot's of ways to skin a cat LOL

Cheers
 
(Ian, you are right on the money with this.)

A steel girdle is cheap insurance despite its additional weight. Bolted to the main bearing caps it significantly increases the rigidity of the lower end and is something appreciated by demanding mistresses of all types. The problem is that the stock Armando Oil pan does not have enough inside clearance to fit over a 7 inch wide girdle on the main bearing caps. The main area of interference was the concave starter motor intent. The Canton pan by comparison has straight sides, and modern starter motors apparently have smaller diameters that fit just fine with plenty of clearance without a starter indent.
 

Attachments

  • 74170-ArmandoOilPanMods-2_2.JPG
    74170-ArmandoOilPanMods-2_2.JPG
    129.7 KB · Views: 418
I have to say that Armando is a stand up guy and he did exactly what he promised in his advertisements to get the oil pan to fit. I sent him pictures and measurements and a few weeks later a revised oil pan arrived with the concave starter indent left out. Except for the indent being removed, this is a standard full-size full-length GT40 oil pan and the end of the pan now looks just like the Canton. The oil pan also included the correct height oil pick up tube with screen (in picture #1) and the oil dip stick tube with fittings.

Theoretically with the starter indent gone, I could now do a trial fitting and actually mount the pan to the engine block. Theoretically that is…...because now that the starter indent was gone I discovered that the girdle around the bulge of the oil pump was also lacking sufficient clearance. This picture shows the girdle as it goes around the oil pump which used to clear the straight sides of the Canton Oil pan.
 

Attachments

  • 74249-ArmandoOilPanMods-3_2.JPG
    74249-ArmandoOilPanMods-3_2.JPG
    221.9 KB · Views: 436

John B

Temp Selling Pass
One problem with armondo's I just discovered is that if you have a 4 bolt mains,the pan will hit the out side main bolts. It had to be re-fabbed to fit the 4 bolt main..Just a note of thought.

Oliver
 
And this second picture shows the area of interference inside the oil pan. The oil pump clearance problem is probably an artifact of the welding around the circumference of the Armando pan and may not be present in the variations from pan to pan.
 

Attachments

  • 74308-ArmandoOilPanMods-4_2.JPG
    74308-ArmandoOilPanMods-4_2.JPG
    154.7 KB · Views: 412
This clearance problem was not as extensive as the starter problem so I decided to fix it myself. Like I said, the interference was small and it could have probably been hammered out. However I wanted a total no problems fit and decided that it would be better if a cap was made to fit over the entire interference area and then welded in place.
 

Attachments

  • 74309-ArmandoOilPanMods-5_2.JPG
    74309-ArmandoOilPanMods-5_2.JPG
    150.8 KB · Views: 409
[ QUOTE ]
One problem with armondo's I just discovered is that if you have a 4 bolt mains,the pan will hit the out side main bolts. It had to be re-fabbed to fit the 4 bolt main..Just a note of thought.

Oliver

[/ QUOTE ]
On my engine Keith Craft just did a little modification with a hammer and it fits fine now.
 

Ian Clark

Supporter
Hi Bob,

Here's a pic of the Canton pan sectioned 1", starter recess inceased, twin sumps joined to restore capacity.
 

Attachments

  • 74317-CantonGT40pan.jpg
    74317-CantonGT40pan.jpg
    213.5 KB · Views: 405
D

DavidTC

Guest
Ian
As an old hand what experience have you had in dry sumping 351W blocks ?.
Regards
David
 
After the outside cap was welded in place, the inside interference area was cut away and the edges were smoothed. There is still plenty of clearance around the starter motor and I have the added strength of a girdle on the main bearing caps. If you want an Armando pan done this way, I am sure he would be happy to accommodate.
 

Attachments

  • 74339-ArmandoOilPanMods-6_2.JPG
    74339-ArmandoOilPanMods-6_2.JPG
    128.6 KB · Views: 398
So now after that microscopic little report on the Armando oil pan I want to jump ahead to positioning the engine lower and more forward. In stock CAV position a Ford small block with a ZF trans ends up with the half shafts angled down and forward. They are a little hard to pick out but you can see the forward angle of the half shafts in this very early picture of my car.

In previous posts some of the forward angle was reduced by using the adjustable lower A-arms from CAV-Canada and adjusting the position of the rear uprights, wheels, and tires so they were more exactly centered in the wheel wells. Some of the downwards angle was also reduced by lowering the rear of the car when I repositioned the upper shock mounts. Part of my goal in repositioning the engine (besides a better center of gravity and weight distribution) will be to continue to minimize these half shaft angles.
 

Attachments

  • 74341-CAVStockZFShaftAngles_2.JPG
    74341-CAVStockZFShaftAngles_2.JPG
    218 KB · Views: 420
I put the chassis on blocks at the exact desired front and rear ride heights, stretched a string across the bottom of the car, and then leveled and lowered the engine so that the oil pan was about 1/8 inch higher than the belly pan of the car. Precise engine height positioning was easy with the adjustable engine mounts I had already installed. Overall the engine was lowered 1 1/2 inches.

Moving the engine forward was more involved. The main obstacle was the MSD billet distributor. Even with the motor now 1 1/2 inches lower than before, the large diameter distributor cap remained within 1/2 inch of the rear window frame.
 

Attachments

  • 74367-CAV-DistributorSpacing-1_2.JPG
    74367-CAV-DistributorSpacing-1_2.JPG
    194.7 KB · Views: 412
Wow Bob. It's like Deja vu. If you have not finished the job yet you could try the smaller diameter MSD billet distributor. You can get a glimpse of it is some of the shots on THIS PAGE. Much smaller in diameter. I think it is MSD 8578.
 
Yea Gary, you already pointed this out to me and I did not forget. Much of what I do here is really based on helpful advise from you, Ian, and others. Here is the next installment:

I guess a lot of forum members already know that a small diameter distributor needs to be used on a GT40 but again I must thank Gary Gibbs for telling me a few months back because I did not know. (Just like I did not know that the GT40 oil pan is virtually mandatory if you want your engine to sit low in the chassis.) And for that matter almost everything I do has been done by many others, but is mostly shown as a result, not as a small step sequence.

After doing a bit of research I was able to simply replace my large diameter Ford style MSD distributor cap and rotor assembly with smaller GM style units from MSD. As you can see from the picture, the GM style unit has a diameter about 1 1/4 inches smaller. For just a bolt-on fix, I thought this was a huge improvement. If I wanted to replace the entire distributor, even smaller versions are available like the one previously shown in the attachment called “MSD small dist.bmp.”
 

Attachments

  • 74389-CAV-DistributorSpacing-2_2.JPG
    74389-CAV-DistributorSpacing-2_2.JPG
    131.9 KB · Views: 385
Using the small diameter distributor cap will let the engine move forward about 5/8 inch but I still wanted more. All the original cars have a recess or indent in the rear window frame that makes more space for the distributor and permits the engine to be located even more forward. The attached picture is from the historic races at Monterey last year and shows a GT40 with the distributor indent. I decided to do a cut-out for my car but I did not want to loose any structure or strength.
 

Attachments

  • 74440-1012-DistributorIndent_2.JPG
    74440-1012-DistributorIndent_2.JPG
    184.4 KB · Views: 430

Ian Clark

Supporter
Hi David,

You got me on that one! Haven't done a dry sump system yet, although our next drivetrain combination will be a 427FE with carburation to be decided, but will be dry sumped so I'll keep you posted:)
 

Ian Clark

Supporter
Hi Bob,

You should be able to get the engine with the smaller distributor cap under the cross bar on the firewall and forward a bit further. We did it on an EFI car with all the extra plumbing and harnesses to contend with too. Hope the picture helps...

Cheers
 

Attachments

  • 74498-347throughfirewall.jpg
    74498-347throughfirewall.jpg
    293.2 KB · Views: 420
Thanks for the very interesting picture Ian. You show the end game for all of us. Keep them coming. I also notice a lot of other subtle modifications. My 2-Do-List continues to grow.

The distributor on a small block Ford exits the block at an angle, so to make the distributor end up looking centered in the new indent, I biased the cut out slightly to the left of chassis center. To make the indent, I used an extra thick (3/16 inch) piece of stainless steel. It was curved, recessed inside the channel of the chassis, and then seam welded.

AFTER this picture was made, the engine and transmission were moved to a final position for a total overall forward relocation of about 1 1/4 inches. Then, with the added height of the spark plug wires, the top of the distributor appears centered in the cut-out.
 

Attachments

  • 74531-CAV-DistributorSpacing-3_2.JPG
    74531-CAV-DistributorSpacing-3_2.JPG
    202.7 KB · Views: 393

Ian Clark

Supporter
Nice piece of work Bob! The recess looks great. It's also worth mentioning here the material thickness on the CAV crossbar is .125 almost three times the original...

Cheers
 
Back
Top