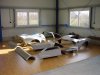
<u>My MDA has a new home!!!</u>
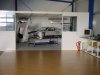
Our new workshop is now finished after some problems and delays in the building permit. Some remainder-work stands still out however we hope to have settled everything until next week. /ubbthreads/images/graemlins/banana.gif
Here is the specification of my MDA:
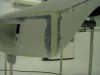
Suspension: Complete suspension. Independent wishbones front and rear. Fully adjustable, Rose jointed upper and Poly bushes lower. Protech ally Coil over shock absorbers, fully adjustable. AVO springs in Black Road race set.
Hubs: Knock on pin drive wheel hubs with fabricated hub carriers, bearings, drive spindles, Spinners, lock pins.
Drivetrain: Gearbox 5 speed Renault UN1 transaxle 3;44 final drive. Billet steel flywheel & AP Racing clutch.
Drivetrain upgrades: Gearbox Limited Slip differential. Lower fifth gear supplement.
Engine: Ford 302 block, 289 HiPo heads, Steel crank, Compression 11:1, Edelbrock Victor Jr. intake, Moroso Front sump oil pan, Barry Grant Speed Demon carb, Ford oval air cleaner, MSD distributor, MSD 6AL ignition box
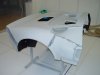
Interior & upholstery: Black leather seats, black carpet set with leather. Seat runners, race harnesses, centre gear-change. Door pockets and handles.
Exhaust system: Stainless steel full crossover system with collectors, headers and two silencers.
Heat shields in stainless steel.
Windows: Windscreen and rear window tinted blue.
Gear change: Centre mounted gearshift with cable change.
Wheels & tires: ImageWheels, BRM style, Front 8x15, Rear 10x15
Braking system: MDA bias pedal box assembly complete.
No calipers and rotors yet.
Additional options: Removable steering wheel. Dual and single vented nostril. Air conditioning.
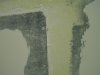
Our plans are to finish everything till June (Le Mans Classic). The body is now in the paint shop for some baking – to out-sweat the moldwax. After that we start with the dirty work.
Everybody interested is invited to visit us. /ubbthreads/images/graemlins/beerchug.gif
With best regards,
Reinhard
GT40 in the “Dust cabinet”.
Our new workshop is now finished after some problems and delays in the building permit. Some remainder-work stands still out however we hope to have settled everything until next week. /ubbthreads/images/graemlins/banana.gif
Here is the specification of my MDA:
Suspension: Complete suspension. Independent wishbones front and rear. Fully adjustable, Rose jointed upper and Poly bushes lower. Protech ally Coil over shock absorbers, fully adjustable. AVO springs in Black Road race set.
Hubs: Knock on pin drive wheel hubs with fabricated hub carriers, bearings, drive spindles, Spinners, lock pins.
Drivetrain: Gearbox 5 speed Renault UN1 transaxle 3;44 final drive. Billet steel flywheel & AP Racing clutch.
Drivetrain upgrades: Gearbox Limited Slip differential. Lower fifth gear supplement.
Engine: Ford 302 block, 289 HiPo heads, Steel crank, Compression 11:1, Edelbrock Victor Jr. intake, Moroso Front sump oil pan, Barry Grant Speed Demon carb, Ford oval air cleaner, MSD distributor, MSD 6AL ignition box
Interior & upholstery: Black leather seats, black carpet set with leather. Seat runners, race harnesses, centre gear-change. Door pockets and handles.
Exhaust system: Stainless steel full crossover system with collectors, headers and two silencers.
Heat shields in stainless steel.
Windows: Windscreen and rear window tinted blue.
Gear change: Centre mounted gearshift with cable change.
Wheels & tires: ImageWheels, BRM style, Front 8x15, Rear 10x15
Braking system: MDA bias pedal box assembly complete.
No calipers and rotors yet.
Additional options: Removable steering wheel. Dual and single vented nostril. Air conditioning.
Our plans are to finish everything till June (Le Mans Classic). The body is now in the paint shop for some baking – to out-sweat the moldwax. After that we start with the dirty work.
Everybody interested is invited to visit us. /ubbthreads/images/graemlins/beerchug.gif
With best regards,
Reinhard
GT40 in the “Dust cabinet”.
")