

You are using an out of date browser. It may not display this or other websites correctly.
You should upgrade or use an alternative browser.
You should upgrade or use an alternative browser.
Roaring Forties 105
- Thread starter Jim C
- Start date
Thanks Rick
All the best to you and your family.
I am going to take time out for sure.
Going 4 days a week next year,need to live a little.
Jim
All the best to you and your family.
I am going to take time out for sure.
Going 4 days a week next year,need to live a little.
Jim
Last edited:
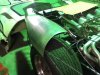
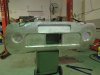
panel shots
mile stone today ,the first 1/4 panel.
I have not trimed the wheel arches yet.
Need to touch up a few areas but cant do that till is off the frame.
Jim
mile stone today ,the first 1/4 panel.
I have not trimed the wheel arches yet.
Need to touch up a few areas but cant do that till is off the frame.
Jim
Attachments
Keith
Yes photos are crap, it is of an ipod.
The order was placed with Santa and the issue will be resolved in about a week.
Chris
I would have to buy bigger rubber.
295 cost enough.
jim
Yes photos are crap, it is of an ipod.
The order was placed with Santa and the issue will be resolved in about a week.
Chris
I would have to buy bigger rubber.
295 cost enough.
jim
Dimi Terleckyj
Lifetime Supporter
Hi Jim
You're not wrong.
I run 335's on the rear and they want an arm and a leg for those.
I see you are still not sleeping, but it looks to be going great.
Dimi.
You're not wrong.
I run 335's on the rear and they want an arm and a leg for those.
I see you are still not sleeping, but it looks to be going great.
Dimi.
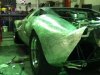
Keith you will be happy to know the camera arrived.
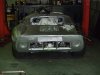
Started on the back panel.
Wheeled the rear main panel in one peice.
Bit dodgy ,I didnt have any paper for a pattern so I used a bed sheet.
It worked.
I then made seperate sections and instaled.
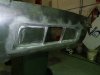
This is the vent area.
That is in one peice as well other than the corner sections.
Started on the back panel.
Wheeled the rear main panel in one peice.
Bit dodgy ,I didnt have any paper for a pattern so I used a bed sheet.
It worked.
I then made seperate sections and instaled.
This is the vent area.
That is in one peice as well other than the corner sections.
Attachments
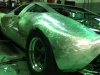
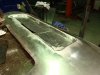
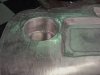
I welded in the vent area in after cutting out the apature.
Then did a file finish on the welds.
In the centre vent it has a profiled rib on either side of the opening.
I couldnt fold it so I made a basic press tool to pushed it into die rubber then welded them in seperate.
Then did a file finish on the welds.
In the centre vent it has a profiled rib on either side of the opening.
I couldnt fold it so I made a basic press tool to pushed it into die rubber then welded them in seperate.
Attachments
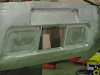
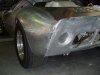
The last parts to the panel is the tail lamp pockets.
It will take about a day slapping and filing to get it finished.
The side vents will get cut out just leaving the picture frames.
Thats it, I should be able to put a few larger sections together soon.
Jim
It will take about a day slapping and filing to get it finished.
The side vents will get cut out just leaving the picture frames.
Thats it, I should be able to put a few larger sections together soon.
Jim
Attachments
Last edited:
Thanks gents I never replied to your posts, I didn’t want to keep dragging it up.
Zolis I have never done a full project, I have to admit I like working outside the comfort zone, you learn way more.
You make errors and you figure out how to fix your f*** ups.
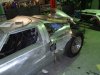
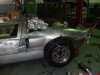
And talking of that the rear guard I cut up.
I was not happy with the duct on the side.
It turned out the wire frame was not correct in that area so the bolt cutters came out and I dealt with it.
The guard went through the band saw and removed the front 1/3rd and started again.
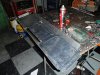
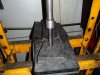
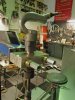
I made a new piece of equipment for forming and planishing smaller or isolated areas on panels.
I made a frame and mounted an air jack hammer with a reg and throttle pedal.
The post is a mount to put anvils of various radiuses that I make on the lathe.
The sample panel was some scrap that I formed in the hammer on the test run.
The hammer is to save time and save my wrist doing it manually.
Jim
Zolis I have never done a full project, I have to admit I like working outside the comfort zone, you learn way more.
You make errors and you figure out how to fix your f*** ups.
And talking of that the rear guard I cut up.
I was not happy with the duct on the side.
It turned out the wire frame was not correct in that area so the bolt cutters came out and I dealt with it.
The guard went through the band saw and removed the front 1/3rd and started again.
I made a new piece of equipment for forming and planishing smaller or isolated areas on panels.
I made a frame and mounted an air jack hammer with a reg and throttle pedal.
The post is a mount to put anvils of various radiuses that I make on the lathe.
The sample panel was some scrap that I formed in the hammer on the test run.
The hammer is to save time and save my wrist doing it manually.
Jim
Attachments

Last edited:
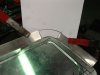
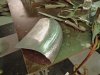
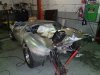
Here is the new duct section being made, You rough it all out then work the area with dollys or in the air hammer, sometimes you just have to get brutal to get what you want then you go from their and clean up.
Attachments
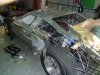
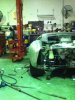
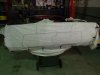
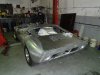
Today was a big day, I joined up some big panels.
Cut the rear vent holes.
Cut the vent hole and recessed the area for the vent on the deck of the rear clip.
Welded the rear gaurd ,top deck and rear tail panel.
I am able to semi finish areas but when the frame is cut and removed then the real finish work will start.
It dosnt seem a lot but it is time consuming.
Jim
Attachments
Similar threads
- Replies
- 139
- Views
- 18K