

You are using an out of date browser. It may not display this or other websites correctly.
You should upgrade or use an alternative browser.
You should upgrade or use an alternative browser.
Roaring Forties 105
- Thread starter Jim C
- Start date
No mister Goldsmith it didnt on that occasion but that dosnt mean Im wrong.
But thanks for asking
But thanks for asking
Peter Delaney
GT40s Supporter
Jim - stunning work !!!
I really had no clue as to the lengths that you will go to avoid finishing the car !!
Kind Regards,
Peter D.
I really had no clue as to the lengths that you will go to avoid finishing the car !!
Kind Regards,
Peter D.
Jim is still to move to the cross word puzzle stage in his life (lol)
do you use two part bonding agent when you joined inner and
outer spider section together
chris
Yes Chris it 3m 8115 panel bond.
It is 2 part epoxy, A & B and you have to buy a gun.
I have to say if you don’t want to weld metal this is the shit.
I have changed how I approach the assembly on this job due to the adhesive.
If you know you will get distortion through welding on a flat panel area just glue it.
Areas like door handle recesses have to be fabricated then welded into the panel.
fabricate them with a flange and bond them in from the bach then use a little filler around the edge, much less risk.
It is impressive.
jim
Pete D
Its my OCD kicking in,But I am publicly anouncing after 8years this is it.
I will finish the body then paint it and it will just be maintanance.
Chris Coote.
Crosswords have to many words for me.
I am not bright enough for that , I leave that to the women in the family.
Jim
Its my OCD kicking in,But I am publicly anouncing after 8years this is it.
I will finish the body then paint it and it will just be maintanance.
Chris Coote.
Crosswords have to many words for me.
I am not bright enough for that , I leave that to the women in the family.
Jim
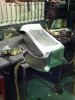
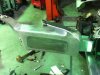
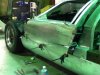
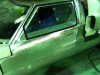
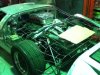
Well the doors a proving to be a real mission.
I will not say how many hours have gone into the L/H door but let’s say it is worth about $10.000.
I will break it down for you it’s about $77 in alloy and the rest is labour.
These 2 pics are the pillars being fabed .
I will not say how many hours have gone into the L/H door but let’s say it is worth about $10.000.
I will break it down for you it’s about $77 in alloy and the rest is labour.
These 2 pics are the pillars being fabed .
Attachments
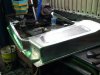
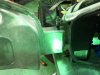
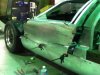
The front section that houses the hinge pin was a pain.
I ended up doing it 3 times, the issue is merging shapes.
You have the lower door, the inner seal area, the gaurd profile to match the front clip.
You have to bring them all together and make them work.
I got it on the 3rd go at 4.30am sunday morning,yip I couldn't let it go.
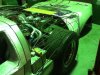
Sorry about the quality of the photos Im still working of my Ipod.
Jim
I ended up doing it 3 times, the issue is merging shapes.
You have the lower door, the inner seal area, the gaurd profile to match the front clip.
You have to bring them all together and make them work.
I got it on the 3rd go at 4.30am sunday morning,yip I couldn't let it go.
Sorry about the quality of the photos Im still working of my Ipod.
Jim
Attachments
Last edited:
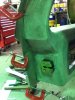
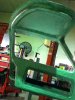
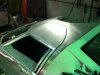
The inner roof skin I looked at for some time to decide on how to go about it.
I wanted to keep some similarity in look but I needed to keep some simplicity in the manufacture side of things.
I am happy with the outcome and it fits pretty good.
I built a flat beam section out near the upper window edge to add rigidity.
The roof section will get foam filled after the outer skin is fitted
Jim
Attachments
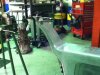
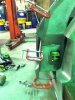
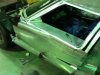
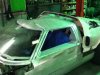
All the flanges for the side window have been bonded in and that has allowed me to make the outer skin.
This is the ruff out stage, the wheeling is done and is datumed onto the frame.
I have cut the side vents in the doors and the lower flange has been turned on the jenny wheel.
I have about 2 hrs work then I should be able to do a fit up.
I will use urathane on the skins as the 8115 will not allow me to remove it if it is damaged in the future.
Petrol inside the door will eat the urathane and allow me to save the frame.
The light bouncing off the panel makes it look average but its pretty good in real life.
Thats it for the moment.
Jim
Attachments
Last edited:
Peter Delaney
GT40s Supporter
Jim, every time you post, my jaw drops further !!
As to the commitment to finish the body & go into "maintenance mode" - I know what that means - make room for the P4 !!!
Kind Regards,
Peter D.
As to the commitment to finish the body & go into "maintenance mode" - I know what that means - make room for the P4 !!!
Kind Regards,
Peter D.
Pete
I will get over this one first.
The P4 is in the planning stage, the alloy on the 40 is a practice run.
Jim
I will get over this one first.
The P4 is in the planning stage, the alloy on the 40 is a practice run.
Jim
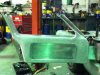
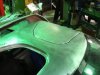
Door skin is fitted.
Glued in the side scope sections in the doors to avoid heat distortion from welding.
Made the roof skin for the door.
I am very happy with this the fit and gaps are excellent.
I have done the pillar skins and the door pocket but have no photo.
I guess I wont be posting for a while as I have to start on the other door and I don’t see any point in repeating the post.
The rear clip will be the next on the list.
Jim
Attachments
deleted
Similar threads
- Replies
- 139
- Views
- 18K