welcome to GT40s.com! If you've never posted on the forum maybe give it a go by introducing yourself in the Introduce Yourself Here forum. Also, think about becoming a Forum Supporter at GT40s.com. Becoming a supporter will allow you more PM space, an avatar, and the money is used to keep GT40s.com running.
Enjoy the forum!
Welcome to the GT40s.com, the World’s Largest GT40 resource.
You are currently viewing our boards as a guest which gives you limited access to view most discussions and access our other features. By joining our free community you will have access to post topics, view pictures, communicate privately with other members (PM), respond to polls, upload content and access many other special features. Registration is fast, simple and absolutely free so please, Join Our Community Today!
Why not start with your first post today and become an active part of GT40s.com now! And, if you find you enjoy GT40s.com think about becoming a Forum Supporter.
GT40 Build LogsFor build threads and build diaries only.
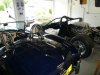
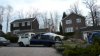
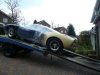
Here we go with my RCR40 MK1 with 2" flares. I've pushed off, the slope is steep (inverse of the learning curve I face) and I got no brakes.
Main reason for posting the build here is that I don't want to let the side down by not maintaining the high standards of the many other excellent builds on the forum so hopefully will be kept on the straight and narrow.
Fran already been v.useful answering dumb questions
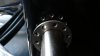
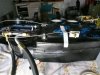
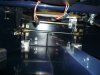
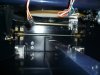
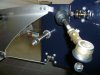
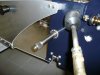
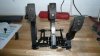
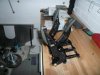
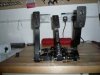
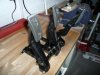
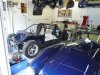
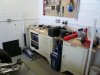
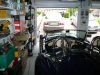
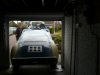
Pics of the car and v.small work space attached. Keeping the cobra for the time being so all the 40 bodywork now hanging from the rafters.
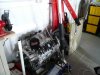
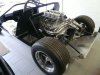
Just look at the LS7 with Kinsler stack - Now thats what I'm talkin' about.
Plan to fit the aircon first, updates as and when.
Congrats John,
I've just received mine so we're starting roughly at the same time, i'm still deciding what to do 1st though...perhaps get the body alignment done.
Good luck, hope i can pick your brains now and then.
Simon.
__________________ RCR 40, Ally block 302 B&S to 370 ci by T&L engines, ZF trans.
LS7 eh?
VERY nice engine. I have a pal with one in a cob. It's smooth, powerful and best of all (in these days of the £5-$10 gallon) economical! he regularly gets well over 30 mpg.
Keep the pics coming
Simon
__________________ GTD with Southern GT rear end. Lowered engine and gearbox. 302, R21T gearbox with LSD.
Great to see your RCR in the flesh on Saturday - pictures really don't do it justice, it looks just superb!! Although in my excitement, I did'nt even snap any pictures, despite having taken my camera...doh!
Yes you have a busy time ahead of you, but a fun one too no doubt. I look forward to seing it come together and finally hearing that awsome LS7 fire up! It surely won't be lacking in the power dept... Should be a great test for the proposed ZFQ - which I'm sure will cope admirably.
One last thing, post a pic of that Tilton pedal box when you get a chance, that is a 'piece of art' in itself!!
Thanks again for your hospitality and I look forward to seing it again.
ps - the bike seemed to handle a little better on the way home, without your flywheel and clutch strapped to the rear seat...
__________________ regards
Paul Thompson
-----------------------------------------
Too Many Hobbies - Too Little Time
More Pics of build progress. In summary work to date
Remove body parts and hang from garage roof.
Mount chassis on 4 axle stands with wooden load spreaders
Remove engine and suspension
Shorten knock off studs
Shorten sway bar arms and mark for drilling (will be using a mate's pillar drill, thanks to Joe Tavani)
Assy pipe work to evaporator and trial fit to mono
Trial fit drier
Cut all holes for air con and front sway bar (except those for pass through from plenum to dash - waiting on the "new style" RHD plenum to arrive)
Trial fit sway bar (excluding linkage as waiting for these to arrive from Fran along with some other parts not sent) For the sway bar holes I have interference fitted two 3/4" oil seals into the mono and will hold them in place with Titanium washers which come with radial pre-drilled holes just right for button head bolts.
Have used a combination of Fran’s build manual and Chuck and Ryan build thread so far. Fran and his guys been v helpful and Chuck and Ryan’s thread is really superb. Also thanks to Chuck for answering some specific question for me.
Pass through hole made in lower dash crossmember and rubber edged to prevent any chafing
Evaporator fitted and all pipes connected to bulkhead pass-through fittings as per Chuck and Ryan.
Sway bar mounted through mono with 1" oil seal rings held in place with the titanium washers. Fabricated ally mounting blocks for the sway bar bearing, rather than stacking wahers, see pic
Brake and clutch lines P clipped into place
Kinda held up on the air con and sway bar at the moment waiting on some parts from Captain Frantastic.
Grin just gets wider and wider every time a step into my workshop
Can you show a few more pics of the sway bar, Is that the Front bar your talking about? I was looking at the one on my car an not all that happy with it, It is very low to the ground as it's on the underside of the car and with the small diameter front tires the brackets and bushings will definitly save the chassis from scraping ;-). Just looking for other ways, I can't remember but someone did it in front of the bulkhead and looked pretty good.
Sandy
__________________ RCR GT40 #11 348" Alloy SBF, 930 Box, Gulf 1075 Trim Now in the Garage, still under construction...
Basically I followed Frans on line build manual for the front sway bars (don't think he has written up rear yet)
I will publish more pics tomorrow so that you can see what I've done different to Fran. However dimensionally have followed Frans instructions exactly. As you will see it runs across the footbox area below the level of the steering rack. Positioning in the vertical plane is relatively easy. Distance back from from the front face can be established with washers (as per Fran) but I fabricated a pair of ally spacers. The other thing I did different was replacing the grommit type seal which Fran suggests with a proper oil seal, 1" ID. I did this by making two holes exactly positioned and sized so that the OD of the seal was a push fit - the seal was .25" deep so exactly the same as the mono in that area. I then drilled a row of holes around the oil seal hole and attached two Titanium washers one on the inside face and one on the outside face (the T washers had pre-drilled radial holes in them which lined up with the holes in the mono). Then button head SS 4mm to hold the T washers in place. A bit fidly but works perfectly and looks neat. The washers I got from TastyNuts (:: T A S T Y - N U T S :: by Pro-Bolt go to shop on line click on Titanium and then drilled washers, I think I used M28)
Hope this helps
John
Last edited by John Lowe; 08-06-08 at 04:59 PM.
Reason: forgot web address
Very interesting. I think I will have more work to do. I was thinking the other day, how about right through the inside of the car? Seems that is the better way to go. What I have might be fine, but just looks like it is going to get caught up on something. I'll get on the dimesions for the CNC stuff.
Sandy
__________________ RCR GT40 #11 348" Alloy SBF, 930 Box, Gulf 1075 Trim Now in the Garage, still under construction...
I guess I will have to do some more work. That is way slick. I hope not much is different on the suspension end. My bar picks up the lower arm from the bottom as I recall, I'm going to have to bug Fran now ;-)
Sandy
__________________ RCR GT40 #11 348" Alloy SBF, 930 Box, Gulf 1075 Trim Now in the Garage, still under construction...