Work Dolly

I'm contemplating building a dolly to place my chassis on while I build it up. I've attached a crude drawing with some rough dimensions. It is built from 2x4's and 1/2" plywood for the top and bottom, and the sides part way up. This will give it needed structural support and provide a space to put tools and parts while progressing with the build. I need to be able to roll it around in the garage, eliminiating jackstands. Comments welcomed.

work_dolly.jpg


Cheers
Bill D
 
I was thinking you might want to incorporate heavy duty coasters instead of wheels (warehouse variety). Seems to be the season to start constructing chassis tables as I was going to start mine, too /ubbthreads/images/graemlins/smile.gif
 
Yes, the wheels would be heavy duty from Harbor Freight. Something like this 10" pneumatic swivel caster for $40 from HF. capacity is 300#

38944-t.gif
 
You could purchase two engine stand from Harbor frieght and use square steel to tie the front and rear of the frame to them. You can now move the frame around in the shop and turn the frame to work on the bottom. Talk to Hershall I think he built his car this way
 

Howard Jones

Supporter
WE took all the air filled wheels off our tables at work. They are hard to push around when loaded and are always low on air. They were replaced with Polyurethane casters. Much better!

www.grainger.com

Use "national stock number" under keyword pull dowm menu, then put 3G137 in search window.

Granger stock number 3G137

Alathane (polyurethane) wheel caster
5 5/8 inches overall height with 4 in diameter wheel. With swivel plate mount.
Load rated at 700 pounds each
$40.35 each.

I would put swivels on all four corners.
 

Howard Jones

Supporter
Bill, you gotta go with northern. They have some really good prices. You can do the whole thing, wheels wise, for about 60 bucks or so.
 
Bill,
Since I have one, I will give you my impressions.
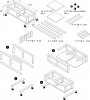
1. Consider making it only 24" tall. The sil height will be at waist high and you can bend over and into it easier. I'm 5'9", and the extra 6 inches hits me in the ribcage. Also, at 24" the sil is the next step up from a foldup kitchen step, making easy entry for projects like test mounting everything. It also puts all the suspension pieces at waist level which helps when you need that third hand. I use the engine hoist and the cloth tiedown straps for mounting the rear clip for test fits and it has to get pretty high for that, unless you always have someone to help out. There is a place right about in the middle of the wheel arches where it will pick up my clip level.
2. Consider puting either one set of wheels as swivel, or don't put wheels on one end and get a trailer dolly to lift the post not wheeled and it is easily moved. With wheels on front and rear, it will move every time you lean against it. I use a hand truck to lift the rear of my frame. The cross members are at a height that the truck just fits underneath, and when lowered, it picks the frame up. The truck acts as its guide.
3. I agree that you need hard rubber or poly wheels. If you like #2, put the wheels on the front as it has less weight to carry. The wheels may deform over time from a lot of weight.
4. Make the corner post from 6x6 post. Once you sink carrige bolts and mortise the cross pieces to it, it won't "sway". I have a pic or two in a garge post here somewhere.
5. My stand is only 47" wide and the post sit just under the pan on the corners. 72" will put your frame into the rear wheel wells. Get the measurements of your pan and put the post on the corners. The corners ought to be so the rear wheels can go through their arc without hinderance. It won't make the rear too heavy. With the rear clip and spider on and the motor/trans in place and nothing on the front, it takes about a 100 lb effort to lift the front end of mine.(mine is a DRB/GT40 Australia that come with a steel pan attached).
6. Build the frame with the foresight of how you are going to get the car off it when at that point. Mine has the front crossmembers and posts as a unit. I secure the side frame rails to the frame of the car with nylon ties(it will become apparent in a minute).Lift the front of the car with the engine hoist, remove the front posts/crossmember piece. Lower the car(the ties will keep the frame rails from flipping away from the car), and move the hoist to the rear and raise the rear of the car. Remove all frame pieces, and lower the car. Reverse for mounting on the frame.
Here is the thread on dollyswith a pic of mine.


Bill Here
 
Bill,
It looks very similar to the one I build and it worked well. Just one other piece of advice. Buy castors with a locking mechanism. Nothing worse than having the job wheel away from you when you are pushing against it for whatever reason.
 
Bill

You have to think about how you going to get it down once you add all the weight.


My ERA came with two independent supports that made it very easy to get down. Lift the front
remove the front set it down on its own tire and same for the back. You can't really appreciate the lines of the car till its on its own tires.

P1010121.jpg
 

Chris Duncan

Supporter
Agree on the 24" height. Just enough to get under with a creeper but not too high to reach over or climb inside.

I incorporated jackstands. Essentially two separate angle iron frames front and back with 4ct 300lbs casters each. With a square place for the jackstands to rest on. Very sturdy. Easy to move until the engine is in, from that point on there's no need for locking casters, I'm only 135lbs. and it's all I can do to get this thing moving.

Had to put locating pins on top of the jackstands otherwise the chassis would teeter diagonally and come off one corner and that corner would roll out of position when moving the chassis. This wouldn't happen if the whole thing was one piece.
 
Hey guys - haven't built it yet but thought it would inspire anyone else looking to build a cart. I wanted to eliminate wasted materials and make it as easy as possible to build by using 6 and 8ft 2 x 4's and 3-4 inch castors.

Thought the shelves would come in handy-

Chris

Chris
 

Attachments

  • 66913-Cart1.jpg
    66913-Cart1.jpg
    219.2 KB · Views: 299
Chris, I would maybe think about a little more support on the sides in the form of a flat piece from front to rear sticking up 8 Inch or so - to make the whole thing from trying to fold flat. When I had my car on it's stand ,(Sounds like a war story on it's way) I found that 20 inches from the car floor to the concrete was high enough for me - also meant I could sit down. Mine was alot simpler in that the base was only about 8 inches high with 4 axle stands fixed to it. I then had a piece of 2 x 2 running from side to side with foam for the car to sit on which protected the cars floor. It wasn't very pretty but it appears in my early build pics.
 
[ QUOTE ]
Chris, I would maybe think about a little more support on the sides in the form of a flat piece from front to rear sticking up 8 Inch or so - to make the whole thing from trying to fold flat.

[/ QUOTE ]
Or triangulate. Cut a bunch of triangles out of plywood and put them in various corners.
 
I agree with both the above.If you don't triangulate both lateral and forward, it could colapse on you. Not too bad if you have tires mounted but terrible if you don't. I would also beef up the corners. 2x4s tend to warp or twist over time as they dry out. Also, notch the top rails into the post and use long deck screws or carrige bolts to hold.

Bill
 
Thanks for the input guys, should be a decent dolly once all of the suggestions are incorporated - and I'll have some extra firewood when I'm done.

Chris
 
Gentlemen:
Some great ideas there,and good points also. I agree with the solid casters, those pnuematic ones are great for going over rough spots, but always need air, and we finally replaced them with eurethane wheels akin to what scaffolders use. Paul and Ben make pretty good points about the triangulation, I have seen wooden benches get racked and these weren't being pushed around the shop. Since I do a lot of chassis work we use metal tables, usually 2x2 tubing as this can be grounded easily for welding, and although it is heavier I am interested in longevity also as things tend to get banged around in a shop environment (although nobody ever does it). I recently made a table using tubing I got from McMaster that has holes punched in 1 inch increments, the sizes nest inside one another and with a few 3/8 pins I can adjust my height about 12 inches. Another feature you guys may want to look at is having small legs near the casters with threaded inserts underneath, this can be set up to lock and level the table if you don't intend to move it in the near future. These are some of the features I needed for clamping and welding and I realize once you have your completed chassis this may not suit your needs, but the perforated tubing really works well for height adjustment, and I believe it could be integrated into the wood frame easily.
Hope some of this helps
Cheers
Phil
 
Back
Top