

The SLC kit comes with eyeball vents for passenger heat/ac, which can be turned off to force all the air to go through the defrost vents. However, even with the vents fully open, some air will want to go out the defrost.
I live in a part of the country where it can get warm and humid. This means there are days where you want the a/c running, but don't want to blow cold air on the windshield, or else it will fog up.
To address this, I modified the ventilation "anchor" with a kind of butterfly valve, using the following:
- 3/8" steel rod (lying around, but probably came from Home Depot)
- 1/8" steel angle (lying around, but probably came from Home Depot). Could also use flat bar stock.
- 2 Snap ring bushings ($0.12 each) with 3/8" inside diameter https://www.aircraftspruce.com/catalog/hapages/snapbushing.php
- Epoxy and microballoons (also lying around, but probably the epoxy came from West Marine and the microballoons from Aircraft Spruce)
- Small sheet of steel, aluminum or plastic (I used some plastic which was lying around)
- 2 #6 machine screws, with washers and locknuts (also lying around, but also probably came from Aircraft Spruce)
The steps to build it were:
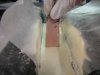
1) Using a power file (portable belt sander with a 1/2" wide belt), square off the inside of the "anchor" so that a square door will be a good fit. Actually, because of the curve of the piece in this area, it was necessary to apply a slurry of epoxy and microballoons to add extra material to build up square walls (step 2)
2) Mix a couple of squirts of epoxy into a paper cup (I really like the West System for this; you attach their pumps right onto the can. One pump of resin to one pump of hardener gives the right mixture). Pour some into a second cup and add some microballoons, stirring with a popsicle stick. Keep adding microballoons until a thick mixture is obtained that doesn't drip off the popsicle stick.
3) Apply the slurry to the inside walls of the anchor. Use a piece of waxed paper on the inside to provide a non-stick surface to use a piece of cardboard or plastic applicator to smooth the walls.
4) After hardening, sand with a sanding block. Repeat step 2 again. When the walls are square, paint some mixed liquid epoxy (no microballoons) to help provide a smooth, hard finish.
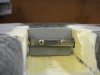
5) Drill a hinge line through the anchor. Drill to match the outside diameter of the snap bushings.
6) Insert the snap bushings. Push the steel rod through them to make sure they are lined up correctly. Make sure the bushings are flush with the inside walls and apply some epoxy/microballoon slurry to the outside, which helps to glue the bushings in place and hold them square.
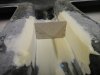
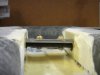
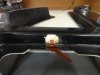
7) Fit a piece of cardboard into the tunnel so that it is a snug fit. Use the cardboard as a template to cut the "valve" out of the plastic sheet.
8) Grind a flat spot into the middle of the steel rod to fit the plastic sheet. The ends of the rod should be kept round where they will rest inside the bushings. Only the middle section should be ground flat on both sides (one side for the sheet and the other side to make a flat surface for the screw heads). Place the rod into the anchor and mount the "valve" onto it with the #6 screws.
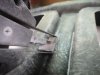
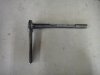
9) Cut the steel angle to make two flat bars. Put one in the scrap metal box and trim the other into an arm. Drill a 3/8" hole at one end.
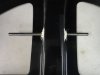
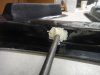
10) Assemble everything onto the anchor with the arm loosely on the steel rod.
11) Place the assembly on the car and mark where a slot needs to be cut in the top of the car.
12) With the assembly on the car, place a felt mark on the rod and hinge and hold them together by hand while rotating the valve, to ensure the slot in the car is long enough. Determine how the arm needs to be mounted to the rod such that it will travel from 45 degrees forward to 45 degrees backward from vertical (i.e. when the arm is straight down, the valve should be halfway open). Mark the desired position of the arm on the rod with a felt marker.
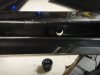
13) Tack weld the arm on the rod.
14) Take everything apart, weld the arm fully on the rod and then paint it with some rust paint.
15) Put it all together. The arm can be moved with a cable pushrod control (e.g. https://www.aircraftspruce.com/catalog/appages/buttondashctrl.php?clickkey=9087), or a servo motor.
The whole process took about 10 hours, including head scratching. Someone who knows what they're doing could probably do it a lot faster.
I live in a part of the country where it can get warm and humid. This means there are days where you want the a/c running, but don't want to blow cold air on the windshield, or else it will fog up.
To address this, I modified the ventilation "anchor" with a kind of butterfly valve, using the following:
- 3/8" steel rod (lying around, but probably came from Home Depot)
- 1/8" steel angle (lying around, but probably came from Home Depot). Could also use flat bar stock.
- 2 Snap ring bushings ($0.12 each) with 3/8" inside diameter https://www.aircraftspruce.com/catalog/hapages/snapbushing.php
- Epoxy and microballoons (also lying around, but probably the epoxy came from West Marine and the microballoons from Aircraft Spruce)
- Small sheet of steel, aluminum or plastic (I used some plastic which was lying around)
- 2 #6 machine screws, with washers and locknuts (also lying around, but also probably came from Aircraft Spruce)
The steps to build it were:
1) Using a power file (portable belt sander with a 1/2" wide belt), square off the inside of the "anchor" so that a square door will be a good fit. Actually, because of the curve of the piece in this area, it was necessary to apply a slurry of epoxy and microballoons to add extra material to build up square walls (step 2)
2) Mix a couple of squirts of epoxy into a paper cup (I really like the West System for this; you attach their pumps right onto the can. One pump of resin to one pump of hardener gives the right mixture). Pour some into a second cup and add some microballoons, stirring with a popsicle stick. Keep adding microballoons until a thick mixture is obtained that doesn't drip off the popsicle stick.
3) Apply the slurry to the inside walls of the anchor. Use a piece of waxed paper on the inside to provide a non-stick surface to use a piece of cardboard or plastic applicator to smooth the walls.
4) After hardening, sand with a sanding block. Repeat step 2 again. When the walls are square, paint some mixed liquid epoxy (no microballoons) to help provide a smooth, hard finish.
5) Drill a hinge line through the anchor. Drill to match the outside diameter of the snap bushings.
6) Insert the snap bushings. Push the steel rod through them to make sure they are lined up correctly. Make sure the bushings are flush with the inside walls and apply some epoxy/microballoon slurry to the outside, which helps to glue the bushings in place and hold them square.
7) Fit a piece of cardboard into the tunnel so that it is a snug fit. Use the cardboard as a template to cut the "valve" out of the plastic sheet.
8) Grind a flat spot into the middle of the steel rod to fit the plastic sheet. The ends of the rod should be kept round where they will rest inside the bushings. Only the middle section should be ground flat on both sides (one side for the sheet and the other side to make a flat surface for the screw heads). Place the rod into the anchor and mount the "valve" onto it with the #6 screws.
9) Cut the steel angle to make two flat bars. Put one in the scrap metal box and trim the other into an arm. Drill a 3/8" hole at one end.
10) Assemble everything onto the anchor with the arm loosely on the steel rod.
11) Place the assembly on the car and mark where a slot needs to be cut in the top of the car.
12) With the assembly on the car, place a felt mark on the rod and hinge and hold them together by hand while rotating the valve, to ensure the slot in the car is long enough. Determine how the arm needs to be mounted to the rod such that it will travel from 45 degrees forward to 45 degrees backward from vertical (i.e. when the arm is straight down, the valve should be halfway open). Mark the desired position of the arm on the rod with a felt marker.
13) Tack weld the arm on the rod.
14) Take everything apart, weld the arm fully on the rod and then paint it with some rust paint.
15) Put it all together. The arm can be moved with a cable pushrod control (e.g. https://www.aircraftspruce.com/catalog/appages/buttondashctrl.php?clickkey=9087), or a servo motor.
The whole process took about 10 hours, including head scratching. Someone who knows what they're doing could probably do it a lot faster.
Attachments
-
 DSC05251.JPG106.1 KB · Views: 296
 -
 DSC05254.JPG79.9 KB · Views: 284
 -
 DSC05256.JPG62.3 KB · Views: 309
 -
 DSC05258.JPG75.9 KB · Views: 256
 -
 DSC05259.JPG75.6 KB · Views: 257
 -
 DSC05262.JPG66.7 KB · Views: 256
 -
 DSC05263.JPG75.9 KB · Views: 267
 -
 DSC05268.JPG62.3 KB · Views: 266
 -
 DSC05267.JPG63.1 KB · Views: 269
 -
 DSC05269.JPG72.8 KB · Views: 287
 -
 DSC05273.JPG76.7 KB · Views: 268
Last edited:


