

You are using an out of date browser. It may not display this or other websites correctly.
You should upgrade or use an alternative browser.
You should upgrade or use an alternative browser.
SPF Drivetrain Install
- Thread starter Silver66fb
- Start date
Tim,
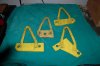
Yes you can lift the engine by the cylinder head ends. I welded up plates with rebar loops that bolted to the ends. Used a leveler with the engine hoist. Made angling under the bulkhead easier. Remove the carb for better clearance and install engine without trans.
The hoses referred to are the coolant ones. SPF provides more than needed. You'll have to do some cutting and fitting of the rubber pieces, but I don't think I had to modify the metal pieces.
Since you have the Roush setup you'll probably find the a/c hoses are way too long. Some owners have replaced them with custom made shorter ones. I just tucked the extra behind the passenger seat. It takes a bit of packing, best done before final connection to the a/c compressor.
When you go to install the trans you'll probably have to raise the rear of the engine enough to allow the trans to side over the lower crossmember of the frame.
Tim,
It sounds like you're set.
At first, I tried to install the motor by holding the motor by bolts on the heads...I just couldn't move the engine far enough forward because the chains would get in the way. Using a lifting plate was MUCH easier.
The hoses I was referring to were for the radiator and heater.
One thing I forgot to mention, AND THIS IS IMPORTANT. If you are using a standard (ie, non-original) bellhousing, you will almost certainly have shave the bottom off to clear the cross member. Otherwise, the engine and tranny will teeter-totter. In my case, I had to shave off a bit above the lowest bolt hole on the bellhousing. I know that there are pictures on this site showing where to cut, but its not really critical...just cut enough to get clearance. I have pictures too, if you need them.
This is one of the reasons not to put the engine and tranny in together...you'll probably end up mounting and dismounting the transaxle a couple of times to make sure it all fits. I think I used a cutoff disc and grinder. It was pretty easy.
Last edited:
Tim, I hope you're high and dry in Houston. The news reports look horrible!
Dave, thanks. I couldn't get to work yesterday, but today is much better! I appreciate the concern.
Tim
Tim,
Yes you can lift the engine by the cylinder head ends. I welded up plates with rebar loops that bolted to the ends. Used a leveler with the engine hoist. Made angling under the bulkhead easier. Remove the carb for better clearance and install engine without trans.
The hoses referred to are the coolant ones. SPF provides more than needed. You'll have to do some cutting and fitting of the rubber pieces, but I don't think I had to modify the metal pieces.
Since you have the Roush setup you'll probably find the a/c hoses are way too long. Some owners have replaced them with custom made shorter ones. I just tucked the extra behind the passenger seat. It takes a bit of packing, best done before final connection to the a/c compressor.
When you go to install the trans you'll probably have to raise the rear of the engine enough to allow the trans to side over the lower crossmember of the frame.
DaveM,
Thanks! If you have a pic of the plates you welded up, I'd love to see it.
8. I'm pretty comfortable with the wiring, once I understand what everything is. Mark's suggestion on the wiring diagram is a good one. I also have the somewhat dated owner's manual in electronic form. Amen on solder and good connectors - I never want to redo any of that. I also plan to use an MSD box and locate it in the battery box with the battery, as I've seen someone else do here on the forum.
I love this forum.
You may want to rethink the MSD choice. MSD is gaining a very poor reputation for quality and failure rate. Look at Crane or one of the other brands. Also while MSD stands for "Multiple Spark Discharge" most of their boxes go to single spark over 3000 RPM whereas many other brands go multiple to redline.
Depending on what you plan on doing with the car and the amount of power output, now may be an opportune time to look into some items to improve the longevity of your installation. Olthoff offers a lower transmission mount as the upper mount is not the most robust. As well, there is an upper shock/sway bar mount that is a lot sturdier than the factory items.
Here are the plates I welded up. When Ron referred to shaving the bellhousing he meant the lower portion of the RBT. I don't think I had to shave my Quicktime bellhousing.
Dave,
You may be right. I typed "transaxle" the first time I mentioned "shaving." When I read it later, I thought maybe I made a mistake, so I changed it to "bellhousing". But, now that I think about it, it was the RBT.
So Tim, be prepared to shave your nice, expensive transaxle.
Tim,
Regarding the MSD. I've heard the stories too. Some think it is related to heat, I don't know, but I had originally had put mine in the battery box, too. I ended up moving it to its current location because I felt better with a bigger battery. I had first used an Odyssey PC680 (small enough to leave room for the MSD). I was stranded once when the battery ran down while the radiator fans tried to cool the engine after I had parked and walked away.
While a little more difficult to get to, I think the MSD (or Crane, or?) is better insulated from the heat where it is now. And really, all I have to do to get to it is lift the passenger seat out. Not a big deal.
One other suggestion, totally unrelated; some people suggest drilling a small (1/8 in) hole in the thermostat to help bleed the system. Position the t-stat so that the hole is in the top half, and it should be easier to get the air out. Makes sense to me, I did it. Maybe its overkill, but I'm sure it didn't hurt anything, either.
yes, yes, yes on T-Stat hole. 1/8" is sufficient. And a vacuum fill is the best way to add the coolant but you can bleed the system out with time, jacking both ends and using the vent on the radiator.
We suggest the Ford Motorcraft "Gold" coolant and a bottle of "water wetter". Buy the coolant concentrate as I am sure water is cheaper at your house than it is at the dealership!
We suggest the Ford Motorcraft "Gold" coolant and a bottle of "water wetter". Buy the coolant concentrate as I am sure water is cheaper at your house than it is at the dealership!
After engine installation I found it easier to bolt the bellhousing to the block and then bolt the trans to the bellhousing. Not sure trans and bellhousing will fit as a unit. The Quicktime bellhousing has 2 cutouts at the top for the two bolts that fasten into the trans. I put the bolts in the cutouts first and hold them in place with some rubber tubing so they don't fall into the bellhousing bolting up the trans.
Mike
Lifetime Supporter
I have an MSD box I'll sell very reasonable. For my new engine I went with Pertronix. Everything contained in distributer no external control module required. Very clean setup.
'Plug n Play' Billet Distributors
I have the Quicktime bell housing and did not need to shave anything.
Replacing the Girling reservoirs with the Tilton unit is not a bad idea so you don't have brake fluid peeling the paint off the chassis.
Speed hut makes a nice GPS speedo with the GT font that is nice.
Some replace ammeter with voltmeter.
Foam liner in wheel wells help prevent damage to fiberglass.
Avon tires.
Braille makes a nice lithium battery that weighs 5 lbs and cranked my old 427 better than the lead acid battery.
Install engine then bell housing then transaxle.
Examine as much wiring as possible. Mine where it exited cabin into door for heater controls would have rubbed through pretty quick. Wrapped to with sheathing.
Plan on wheel bearing inspection, clean, & service each year. Get the socket tool from Dennis. If you have the tight fitting half shafts get the puller tool from Dennis.
My Wilwood master cylinders didn't last too long. There are other options.
Pretty much each item can be found using the search forum function.
Lets see pics when its done.
PS ditch the cup holders and A/C and don't pay attention to the old farts
I have an MSD box I'll sell very reasonable. For my new engine I went with Pertronix. Everything contained in distributer no external control module required. Very clean setup.
'Plug n Play' Billet Distributors
I have the Quicktime bell housing and did not need to shave anything.
Replacing the Girling reservoirs with the Tilton unit is not a bad idea so you don't have brake fluid peeling the paint off the chassis.
Speed hut makes a nice GPS speedo with the GT font that is nice.
Some replace ammeter with voltmeter.
Foam liner in wheel wells help prevent damage to fiberglass.
Avon tires.
Braille makes a nice lithium battery that weighs 5 lbs and cranked my old 427 better than the lead acid battery.
Install engine then bell housing then transaxle.
Examine as much wiring as possible. Mine where it exited cabin into door for heater controls would have rubbed through pretty quick. Wrapped to with sheathing.
Plan on wheel bearing inspection, clean, & service each year. Get the socket tool from Dennis. If you have the tight fitting half shafts get the puller tool from Dennis.
My Wilwood master cylinders didn't last too long. There are other options.
Pretty much each item can be found using the search forum function.
Lets see pics when its done.
PS ditch the cup holders and A/C and don't pay attention to the old farts
The current chassis now come with the voltmeter in lieu of the ammeter so that mod is not needed.
Agreed the Pertronix distributors are nice. If you want to run an external spark box there are several choices that do not say "MSD"!
The "trimming" that is needed is on the ZF case, a boss that was added to the -2 that interfere with the GT chassis. Hacksaw and a grinder....do it right and no one will ever know it was there.
And that dang Dennis, does he keep installing cupholders or was it only on your chassis Mike?
Last edited:
Similar threads
- Replies
- 38
- Views
- 11K
- Replies
- 27
- Views
- 11K