

With the help of a welder friend, we just finished the rear exhaust on my LS7/Graziano.
Here is what we did:
Parts:
1) 2 FlowMaster Hushpower DBX mufflers http://www.summitracing.com/parts/flo-13014310
2) 1 U-Bend http://www.summitracing.com/parts/sum-622004-ss
3) 2 clamps http://www.summitracing.com/parts/sum-692300
4) 2 Exhaust Grommets Stainless Works EXGRO, Stainless Works Trick Hangers | Stainless Works
5) One 3" doughnut, $40 on eBay Mandrel Bend Donut 3 0" 3 0in 3in 3 00" 3 Exhaust Intake Stainless Steel Ubend | eBay
6) 1/4" x 3" x 2' steel angle
7) 22 gauge stainless steel sheet metal (on hand)
8) Perforated exhaust hanger strap from local auto parts store
9) Used mid-pipes from Corvette Z06
10) 2 Exhaust manifold to flange gaskets, GM part no. 15272179 GM Parts Direct: Search results
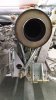
To build the exhaust system, we cut the mid pipes immediately below the flange and cut out the cats. We then bolted the flanges onto the exhaust manifolds and started eyeballing angles with the help of an angle measuring tool (I have no idea what they are called, but it is basically a hinged ruler). We then used a portable band saw to cut either the U-pipe or the donut (depending on how tight the bend needed to be) into approximately the right angle and held it on to the assembly, using a marker to get the right clocking position. From there, we removed and tack-welded it, then re-assembled and moved onto the next item, working from the manifold back to the muffler.
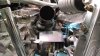
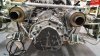
The heim joints are too close together to allow the 6.5" mufflers to pass through. This required doing three things:
1) Cut off the upper tab on the right frame heim and re-weld it slightly more inboard, keeping in mind the clearance necessary to the Graziano's shifter connection.
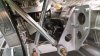
2) Move the transmission support heims down one bolt on the frame as pictured.
3) Fabricate new transmission mounting brackets for the lower end of the two transmission support heims. This moved the connection point lower down.
The combination of moving the heim bolting location and dropping the point of attachment onto the bracket meant that essentially the same angle was preserved, while providing more clearance off the muffler.
On the right side, we were able to preserve the existing O2 sensor location, but on the left, we needed to cut the old one off to start the bend sooner. The GM engine harness/computer kit comes with bosses, so we just welded one on the left side in an appropriate place. Note that the sensor/boss needs to be installed somewhere between horizontal and vertical, angled with the tip downward.
For the muffler hangar on the right side, we were able to just bolt through the steel bar structure to attach the silicone grommet. On the left side, the bar geometry was such that we couldn't get a bolt straight through the bar, so we welded a tab made out of 1/8" x 2" steel angle to the bar and bolted the grommet to that. In both cases, a 1" x 3" strip was cut out of the 22 gauge steel sheet to make a little bracket between the perforated strap around the muffler and the silicone grommet. The bottom of the strip was bent up slightly to help capture the perforated strap and in addition, an 8-32 screw with steel locknut was used to help keep the bracket and strap together.
We rough positioned the rear decklid to determine that we were in the ballpark with the muffler exit position, but probably will need to put a slight "S" bend in the tips to get them to come out at the right position.
Be careful welding cats in position; they have a flow direction arrow stamped on them.
On the right side, we needed to cut down the manifold studs a bit to get the assembly in and out. On the left side, the studs were left as-is.
The clamps are used to connect the mufflers to the pipe. This makes it possible to unbolt the clamps, remove the muffler, unbolt at the flange connection and then lift the rest of the assembly out as one unit (with some twisting, turning and lubricating words).
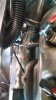
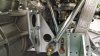
One of the pictures "Rear of Car" shows the oil cooler bypass line on the transmission. This is apparently required if you are not using a transmission oil cooler (something I learned from another post on this forum). This will be primarily a street car and I am told that for street use, a transmission oil cooler is not required. The same picture also shows how tight the clearance is between the transmission shifter arm and the heim, with its re-welded top tab (there's actually more clearance than it looks in the picture).
The final product is quite a tight fit, but hopefully will result in a reasonable noise level for street use while preserving plenty of flow through the 3" pipes. The real test should come in a few months, with first engine start. . .
Here is what we did:
Parts:
1) 2 FlowMaster Hushpower DBX mufflers http://www.summitracing.com/parts/flo-13014310
2) 1 U-Bend http://www.summitracing.com/parts/sum-622004-ss
3) 2 clamps http://www.summitracing.com/parts/sum-692300
4) 2 Exhaust Grommets Stainless Works EXGRO, Stainless Works Trick Hangers | Stainless Works
5) One 3" doughnut, $40 on eBay Mandrel Bend Donut 3 0" 3 0in 3in 3 00" 3 Exhaust Intake Stainless Steel Ubend | eBay
6) 1/4" x 3" x 2' steel angle
7) 22 gauge stainless steel sheet metal (on hand)
8) Perforated exhaust hanger strap from local auto parts store
9) Used mid-pipes from Corvette Z06
10) 2 Exhaust manifold to flange gaskets, GM part no. 15272179 GM Parts Direct: Search results
To build the exhaust system, we cut the mid pipes immediately below the flange and cut out the cats. We then bolted the flanges onto the exhaust manifolds and started eyeballing angles with the help of an angle measuring tool (I have no idea what they are called, but it is basically a hinged ruler). We then used a portable band saw to cut either the U-pipe or the donut (depending on how tight the bend needed to be) into approximately the right angle and held it on to the assembly, using a marker to get the right clocking position. From there, we removed and tack-welded it, then re-assembled and moved onto the next item, working from the manifold back to the muffler.
The heim joints are too close together to allow the 6.5" mufflers to pass through. This required doing three things:
1) Cut off the upper tab on the right frame heim and re-weld it slightly more inboard, keeping in mind the clearance necessary to the Graziano's shifter connection.
2) Move the transmission support heims down one bolt on the frame as pictured.
3) Fabricate new transmission mounting brackets for the lower end of the two transmission support heims. This moved the connection point lower down.
The combination of moving the heim bolting location and dropping the point of attachment onto the bracket meant that essentially the same angle was preserved, while providing more clearance off the muffler.
On the right side, we were able to preserve the existing O2 sensor location, but on the left, we needed to cut the old one off to start the bend sooner. The GM engine harness/computer kit comes with bosses, so we just welded one on the left side in an appropriate place. Note that the sensor/boss needs to be installed somewhere between horizontal and vertical, angled with the tip downward.
For the muffler hangar on the right side, we were able to just bolt through the steel bar structure to attach the silicone grommet. On the left side, the bar geometry was such that we couldn't get a bolt straight through the bar, so we welded a tab made out of 1/8" x 2" steel angle to the bar and bolted the grommet to that. In both cases, a 1" x 3" strip was cut out of the 22 gauge steel sheet to make a little bracket between the perforated strap around the muffler and the silicone grommet. The bottom of the strip was bent up slightly to help capture the perforated strap and in addition, an 8-32 screw with steel locknut was used to help keep the bracket and strap together.
We rough positioned the rear decklid to determine that we were in the ballpark with the muffler exit position, but probably will need to put a slight "S" bend in the tips to get them to come out at the right position.
Be careful welding cats in position; they have a flow direction arrow stamped on them.
On the right side, we needed to cut down the manifold studs a bit to get the assembly in and out. On the left side, the studs were left as-is.
The clamps are used to connect the mufflers to the pipe. This makes it possible to unbolt the clamps, remove the muffler, unbolt at the flange connection and then lift the rest of the assembly out as one unit (with some twisting, turning and lubricating words).
One of the pictures "Rear of Car" shows the oil cooler bypass line on the transmission. This is apparently required if you are not using a transmission oil cooler (something I learned from another post on this forum). This will be primarily a street car and I am told that for street use, a transmission oil cooler is not required. The same picture also shows how tight the clearance is between the transmission shifter arm and the heim, with its re-welded top tab (there's actually more clearance than it looks in the picture).
The final product is quite a tight fit, but hopefully will result in a reasonable noise level for street use while preserving plenty of flow through the 3" pipes. The real test should come in a few months, with first engine start. . .
Attachments
-
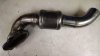 Right Pipe.jpg174.4 KB · Views: 316
 -
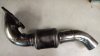 Left Pipe.jpg164.1 KB · Views: 295
 -
 Right Pipe from Top.jpg73.1 KB · Views: 298
 -
 Right Pipe from Rear.jpg194.3 KB · Views: 343
 -
 Right Muffler.jpg77 KB · Views: 261
 -
 Rear of Car.jpg268.5 KB · Views: 410
 -
 Right Bracket.jpg182.5 KB · Views: 322
 -
 Left Bracket.jpg211.2 KB · Views: 373
Last edited:
")