1149 Mono Replica

Ron McCall

Supporter
Jim,

Sounds like you are making some great progress!!
Do you think the car will be finished for spring time?
If you are interested, the local Pantera club is having a meeting in Owings Mills Md on Dec 19th.
I probably will take the Pantera instead of the GT40 but you never know!
If you are interested in attending, email me for details.The owner of the shop who is hosting the event knows a local guy who ownes two Safir GT40s. I'm going to try to get him to invite him as well!

Great job on your car!
 
Jim

like your accelerator cable bracket. Could you tell me the source and evtly Part#

attachment.php


Thanks
TOM
 

Jim Rosenthal

Supporter
That accelerator cable bracket came from Jeg's (JEGS Performance Auto Parts - Accel Billet Specialties Edelbrock MSD Moroso Mr Gasket).

I am not working at the hospital on 12/19 and would be interested in coming. I don't have anything with a Ford engine that can be driven in December, but I would love to attend. Email me with details, if you can.

Are the Safir cars the ones from Parkton, MD? If so, I think one was at Summit Point not too long ago, someone sent me some photos.
 

Ron McCall

Supporter
That accelerator cable bracket came from Jeg's (JEGS Performance Auto Parts - Accel Billet Specialties Edelbrock MSD Moroso Mr Gasket).

I am not working at the hospital on 12/19 and would be interested in coming. I don't have anything with a Ford engine that can be driven in December, but I would love to attend. Email me with details, if you can.

Are the Safir cars the ones from Parkton, MD? If so, I think one was at Summit Point not too long ago, someone sent me some photos.


Give me your e-mail and I will you provide you with the details. Yes. they are the same. This picture is from the Summit Point event in November.
 

Attachments

  • 6a0112791cb10528a4012875f8b7de970c-800wi.jpg
    6a0112791cb10528a4012875f8b7de970c-800wi.jpg
    32.4 KB · Views: 396

Jim Rosenthal

Supporter
First photos of the dashboard with the gauges and switches set in. One indicator light is missing, a green one for the turn signal. (opening needs to be reamed a bit for it) Otherwise everything seems to fit very well. The dash molding is thin and flexible enough that I am keeping it on the table upside down as I think it may crack if left rightside up. The painter, Glenn Brown, did an outstanding job with the dull black finish on the dash. Next thing is to plan the wiring- where it all goes and gets bundled with etc.

Notice I forgot to fit a voltmeter and there is only one fuel level gauge. I'll use two senders and a DPST switch to choose which one talks to the fuel level gauge. As for the voltmeter...maybe the ammeter will be enough? The original-style CAV ammeter came from Andrew Booth, to whom I am much obliged for all the help he's been.
 

Attachments

  • 20091216_02.jpg
    20091216_02.jpg
    45.9 KB · Views: 555
  • 20091216_01.jpg
    20091216_01.jpg
    45 KB · Views: 515
  • 20091216_03.jpg
    20091216_03.jpg
    48.9 KB · Views: 501

Chuck

Supporter
Jim:

Dash looks good. Like the lucas switches and intruments - nice authentic / original look. That amp meter adds to the originality as well. Very nice!

Chuck
 
Jim:
The ammeter is definitely correct, but they are a real pain in the butt. You will need to feed your battery power for all of the accessories through the ammeter to get it to function, and they have been known to cause problems. The meter can be a high resistance point, and that usually means they get hot.
There was a thread on ammeters here on the forum a couple of months ago that covered the subject pretty well.
I am going with a voltmeter, just my choice from experience.
I see you are using bottom read Smiths gauges, and I have 4 or 5 voltmeters laying around here. I will post a few photos later today, and if you see anything you like PM me with your address and its yours for the asking.
Your dash looks great, and I am currently working on mine and if it comes out anywhere close to that I will be happy.
Cheers
Phil
 

Jim Rosenthal

Supporter
Yes, I noticed that the ammeter terminals are pretty robust. Does that mean that all the power for all the accessories needs to go through it- like all the lights, etc? I'm not sure I want to do THAT.

Thanks for the offer; you can also PM me as well or send me an email. I have some bits and pieces around here that maybe you'll be able to use. Boy, do I have some bits and pieces.
 
Jim:
To answer your question , yes all the current needs to go thru the ammeter. This enables the ammeter to register current flow in both directions, whether you are charging or discharging. The voltmeter needs only to be hooked up at any point in the system and it will read system voltage, and show whether you are charging or not.
I took a photo with my crappy little camera, and I have these two voltmeters laying around.
Looking at your dash reminds me of one I saw this year at Carlisle in an SPF, the finish was a flat black, but felt almost like a velvet to the touch. The car was in the big building at a display, and no one there seemed to know or wanted to say what the finish was. A little research and I found out that it is a basecoat flat black, with a finish called soft touch clear coat. Really a nice looking finish.
cheers
Phil
 

Attachments

  • Voltmeter 004.jpg
    Voltmeter 004.jpg
    31.1 KB · Views: 380

Jim Rosenthal

Supporter
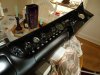
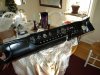
I've been wiring the dashboard, and enjoying it, since I get to do it at home and not freeze in a cold garage. Meanwhile the shop has been industriously working along on the bodywork, with the result that the headlight mounting points are in (they needed to fabricate flat sections that the Marchal headlight mounts will bolt to, and drill holes for the headlight adjusting screws so that they can be aimed.

Has anyone wired their headlights WITHOUT using a relay? The Marchal lamps' bulbs draw enough that I think the prudent thing would be relays for the high beam, low beam, and driving lamps. It seems risky to do it any other way. The labeled harness wires will then become the primary side of each relay circuit, since the harness doesn't seem to have relays in it.

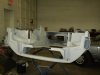
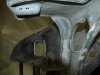
We had to backtrack and (again!) modify the rear bodywork to clear the battery. We didn't realize that when there is actually a battery in the battery box, plus the fiberglass cover over it that I got from Cushman, the rear bodywork sits on the cover. Safir Mark V cars seem to have had the battery on the right side of the car; my Mark I tub has it on the left (which will also mean running a starter cable over to that side as well; can't wait to see where we can fit THAT in). Consequently the bodywork interferes with the top of the battery cover. This week we sawed a 3x3 section out of that area and rebuilt that part of the rear clip in order that when it comes down and seats there is enough room for the battery and its hold-downs.

The rear clip also interferes with the outboard fuel pump mounting area, possibly. I won't know until I have my fuel pumps from Andrew, but I'll figure out a way to get them in there, so help me.

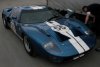
We have been "almost done" with the rear bodywork about six times now and each time we think we are finished, something else comes up. If the bodywork mods we are now doing clear the battery, then the only thing left is to drill the holes for the pins that secure the leading edge of the bodywork up on top (because the angle of the bracket is wrong and the tub is already painted, we have elected to make up angled spacers of stainless tubing stock which will correct the pin angle so that the rear bodywork can smoothly go up and down) Then maybe it's off to the paint shop. I hope. All the lights have been fitted (not that there are so many, are there; I passed on backup lights since you can't see out the back of the car anyway, who needs them), the louvered grilles all fit, and the exhaust pipes come more or less out of the center of that rectangular opening in the middle of the back. So, maybe- just maybe- in a week or two the first part of the exterior of my car will get filled, primed, and the black inner finish applied. That would be nice, wouldn't it?
 

Jim Rosenthal

Supporter
If all goes as planned, the rear body section, which has now been fitted with its "hood" pins (I think they would be called bonnet pins on the other side) will go to the body shop either Thursday or Friday. The relief that had to be made to clear the battery came out very well. The pins corrected nicely with the angled stainless pipe spacers (we had a section of 316 SS pipe left over from the Cobra project; it was used to mount the bumperettes). Photos on the way.

Can anyone recommend a good basic book on how to wire up a car? I have instructions for the Smiths gauges and a few other things but I could use some formal reference. My marine wiring experience is helpful (I am actually using Ancor marine wiring materials since they are a bit heavier than AWG and I already have a lot of Ancor stuff in my boat's electrical repair chest) but not everything on a GT40 has an analog part on a boat. Like, for example the turn signals are the same color right and left, and there's nowhere to put the bilge pumps.

All kidding aside, if anyone has a suggestion on a wiring handbook, please pass it along.
 

Jim Rosenthal

Supporter
The rear body section moved this week to the body and paint shop; sort of anticlimactic, really- just loaded it in the pickup and drove it over there. Meanwhile, work has moved along on the front section- reliefs in the nostril panel needed to be made for the radiator fan rigging, which they've done, and there will be some sanding and matching of surfaces so that when the nostril panel is tightened down with the Dzus fasteners it fits without distortion and the possibility of cracking. Also remaining to do are the openings for the driving lamps and those partitions behind the lamp assemblies which mount the aluminum covers for the backs of the lamps. Those pieces are mostly made, at least the FRP ones are; we just have to glass them in and then make up the aluminum covers.

I chose to fit the larger driving beams which resemble the ones fitted to 1075 in its race days. More than likely, these are so large that there won't be room for a park-turn signal in the lower lamp recess. I would be grateful if folks would make suggestions about what sort of turn signals to use, where to mount them, etc. I've had a few ideas (flat ones mounted horizontally ahead of the headlamps in the upper recesses, LED ones mounted up there, or something on the side of the body and not in the lamp recesses at all). Suggestions appreciated, believe me. Don't be shy. I need all the help I can get. No doubt there are products I am not aware of, even after looking around on the web, and the right one may be known to someone else.

After the front clip is done and departs for the body shop, we're going to tackle the fuel tank problem; we have a flat template of the putative shape of the tank, and we're going to see if that will fit; if so, the metal shop will make up the tanks accordingly and then we just have to take off some of the front running gear to get them in there. During that time the doors need to be cut partly apart and reglassed so that they properly fit the monocoque, and then maybe finally we'll be done with all the dusty work. At least I hope so. The doors fit the body below the beltline fairly nicely; it's the fit to the roof and upper door opening that isn't good, and the tops of the doors are wavy and irregular. We're still figuring out how to get that right. Probably some interior reinforcement and exterior surfacing...

Photos Monday. The shop is closed for the weekend.
 

Brian Stewart
Supporter
This is how two original cars have tackled it Jim.
 

Attachments

  • Picture 1.jpg
    Picture 1.jpg
    30.5 KB · Views: 409
  • Picture 2.jpg
    Picture 2.jpg
    34.3 KB · Views: 424

JimmyMac

Lifetime Supporter
The original versions which I have came from a Ford Anglia.
However these lights from Holden are available in amber and are a pretty accurate substitute.
 

Attachments

  • HOLDEN LIGHT.jpg
    HOLDEN LIGHT.jpg
    38 KB · Views: 319

Jim Rosenthal

Supporter
A (nonphoto as usual) update: thanks to Andrew for photos of his tanks which are very useful indeed in making the drawings for mine....rear body section was supposed to be in sprayable filler primer Friday, but the gun clogged- not the right one- so maybe tomorrow. With any luck, the black inside color on the rear bodywork may get sprayed in this week as well, if not a great deal of sanding is needed....well, I can always hope.

I should have fuel pumps from Andrew in UK within a week or so, and then we are goint to begin installing everything that goes on the engine room bulkhead: pumps, coil, MSD, etc etc etc etc. I am also getting the fuel fill cones from Andrew; those tapered aluminum fabricated pieces that bolt in under the fuel fill caps and through which the fuel runs down to the tank inlet. Those will go in first; then we make the final drawings for the tanks, based on where everything needs to go to fit into the car and permit access for connections.

We may have a go at fitting the windscreen in the next week or two as well. If it's possible to transport it....
 

Jim Rosenthal

Supporter
Some photos from today. The rear clip is upside down and in the process of getting white filler sprayed on it. The photo of the front clip (which is also upside down; we plan to turn the entire car over to fit the body panels onto it) shows the mounts we added inside the front clip for the Marchal headlamps. The front clip is actually fairly close to completion- the gaps at the rear edges of the clip need to be tightened up, but this should not be too difficult as there is a lot of material there to graft onto. The headlight rear partition panels are more or less ready to go in; they are at the metalworking shop having the covers made for them, and then will get glassed in. The holes and mounts for the round Marchal driving lights will be made up this week or next.

So it goes, as Kurt Vonnegut said. Of course, he always said that when one of the characters in the book got killed. I think it's 'Slaughterhouse Five".

A good read, if you have a dark sense of humor (and who building a GT40 doesn't?) and time on your hands.
 

Attachments

  • 20100126_07.jpg
    20100126_07.jpg
    30.8 KB · Views: 433
  • 20100126_06.jpg
    20100126_06.jpg
    32.1 KB · Views: 401
  • 20100126_03.jpg
    20100126_03.jpg
    31.5 KB · Views: 396
"Some photos from today. The rear clip is upside down and in the process of getting white filler sprayed on it".

Jim, what kind of filler did you use, looks good!
 

Jim Rosenthal

Supporter
I can find out from Glenn, what the name of the stuff is. It may be a Sikkens product, since that's the paint system he uses. It's heavier than a primer, and seems to flow out very well. It also kicks rather quickly; it's dry to the touch in an hour or two. I'll ask him. I do know that it requires a particular gun to shoot it, because it's considerably thicker than primer or paint.
 
Back
Top