1149 Mono Replica

Jim Rosenthal

Supporter
all the wrong photos, I'll try again
 

Attachments

  • 20091001_58.jpg
    20091001_58.jpg
    50.1 KB · Views: 575
  • 20091001_56.jpg
    20091001_56.jpg
    48.9 KB · Views: 567
  • 20091001_54.jpg
    20091001_54.jpg
    43.3 KB · Views: 494
  • 20090919_51.jpg
    20090919_51.jpg
    63.9 KB · Views: 584
Last edited:

Jim Rosenthal

Supporter
Trying again; these are some photos of the coolant lines in, the tank in, and the thermostat housing in, which of course has to come out so we can redrill and tap it and install the sensor for the cooling fans. I don't know whether my prior post survived (only the wrong photos did, I think) but I had a frame made up for the cooling fans which will mount them and bolt into the front of the chassis behind the radiator. THEN we can begin fitting the nose panel and the front bodywork and make sure nothing interferes with anything else.
 

Attachments

  • 20091001_62.jpg
    20091001_62.jpg
    48.9 KB · Views: 552
  • 20091001_63.jpg
    20091001_63.jpg
    57.4 KB · Views: 577
  • 20091001_67.jpg
    20091001_67.jpg
    45.3 KB · Views: 559
  • 20091001_65.jpg
    20091001_65.jpg
    53.5 KB · Views: 531

Jim Rosenthal

Supporter
Spent some time with the fans and the frame for them today, with gratifying results: the frame of square steel tubing cleaned up nicely and once painted with the fans mounted looks very good indeed. The SPAL fans are puller fans; I hope this will be adequate, I know the original ones pushed air instead, but the Kenlowe fans weren't as efficient, I don't think. Anyway, the fans fit the frame, and the frame fits the car, so the next step is to mount it in between the front spars of the tubing structure at the front of the tub, which is what the front body clip mounts to. It appears that this assembly fits well enough that we won't even have to modify the nose panel to clear it.

The nose panel has its' own issues- it is clearly warped and will not fit flush with the front body clip. I have no idea how we are going to solve THAT problem. It has to fit well enough to permit the Dzus fasteners to cinch it down and hold it there. But once the fan assembly is in we can push on with the bodywork.
 

Russ Noble

GT40s Supporter
Lifetime Supporter
The nose panel has its' own issues- it is clearly warped and will not fit flush with the front body clip. I have no idea how we are going to solve THAT problem. It has to fit well enough to permit the Dzus fasteners to cinch it down and hold it there. But once the fan assembly is in we can push on with the bodywork.

Jim,

Great build, keep up the good work! Judicial application with a heat gun in the right places is usually enough to take any warp out of fibreglass.
 

Jim Rosenthal

Supporter
Well, on the fans, we'll see; I hadn't thought of that. I may need to come up with a fan shroud as you say. Or change them out for pusher fans- I could do that, too.

I hope we can get the fiberglass to fit; I didn't know you could do that with a heat gun, but it makes sense. It's worth trying, anyway.


Got a call today from Stainless Headers in Minnesota- they are getting right to work on the set for the GT40. They estimate three or four weeks. As soon as we have something, I'll post photos. If the finished set look like what's on their web site, I'll be very pleased indeed. I plan to leave the old set with them as a pattern in case anyone else decides to get an exhaust system made by them.
 

Jim Rosenthal

Supporter
Here's another question: how important is the sheet metal (aluminum) which encloses the front structure of the monocoque and separates it from the road? I wonder what effect that has on cooling? We haven't done that as yet, and I am still figuring out how I want to do it. Drilling a lot of holes in the tubing and riveting it doesn't appeal to me; I am thinking about alternatives.
 
Last edited:

Rick Muck- Mark IV

GT40s Sponsor
Supporter
Here's another question: how important is the sheet metal (aluminum) which encloses the front structure of the monocoque and separates it from the road? I wonder what effect that has on cooling? We haven't done that as yet, and I am still figuring out how I want to do it. Drilling a lot of holes in the tubing and riveting it doesn't appeal to me; I am thinking about alternatives.

The FAV cars all have the ally riveted on however you could use the newer adhesives to do the deed.

I think you will have cooling air flow issues without the paneling as the radiator outlets will not have enough airflow to work i.e. without the outlet being controlled, the velocity will drop and you wll not have the negative pressure to draw out the hot air.
 

Jim Rosenthal

Supporter
Rick, you may be right. What I have noticed, though, with the nose panel in, is that there isn't a lot of room around the fans for air to get lost, as it were. If I need to work up a shroud for them I will. It would also be fairly easy to install an oil cooler as the engine already has a remote oil filter setup installed, so some of the plumbing is already there. I am hoping to get the fans hard mounted this coming week and get some idea as to how they are going to work- the wiring isn't in, but I can rig something to power them up and see what kind of air comes through the radiator core.

I took one of my other cars to the painter we are going to use for the GT40- a 1971 Mercedes 3.5 convertible. There was a place behind the passengers' side door, below the beltline, where the paint did not match because it had been resprayed or badly done before I got the car. He was able to match the color and flake of the rest of the car, and blended in the clear coat (the whole car was resprayed years ago, long before I got it). The job was very well done. I am very much encouraged as to how the GT40 is going to look when done- his level of craftsmanship is very good indeed. It will be such a pleasure to see it looking like a finished automobile- even if we still have to wire and plumb it, etc. That will be a great day for certain.
 

Jim Rosenthal

Supporter
I looked at the radiator fans and decided to change them at this stage rather than later; if I revise the mounting hardware I can place them right up against the radiator core with the mounting frame behind them instead of in front. This probably won't take too much effort and I agree with Rick that it's better to start off that way instead of having to change it. It will actually make the nose panel fit better, since the fans won't project back as far.

I'm suppose to have a battery, too, which will make it easier to spin them up and see what they do. If we get that finished, and the thermostat housing redrilled and tapped for the fan sending unit, we'll have the cooling system just about squared away.

I think the next thing I am going to tackle is the engine room bulkhead, the whole wiper/washer business, and the dashboard. The dash will go last, because it still needs to be painted; then I am going to take it home and wire it up. But we have had all the instruments and switches already in it. That ought to take up a few winter nights...
 
Jim, I just have my fans wired with a manual switch. My engine stays cool (180F) as long as I'm moving so I don't run the fans unless I get into traffic. Just a thought that might save the drilling and tapping of the thermostat housing.
 

Jim Rosenthal

Supporter
Mark, there's already a hole in it. Otherwise I would do exactly as you say and just make it manually switched. But it was already there, although drilled and tapped for 1/2"-20 thread- basically an oil pan plug. I am going to take it out to 3/8" NPT, which will fit the sender that's already packaged with the SPAL fans and their controller. Might as well. This will only be the third or fourth time I've had the thermostat housing on and off :(
 

Jim Rosenthal

Supporter
Well, here's something that fits- maybe two things, believe it or not. The battery case looked to be the right size for an Odyssey 1230- I think I posted something about Odyssey batteries before- they are great for this kind of application as they don't leak and they have huge cranking power especially for their size. So I ordered one- and when I got to the shop it was already in the battery box, and, imagine this, it does fit perfectly. I have to notch the fiberglass battery box cover that was made by Cushman and it will drop over the battery box perfectly and not skid around- then I can paint it and make some kind of holddown which will work with the screw holes that are already threaded into the tub next to the battery box.

We also reversed the fans so they are next to the radiator core, and ought to work a lot better. We still have to try the nose panel in there- probably we WILL have to notch it a bit since the frame is now aft of the fans themselves, and may interfere with the center section of the nose panel, but it's going to work better and will help keep the engine cooler.

Can anyone recommend a fuel hose brand that is modern but looks old- and will work with barb fittings and external clamps? It's funny, but over the time I have been building this car my ideas about what looks good have changed a bit- I find myself now trying to find things that look as original as possible even though most people won't have any idea what they're looking at. It does matter to me, though, so finding a fuel filter that looks like the FISPA makes a difference. Finding original-looking hose and clamps likewise. Of course I've use SS braided hose for some of the coolant lines, so I'll either have to live with it or shrink-wrap the parts you can see, which I can easily do.

Other news- the headers are in progress. They have a SBF motor at the header shop on which to do the final fit of the pipes, before they finish weld it all up. Can't wait to see these. Oonce they're installed, I may just climb in and sleep in the car for a while....
 

Jim Rosenthal

Supporter
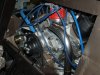
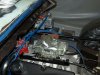
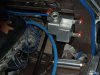
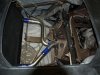
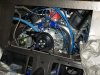
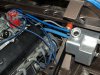
Another update, if anyone's listening (this has taken so long that if I have put everyone to sleep I wouldn't be surprised): anyway, this was a vacation week for me, so some things have gotten accomplished: 1) final assembly of the radiator fan rig and installing it in the car. VERY close to the radiator indeed, we'll see how that works. 2) installing the sending units for the Smith's gauges, which I am about halfway through- hopefully to finish tomorrow- several trips to West Marine for various 1/8"NPT adapters 3) templating the cover plates which go right in front of the windshield frame 4) finding dash vents that will fit. We are trying some from Vintage Air- I don't know if they'll fit, but they are nice guys to deal with, very knowledgeable and efficient 5) working out how the dash wiring is going to go- if the vents fit, we'll have the dash painted and I'll start wiring it up 6) battery and cover in place, just need to make a holddown for it 6) there IS a place for everything that goes on the front engine room bulkhead, although I didn't think there would be. We'll mock this up next week- the fuel pumps, the voltage regulator, the coil, the fuel filter-regulator, the header tank, the expansion tank, and the MSD box- a place for everything, or pretty near so.I think we can get it all in there.

I have some photos, but will wait to post them as I expect to have some better ones etc before too long. The fan assembly interferes a bit with the nose panel, which will have to be relieved to clear the back of the fan frame. That was the price of getting them as close as possible to the radiator core, but I agree with everyone who said they would work better that way. I am not certain they would have worked at all the previous way.
 

Jim Rosenthal

Supporter
A few more small steps...Pegasus Auto Racing sells steel saddle washers for through-bolting round tubes and rods, for example the shift rod that goes back to the ZF transaxle on my car. We had to drill them out to AN-4 size- they do not come in AN-4, only AN-3. Now fitted and snugged up. Also some suitable length AN bolts which secure the proximal end of the forward bodywork stay cables, which now look very trim and neat. And some aluminum covers for those openings in the monocoque which are just ahead of the windscreen frame; on some original cars there were two circular holes cut in the drivers' side one of these to allow the covers of the brake and clutch fluid reservoirs to be removed- they projected up through the metal cover. I decided to just have a relief made in that area, and the reservoirs aren't covered up (I'm not explaining this very well, but they are getting painted and the photos will go up next week) We just have to decide how to secure them in place.

The exhaust system, from Stainless Headers in Minnesota, is under construction; they are waiting for the flanges to arrive from their laser-cutting supply firm. Once they are there, they will weld everything up and after final cleaning, send it all to me. My car came to me with some non-AN bolts holding the transaxle in- not usable for driving. So, since installing the exhaust system will cover up the area where the transaxle mounts, we are going to install the AN bolts that ought to be in there, tighten everything up, and then fit the exhaust system. After that I will need to make up some drawings and templates for the bracket that supports the back of the exhaust system and the perforated metal shield over it. We also need a bracket to secure the Parker lines that run back and forth to the remote oil filter unit. Once that is all in, the only major thing left in the engine room area will be all of the items that need to be secure to the front engine room bulkhead- pumps, coil, fuel filter, MSD control box, voltage regulator. That ought to take us a few weeks and then we can see about making a glass window for the cutout in the rear bulkhead. Photos to follow; wish I had more but I get worn out working on her and then I forget to shoot pictures of what I've done.
 

Jim Rosenthal

Supporter
The Idiot Enlightened; or how I only looked at something fifty or a hundred times before realizing how it fits....

My mother (who loved cars, but is no longer with us, sadly- she would have loved a ride in a GT40) used to say "school's always in session, dear boy". She was right.

Several months ago I bought two original-style dash vents from Andy in the UK, along with other various bits I needed. It appeared that they wouldn't fit in the dash openings.

However, now after reviewing some photos kindly sent me by John Shand, who is clearly far more intelligent than I, it appears that the vents actually mount to the tub, and the ball part of the vent sticks through the fiberglass molding of the dashboard. in other words, they may indeed fit, and they may have fit all along. We'll see Tuesday- I am working tomorrow and can't get down to the shop, but boy do I wish I could. If they fit, then we can paint the dash and I can begin installing all the Smiths instruments and the wiring that works them as well as all the switches.

Of course, if this all DOES work together, it would have been nice to know of it a few months ago and have the dashboard done by now, wouldn't it?

No one to blame but myself, that guy in the mirror. As usual. Am I the only feeble-minded person trying to build a GT40? I hope so.
 

Jim Rosenthal

Supporter
Todd, I don't know. I used to know. 22 ga, maybe? If you PM Brian Stewart or John Shand, or if they're listening, they can tell you. They are both down in the South Island building similar monocoques to mine, and they are around the tooling etc and will know the sheet metal gauge. My guess is that it isn't all one gauge, but I could be wrong. See above- I'm often wrong.
 
Back
Top