Deleated

You are using an out of date browser. It may not display this or other websites correctly.
You should upgrade or use an alternative browser.
You should upgrade or use an alternative browser.
CANAMSA - SA stratch build
- Thread starter Fred W B
- Start date
Hi Fred,
Don`t know if you already use these tools "Fillet Balls"?? They are so cheap/easy to use and handy for doing fillets using plasticene, and they leave a real good finnish! Maybe you could find a supplier over your way?
Link: Wax Fillet tool set - East Coast Fibreglass Supplies
Don`t know if you already use these tools "Fillet Balls"?? They are so cheap/easy to use and handy for doing fillets using plasticene, and they leave a real good finnish! Maybe you could find a supplier over your way?
Link: Wax Fillet tool set - East Coast Fibreglass Supplies
Hi Chris
Thanks for the note. I made my own not so professional versions of the tools you suggest, by welding balls (from ball bearings) to a bar. The smaller one in the pic is made from a stainless steel welding rod with the ends rounded by a power file applied while the rod was rotated in a drill chuck.
Cheers
Fred W B
been a long time Fred, what's going on?
hope your still making progress.
keep it up it!
regards Thomas
hope your still making progress.
keep it up it!
regards Thomas
Hi Thomas
Thanks for your interest and encouragement. I have not been able to spend much time on the project in the last few weeks at all, but should be able to get some more fibreglassing done this weekend
Cheers
Fred W B
Thanks for your interest and encouragement. I have not been able to spend much time on the project in the last few weeks at all, but should be able to get some more fibreglassing done this weekend
Cheers
Fred W B
Ahh very good to hear you're still on it,
otherwise I would have to mail some nice pictures of my GD build to get your appetite going again.....")
keep us posted!
regards Thomas
otherwise I would have to mail some nice pictures of my GD build to get your appetite going again.....
keep us posted!
regards Thomas
Thanks Thomas
Have the LH side door laid up now, and will pull it out the mould on the weekend. Am also making good progress on the RH door mould.
Cheers
Fred W B
Have the LH side door laid up now, and will pull it out the mould on the weekend. Am also making good progress on the RH door mould.
Cheers
Fred W B
Nice.
btw the tools described above, do you use these to put the plasticine on the shut lines of the moulds or something?
I'm desinging the wiring loom for the T70 at the moment, uses stock ford stalks an ls1, Omex 710, and stack dash.
regards Thomas
btw the tools described above, do you use these to put the plasticine on the shut lines of the moulds or something?
I'm desinging the wiring loom for the T70 at the moment, uses stock ford stalks an ls1, Omex 710, and stack dash.
regards Thomas
btw the tools described above, do you use these to put the plasticine on the shut lines of the moulds or something?
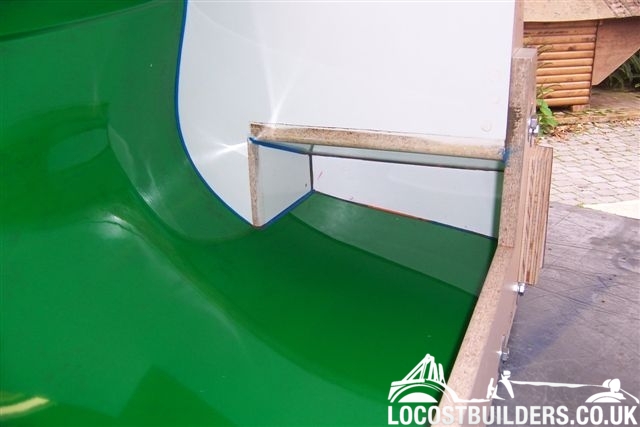
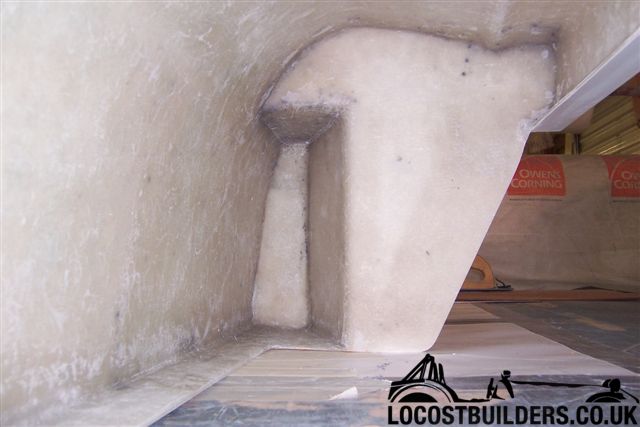
Yes, to form a nice small radius on what will become the "outside" corners on the part, as per the blue lines you see in this pic.
Cheers
Fred W B
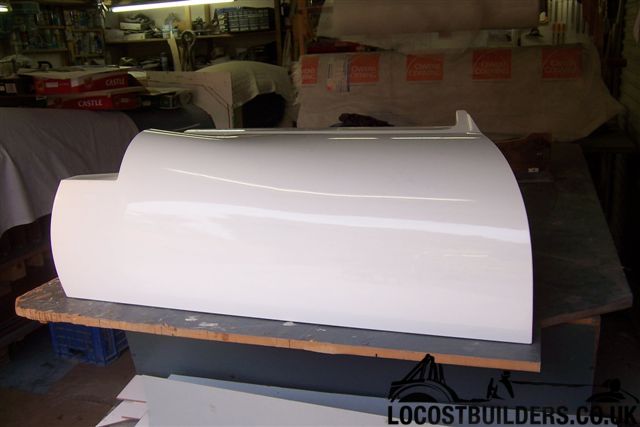
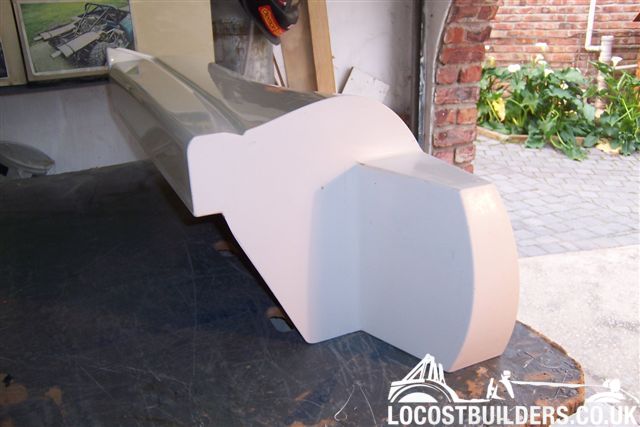
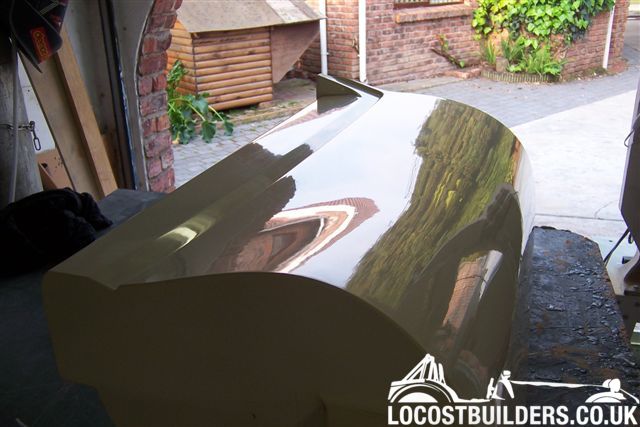
Behold, a door!
Finally finished making up the first real part. The lay-up I used is:
Gel coat (I first stripe coated all the corners/edges, then two more applications).
1 layer 300 gram CSM.
2 layers 600 gram CSM.
This gave me a final thickness of between 3 and 3.5 mm.
I added extra thickness on the edges, and in the forward part of the door and hinge recess.
The final part weighs 5.5 KG.
The pics are as the part came out the mould, with just the edges cleaned up a bit.
My skills with applying the gel coat and laying up are improving, but still some way to go. I have to keep telling myself "Don't Panic" as I try to get it all done neatly before the resin goes off.
Cheers
Fred W B
very nice indeed.
what's the surface quality like? it seems realy good out of the mould.
thumbs up to you Fred!
what's the surface quality like? it seems realy good out of the mould.
thumbs up to you Fred!
Hi...
it looks like you are getting there
I am very impressed that you did this all by yourself and that you are still at it this many years in,
I would probably have given up ! I have lots of half finished projects around here.....
or gotten profesional help, no not the mental kind but someone who works with fiberglass everyday to do the molds.
Anyway keep us posted
Beaulieu
it looks like you are getting there
I am very impressed that you did this all by yourself and that you are still at it this many years in,
I would probably have given up ! I have lots of half finished projects around here.....
or gotten profesional help, no not the mental kind
but someone who works with fiberglass everyday to do the molds.Anyway keep us posted
Beaulieu
Thanks for the positve remarks guys, I am starting to be happy with how things are turning out.
Now almost ready to start laying up the "scuttle" section mold. The parting fences are installed (with 3mm hardboard spacers against the door molds to create the panel gaps) and the surface waxed. Just need to plastacine the remaining small edge gaps and finish cutting all the matt pieces and I can then get on with it.
I decided to do this mold in two parts, hence the locating "bumps" at the centre split line. These were made by casting resin around bolts stood upright in the sections of a plastic tray from a box of chocolates, and then finishing them smooth.
Cheers
Fred W B
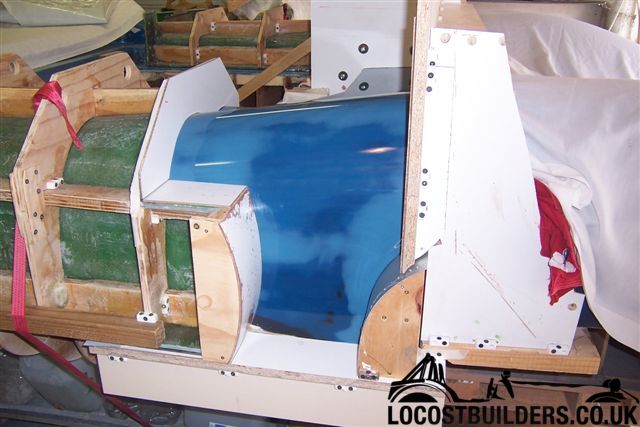
Terry Oxandale
Skinny Man
Great work Fred. Can't imagine what you've got in store for the mechanical pieces!
Thanks guys for the kind compliments.
[SIZE=+0]Terry - I am really looking forward to getting back to the mechanical bits. Their is a bit of information about my chassis progress so far at the very front of this thread. [/SIZE]
[SIZE=+0][/SIZE]
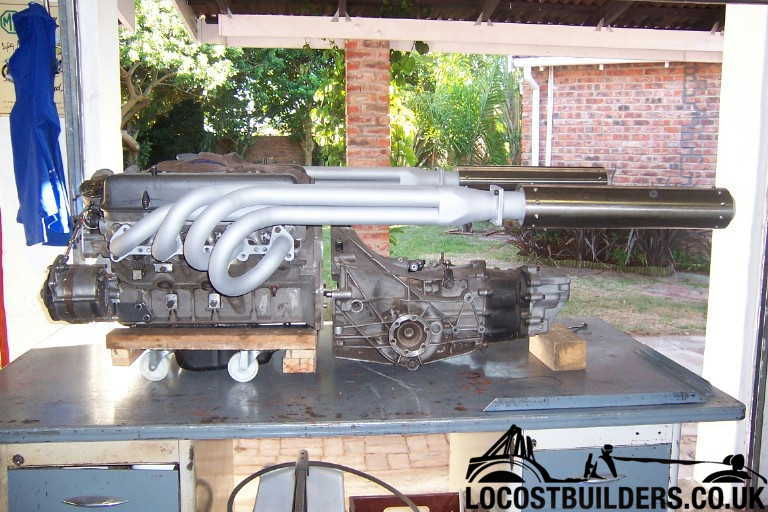
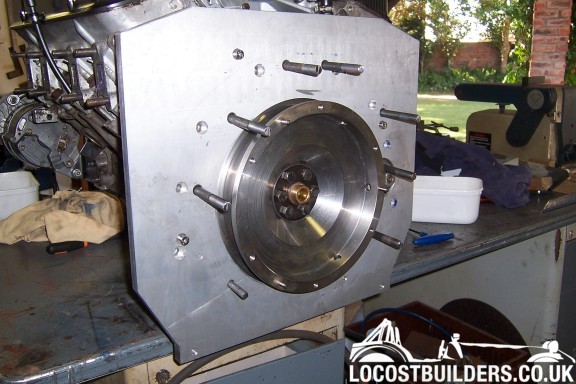
[SIZE=+0]As for running gear, I have a zero distance race prepped Rover V8 to eventually go in, with dry sump and downdrafts. The motor in the pic below is an "old smoker" that I will get the car running with initially. Transaxle is Audi 016 AAZ with an adaptor plate and flywheel of my own design. [/SIZE]
[SIZE=+0][/SIZE]
[SIZE=+0]Once I get the moulds and first body done I will then fit up the body on the proto chassis (some inner panels to sort as well), sort all the mounting brackets etc and make the wishbones. Then I will have to build up the real chassis and car. - Then comes roadworthy, testing and finally installation of the "real" motor.[/SIZE]
[SIZE=+0][/SIZE][SIZE=+0][/SIZE]
[SIZE=+0][/SIZE]
[SIZE=+0]Z.C - I knew the scope of work involved, but wasn't expecting quite this duration![/SIZE]
[SIZE=+0][/SIZE]
[SIZE=+0][/SIZE]
[SIZE=+0]Cheers[/SIZE]
[SIZE=+0][/SIZE]
[SIZE=+0]Fred W B[/SIZE]
[SIZE=+0][/SIZE]
[SIZE=+0]
 [/SIZE]
[SIZE=+0]Terry - I am really looking forward to getting back to the mechanical bits. Their is a bit of information about my chassis progress so far at the very front of this thread. [/SIZE]
[SIZE=+0][/SIZE]
[SIZE=+0]As for running gear, I have a zero distance race prepped Rover V8 to eventually go in, with dry sump and downdrafts. The motor in the pic below is an "old smoker" that I will get the car running with initially. Transaxle is Audi 016 AAZ with an adaptor plate and flywheel of my own design. [/SIZE]
[SIZE=+0][/SIZE]
[SIZE=+0]Once I get the moulds and first body done I will then fit up the body on the proto chassis (some inner panels to sort as well), sort all the mounting brackets etc and make the wishbones. Then I will have to build up the real chassis and car. - Then comes roadworthy, testing and finally installation of the "real" motor.[/SIZE]
[SIZE=+0][/SIZE][SIZE=+0][/SIZE]
[SIZE=+0][/SIZE]
[SIZE=+0]Z.C - I knew the scope of work involved, but wasn't expecting quite this duration![/SIZE]
[SIZE=+0][/SIZE]
[SIZE=+0][/SIZE]
[SIZE=+0]Cheers[/SIZE]
[SIZE=+0][/SIZE]
[SIZE=+0]Fred W B[/SIZE]
[SIZE=+0][/SIZE]
[SIZE=+0]
Holy crap, those are going to be LOUD!
nice to see that even in SA you are using this engine.
Fred can you do me a small favour? can you measure the distance inbetween the exhaust ports on this engine for me?
I have a little hope these will be more of less the same as my LS1, in which case it might be doable to modify a RV8 cross-over set to fit my application. (ls1 with 180 headers...... )
Grtz Thomas
Similar threads
- Replies
- 6
- Views
- 1K
- Replies
- 18
- Views
- 2K