

You are using an out of date browser. It may not display this or other websites correctly.
You should upgrade or use an alternative browser.
You should upgrade or use an alternative browser.
David G 69 Gulf SPF build begins.
- Thread starter 68Rcodeman
- Start date
")
David Garton
Supporter
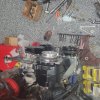
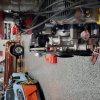
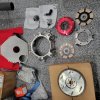
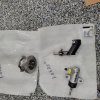
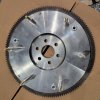
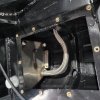
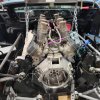
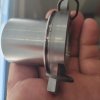
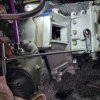
So I have been accumulating needed parts to start the install. I now have the clutch and bellhousing kit with 141 tooth flywheel and external slave cylinder. Then while the engine is on the stand I went through all the loose brackets furnished with the car without any assembly manual. Worked on getting the AC compressor bracket mounted to the right side of the engine. With the Gurney heads the mounting holes are different and the Motorsports block had the boss casted below the head but not drilled or tapped. I was able to get two in the head and drilled and tapped 3/8 hole in the boss under the head and add a third mounting bolt for the AC bracket.
Attachments
Last edited:
David Garton
Supporter
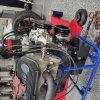
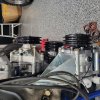
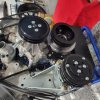
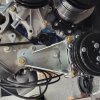
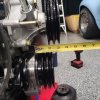
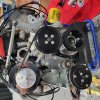
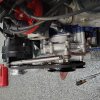
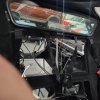
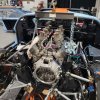
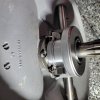
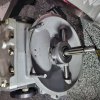
I removed the long nose waterpump and installed the shorty pump from Ford Motorsports . Ordered the double pulley kit from CVF billet pulleys. When ordering they ask factory or aftermarket balancer. Well I said factory and the Crank pulley was an inch short from lining up with the water pump pulley. No biggie because when I called technology they had the adapter in stock and sent it no charge. I was so happy I went back online and ordered their double grooved alternator pulley. After going cross eyed over trying to figure out the loose brackets and pulleys with bearings and C-clips to retain them I have my alternator and AC compressor with all pulleys lining up and the tensioner adjusting tension on both belts and a very good wrap around the compressor pulleys and get to use both of the same belts. Thus leaving me plenty of room on the left side of the engine for the water pump hose and the thermostat housing hose that drops down the same side. All pictures are for fitment and alignment purposes and I am taking it apart and blasting the brackets and powder coating them one color.
Attachments
-
 20240223_165544.jpg231.2 KB · Views: 94
 -
 20240218_095544.jpg308.5 KB · Views: 94
 -
 20240223_133607.jpg653.3 KB · Views: 94
 -
 20240223_140055.jpg410.1 KB · Views: 91
 -
 20240224_165351.jpg424.1 KB · Views: 88
 -
 20240224_165119.jpg556 KB · Views: 78
 -
 20240224_175151.jpg393.6 KB · Views: 77
 -
 20240224_175205.jpg581.6 KB · Views: 77
 -
 20240224_175225.jpg494.3 KB · Views: 70
 -
 20240224_175307.jpg422.6 KB · Views: 83
Last edited:
David Garton
Supporter
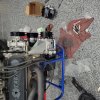
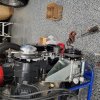
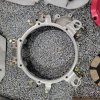
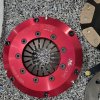
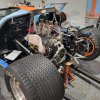
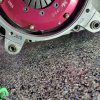
Now that the front of the engine is figured out I will remove the engine from the stand and mount the flywheel and the the bellhousing and zero runout the bellhousing then install the clutch assembly. I want to send the bundle of snakes out for jet hot coating but think I need to test fit it first and make sure they clear the upper crossmember first.
Attachments
-
 20240224_175317.jpg417 KB · Views: 74
 -
 20240223_111656.jpg660.4 KB · Views: 71
 -
 20240223_111633.jpg728.9 KB · Views: 64
 -
 20240223_111622.jpg611.2 KB · Views: 59
 -
 20240223_111617.jpg505.8 KB · Views: 59
 -
 20240223_111559.jpg347.6 KB · Views: 56
 -
 20240223_111611.jpg673.4 KB · Views: 56
 -
 20240223_111604.jpg728 KB · Views: 56
 -
 20240223_111636.jpg625 KB · Views: 56
 -
 20240223_111613.jpg431.1 KB · Views: 115
Is it crucial to zero runout the SAFIR bell housing? If yes, how does one do that? thanks
David Garton
Supporter
Lee It is very important and can make for ease of shifting and longevity of input bearing and other clutch and trans components. Just a good practice to check it. There are offset dowls that you install in the block to move the bellhousing. Not just Safir bellhousings but all bellhousings. Here is a link to help you understand the way it is done.Is it crucial to zero runout the SAFIR bell housing? If yes, how does one do that? thanks
Interesting video. But I thought the runout was measured at the face of the bell housing and and how parallel it is to the flywheel. This guy is measuring the inner bore of the bellhousing. Not really following how it applies to the Safir bell. thanks
David Garton
Supporter
Measured both. First measurement is most important! If it's not centered it will move the input shaft around and cause shifting issues and pre-mature failures.Interesting video. But I thought the runout was measured at the face of the bell housing and and how parallel it is to the flywheel. This guy is measuring the inner bore of the bellhousing. Not really following how it applies to the Safir bell. thanks
Here’s a good thread from BryanF’s build.
Regards Brian
Quaife bellhousing on Ford block
The Ford dowels are 0.5" but the holes in the Quaife E62G1121 bellhousing are about 0.46". Quaife advised against enlarging these holes since one of them is so close to the dowel hole for the Chevy block. How to solve this problem?
www.gt40s.com
Regards Brian
David Garton
Supporter
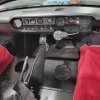
Got my quick Jack's 6K and they work perfect. This is only one click to the first safety lock. Motor is off the motor stand and ready to index the bellhousing. Test fitting the engine tomorrow.


David Garton
Supporter
Joe, Thank you. I would say they are 1/8 to 3/16.What are your panel gaps set at? Those look great!
David Garton
Supporter
Well they put it together so I could take it all apart. Bell housing worked out with .002 runout with factory dowls.


David Garton
Supporter
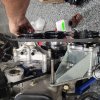
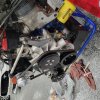
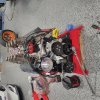
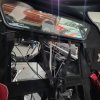
And I was so proud of my belt routing but alternator to high and had to remove to set engine in the car. Once in place I'm going to try with single pulley and see if it fits. Closer then I was when starting on Saturday.
Attachments
-
 20240303_223707.jpg680.3 KB · Views: 85
 -
 20240304_081128.jpg300.6 KB · Views: 78
 -
 20240304_080801.jpg279.4 KB · Views: 72
 -
 20240304_081154.jpg370.2 KB · Views: 69
 -
 20240304_081142.jpg331.4 KB · Views: 68
 -
 20240304_081212.jpg296.2 KB · Views: 70
 -
 20240304_142150.jpg445.9 KB · Views: 74
 -
 20240304_142210.jpg520.4 KB · Views: 77
 -
 20240304_142143.jpg504.7 KB · Views: 69
 -
 20240304_142203.jpg423.6 KB · Views: 74
David Garton
Supporter
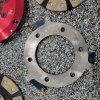
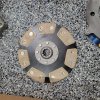
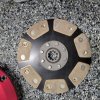
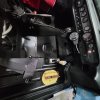
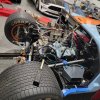
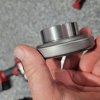
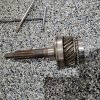
Well the test fitting was good for info. I had to machine .400 off the bottom rear perches that mount to the front of the lower crossmember. This will alow for moving the engine back a bit as the distributor cap was very close to the back of the cockpit. Today I test fit the transmission to the bellhousing without the clutch and made sure I had my pilot bearing set deep enough in the crank. Then the fun began for you dual disc clutch guys going together make sure you have an extra complete input shaft so you can have both disc splines in line. I put studs in the two 3/8 top of the Trans. This is a must if you ever want to pull the Trans without taking the engine and Trans out as one. My bellhousing has inspection covers at top and bottom so it was easy to add lock nuts to the top studs. Trans in and out of back of engine four or five times until I was satisfied with the throwout bearing to fork play. All the shims out from behind the throwout bearing and still had to machine the spacer that the bearing pressed on. All conected and very satisfied with today's progress.
Attachments
-
 20240323_104606.jpg482.7 KB · Views: 35
 -
 20240323_104901.jpg422.8 KB · Views: 33
 -
 20240323_134555.jpg216.6 KB · Views: 31
 -
 20240323_134848.jpg149.6 KB · Views: 32
 -
 20240323_204508.jpg246.9 KB · Views: 32
 -
 20240323_204517.jpg387.3 KB · Views: 29
 -
 20240323_213758.jpg253.7 KB · Views: 30
 -
 20240323_213613.jpg348.6 KB · Views: 30
 -
 20240323_214308.jpg694.3 KB · Views: 36
 -
 20240323_213926.jpg194.7 KB · Views: 41
Similar threads
- Replies
- 38
- Views
- 11K