DRB #5

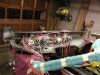
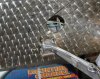
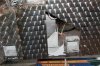
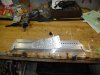
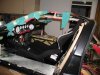
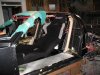
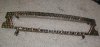
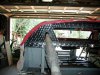
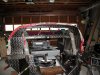
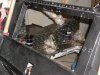
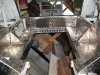
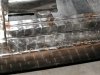
To do the panels I wound up with about 34 piece that needed to be made and there may be two more. Only six panels out of the lot didnot need bending at least once.The hardest to do were the rear upright tower, and the ones that outlined the rear window. The tower had multiple bends in several planes and was a B**** to plan out and bend.The rear window spacers are one inch and my bender's face is 2". Had to make a piece just for that bend. Spacers had to be made as I want to insulate the cabin every way I can. These spaces are filled with expanding foam(Great Stuff) from Home Depot. Now before someone flames me, I know that they will support combustion. I tested a piece of the stuff and yes it will burn, but takes a long time to ignite and a lot of heat before it begins to burn. Just remember, fiberglass will burn as well. The attachment of the spacers at the top of the window almost caused me to give up on the idea of spacers or outlining the window in stainlesss all together. The rear portion of the cage fit too close to the body to attach the rivets at the top(pulling from the cabin). I came up with another idea, that is to pull the rivets from the stainless side and put stainless washers made for rivets on the back side, so that when the mandrel pulled, it snugged up to the washer and held the fiberglass without splitting.
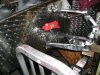
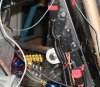
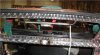
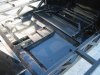
The kick panels were finished as well and are attached with nutserts. These were popped with the Plasma torch and the steel grinding bit used to dress the hole is just the same size as the nutsert itself. These are 4 or 5 times as hard to pull as the pop rivets. It took both hands to pull them snug. The hydraulic puller is very expensive.
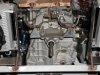
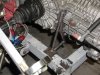
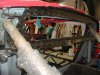
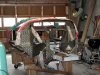
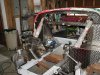
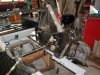
I have done most of the welding and I can tell you that flat welds are the easyest to do. Consequently, the car has been in some very strange positions in order to make the seams as close to flat as possible. The ones I can't do will be done by a racecar fabricator who works for Brad Brand at Atlanta Chassis Dyno. Brad is assisting with the engine build, and is going to fabricate my exhaust system in stainless. They fabricate all of their turbo and exhaust tubing on their 700cu. in. ford engine.
I have all of this week off from work so some more progress should be made. The money I got from the sale of my old 930 will help bring in some more pieces. Hopefully in a month or two I will get to goig faster than a snails pace. the fabrication just took way longer than I thought it would.

Bill
 

Attachments

  • Web P1010089.jpg
    Web P1010089.jpg
    77.4 KB · Views: 1,595
  • Web P1010098.jpg
    Web P1010098.jpg
    93.3 KB · Views: 1,599
  • Web P1010100.jpg
    Web P1010100.jpg
    105.9 KB · Views: 1,569
  • Web P1010130.jpg
    Web P1010130.jpg
    100.6 KB · Views: 1,595
  • Web P1010143.jpg
    Web P1010143.jpg
    102.7 KB · Views: 1,619
  • Web P1010144.jpg
    Web P1010144.jpg
    98.5 KB · Views: 1,630
  • Web P1010147.jpg
    Web P1010147.jpg
    103.4 KB · Views: 1,628
  • Web P1010149.jpg
    Web P1010149.jpg
    103.2 KB · Views: 1,545
  • Web P1010151.jpg
    Web P1010151.jpg
    106.8 KB · Views: 1,549
  • Web P1010156.jpg
    Web P1010156.jpg
    77 KB · Views: 1,559
Last edited:
By God Bill, when you update, you sure do update! As someone with very limited mechanical skills I am always blown away by seeing the work done by the builders. Yours is no exception. I look forward to more reports, especially now that your wife is giving you the move on.

Great Stuff.

Cheers

Jack
 

Peter Delaney

GT40s Supporter
Stunning work Bill !

I really liked your "shelf" idea at the sides of the engine space when you first mentioned the concept, but now seeing it the flesh - what a difference it makes - turning inaccessable/useless space under the sloping sides into useful space which you can actually get to : Brilliant !

As for your s/s work : "I takes me hat off to you" - a masterpiece !

(But, how are your hands surviving ? Mine would just be a work-in-progress consisting of old/recent/new scar tissue & new lacerations !)

I can see that you have moved the engine quite a bit forward & this should improve the f/r weight, along with helping with drive-shaft angles. I'd love to see how you are setting up the belts & pulleys - when I did mine (using the stock RF twin v-belt setup), I thought that there must be a better (more compact) way, but the "rush to rego" did not permit much more thinking in this area. As it was, I had to create some extra clearance into the bulkhead panel to accommodate the A/C pulley.

Fantastic work mate - please keep this pics coming !

Kind Regards,

Peter D.
 
Jack and Peter,
Thanks for the kind remarks. The stainless is not much of a problem believe it or not. When the sheets are cut with a plasma cutter, there is a very slight slag on the underside. you have to use a grinder to knock it off, and even out the cut angles. That leaves the slivers that will make you pay for your endevors. The trick there is to use 60#grit sandpaper on all edges. That gets rid of the burs, and they are easy to handle then. I have had more trouble with the grinder than anything else. At least 4 scars from it. Seems you can't get into those hard to get places with the guard on. Just have to remember where your hand that is holding the grinder is. OUCH!!! My part of the welding is almost done. Just have to turn the car on its side one more time. Then it's off to the fabricator for the exhaust work and the corrective welding.Couple of blow outs to repair that I know are better to leave to the experts than continue and have to do the entire panel over.

Bill
 
Have just finished mounting the rear fans. Fabricating the brackets was a little tricky, and getting them in the right spot was a chore with only two hands to do all the holding and adjusting, but they are in. next will be the screens and to reinstall the wiring.
 

Attachments

  • Web P1010166.jpg
    Web P1010166.jpg
    52.2 KB · Views: 1,357
  • Web P1010165.jpg
    Web P1010165.jpg
    70 KB · Views: 1,415
  • Web P1010163.jpg
    Web P1010163.jpg
    93.1 KB · Views: 1,437
This may sound dumb but, should the coolers be mounted with the inlet / outlets at the top rather than the bottom? To me it seems the way they are presently mounted would cause an air lock or not enable the coolers to fill properly.
 
The originals had the coolers mounted next to the front radiator with the inlet/outlet like a radiator(top/bottom), but the rear space opening, and the design of the radiators from Earl's is such that they have to be on the top or the bottom. I don't remember seeing one made that way. I guess you could have one special ordered, but it would cost a little more. If this is an issue, it is easiy enough to flip the coolers, or weld an outlet at the top.

Bill
 

Attachments

  • Web P1010004.jpg
    Web P1010004.jpg
    93.3 KB · Views: 1,453
Has been a while since I have posted any progress on my car. I apologise for that. Have been busy with helping the owner of the 66road car, writing an article for the GTD club, and honey do projects. Most of the progress that has been made, has been in the area of the wiring. I had it wired, had to do some welding, removed the wiring, reinstalled it, modified it to include multiple relays for all the pumps(4), fans(4), and other parafinalia, then had to rewire a good bit of that when I wanted the radiator fans(front) and the electric water pump to stay on if the temp was over the turn on setting when the ignition was turned off. The wiring manufacturer(American Autowire) advised against it. Told me that when the auto manufacturers WERE doing this, they had some costly fires and have since abandoned the practice. I then had to add another relay just to handle the function of the coil leads to all the other relays. That actually took two 40 amp relays, as the coils utilize about 5 amps each. Now I have to label each relay for reference. All this rewiring caused havoc with the wiring to the switches on the dash, as they contol the coils of the individual relays. So a lot of that had to be redone. The only thing left to do now is to wire up the ignition, which will be done at the engine buildes shop in about 2 weeks.
Many many packages have arrived and are to be installed. As the parts are added, I find some other part that needs to be modified like the external oil filter. I am using quick connects and the exhaust is going to interfeer with its location, so that hose has to be lenghtened. Then the hose to the cooler will be modofied as a result and so it goes.
I have gotten the silencers(what a rediculous word when talking about these cars) and have made the mounts for them. Decided to go with two seperate ones. I am planning to redo the mounts for the coolers after visiing the engine builders shop and seeing some of their handy work. Looks much neater. Will be done in tubing rather than strap.
Hard part was trying to find the quick connects for the water lines. Seems I need three since I relocated the pump. Finding them in a 12 and a 20AN is not easy(or cheap). Ebay helps, but if someone is bidding against you, it will cost more than you had anticipated on. Just trying to find these buggers is hard.
Some of you may remember I was trying to resolve the bump steer since I was going with the Flaming River quick ratio unit. I built a jig to determine where the c/l of the shaft should be. It wound up being 3 1/2" above the lower A arm mount. Then came the issue of trying to get the rack into the car. Should have done this before I paneled the front sections. So I made a cut on the passenger side to mimic the panel in the original DRBs. It will be put back so that it looks like it was meant to be. Since the panels are welded in, a system had to be arrived at if the rack was to ever be removed. With the system I am using it will easily be accomplished. More pics will follow when the car gets back home on Tues. Should have seats in. Lots to do before it goes out again. I'll try to be a little more timely with the next update.

Bill
 

Attachments

  • P1010233 (Small).JPG
    P1010233 (Small).JPG
    80.6 KB · Views: 1,304
  • P1010235 (Small).JPG
    P1010235 (Small).JPG
    67 KB · Views: 1,199
  • P1010266 (Small).JPG
    P1010266 (Small).JPG
    43.5 KB · Views: 1,133
  • P1010281 (Small).JPG
    P1010281 (Small).JPG
    66.6 KB · Views: 1,151
  • P1010283 (Small).JPG
    P1010283 (Small).JPG
    40.5 KB · Views: 1,131
  • P1010286 (Small).JPG
    P1010286 (Small).JPG
    64.4 KB · Views: 1,187
  • P1010292 (Small).JPG
    P1010292 (Small).JPG
    66.2 KB · Views: 1,185
  • P1010293 (Small).JPG
    P1010293 (Small).JPG
    57.4 KB · Views: 1,124
  • P1010294 (Small).JPG
    P1010294 (Small).JPG
    69 KB · Views: 1,156
  • P1010339 (Small).jpg
    P1010339 (Small).jpg
    47.6 KB · Views: 1,213

Bill Hara

Old Hand
GT40s Supporter
Bill

Once again, great post, great determination, great patience and great work too, although it looks like you've had a party already and used party poppers (?) all over the rear of the car:D

I just finished the wiring on my car with the help of some very talented individuals and I can tell you that the grin factor is huge when all the switches, lights, indicators, horns, fans etc WORK!

Keep going mate, you don't have long to go and I'd like to think both our cars could breath life in the not to distant future. rockonsmile

Cheers

Bill H
 
Bill, bang up job! From what I am told the wiring can be the hardest part about building the car. Although looking at the photos I am not sure the lower left ventricle is correctly feeding into the right aorta. Oh wait, thats heart surgery. My bad. All jokes aside, awesome posting Bill. Your car has an awesome color scheme and I look forward to more updates.

Cheers

Jack
 
Hi Bill -

Looking good there.... and a very big thankyou to both you and fellow forum/club member - Brian McCarthy for both your technical pieces - (panelling and painting) Much appreciated and great to get some techy input from overseas...

I'll be editing my last mag shortly for the Winter issue, so if there are any more budding 'writers' out there that would be willing to contribute an article, drop me a line...

(oh and no, you don't have to be a club member to be included - but we always welcome new members, owners or not, GTD or not!)

Sorry to have 'strayed' a bit Bill, as I said, looking good, keep it coming...:)
 
Well, its time again, and I have been rather busy with a lot of parts coming in and work being farmed out. I have redone the electrical wiring,,,, again, due to the fact that I didn't like the relays being left out in the elements in the engine bay. So they have been moved into the cabin. All that is needed now is to test the circuits. That's one area that has always bothered me, to hook up 150 amps to the circuit board and have some misadventure take place with loud pops, smoke and burning insulation. To that end, Peter Delany turned me on to a great idea. That is to use a power supply with low(6-8amps) power to test the circuits. The lights will be dim, and the blinkers will be slow, but at least a lot of wiring won't be ruined if there is a short. I did a search and came up with a reasonable alternative. These usnits are internally fused(circuit breaker) at a surge amperage just above their output. Hook it up to your circuit board, and check each circuit out. So if a short occurs, it blinks off. Nothing fried... Here are some of them on this site. When I first looked them up, they were on sale, but now are back up to regular price. Hope it loads correctly.
Pyramid 12 volt DC Power Supplies
pyramid.htm

I redid the rear cooler mounts and they are much lighter and look a lot better as well. I also used the tubing for the rear trans mounts. Just have to neaten things up a little.
I had the car out to a local Corvette shop in hopes of getting a set of Wilwood brakes for front and rear. It winds up the fronts are early C4s. Nobody makes aftermarket brakes for the C4s. So something will have to be adapted. Then we find out, one of the spindles is bent, and I have come to find out they are not making the spindles any more. I then got a note from Fran Hall. He has to be one of the best people I have come to know on the forum. He said he could help me out with the brakes and bearings. So I have sent a front and rear upright up to him for some research. He hopes to have some good news for me soon. The Corvette shop ordered some Racetec(from New Zeland) seats for me. I spent all day today checking to see if they will fit. They will, but only with some metal work on the floorboards. More welding. And I thought I was through with that phase.
Installed the third brake light from CBS. Lots of things from them. Wound up being one of my Christmas presents. Also got the wireless backup camera from PEP BOYS.
While at the Corvette shop, I got to looking around at parts laying around. I came across some C5 shifters which I think would be a good choice for those of you with the ZF trans, and maybe for the Porshe units as well. I had been experimenting with several shifters, and I think this one has some real promise. It's a rod actuated unit that has rotational and longitudinal motion in one shaft. I have some ideas for the 930 unit which I will check out. May wind up with something like the ZFs. If it doesn't, then I still have my Morse cables to work with.
 

Attachments

  • P1010236 (Small).JPG
    P1010236 (Small).JPG
    66.5 KB · Views: 1,103
  • Web P1010255.jpg
    Web P1010255.jpg
    105.2 KB · Views: 1,026
  • Web P1010256.jpg
    Web P1010256.jpg
    90.4 KB · Views: 992
  • Web P1010259.jpg
    Web P1010259.jpg
    71.4 KB · Views: 996
  • Web P1010248.jpg
    Web P1010248.jpg
    81.6 KB · Views: 996
  • Web P1010249.jpg
    Web P1010249.jpg
    89.3 KB · Views: 1,004
  • Web P1010250.jpg
    Web P1010250.jpg
    85.5 KB · Views: 990
Bill,
I am enjoying your build very much. Thanks for all your details and photos. That car is AWESOME. You aren't really going to drive it on the road, are you? How about making it a conversation piece in the lounge. The paint colours, polished stainless, and standard of finish need to be on display. Even the rear end, with it's coolers and fans, looks stunning.
Fantastic work, and keep going, you're nearly there.
Dalton
 
Hey Bill
I'm keen to know how the Racetech seats fit.
I'm looking for an alternative to the DRB items.
Looking forward to seeing your car in the sunlight.
 
I spent all yesterday working with just one of the seats. DRB's use the corregated floors, and with the seat in full tilt, it matches the rear firewall and the leg room is perfect. Good thigh support and slight bend of the knee. That is the good news. The bad news is that it sits a little high. When I pull out the seat padding(velcro), then my head is under the door(I'm 5-9 and shrinking every year). So I am thinking of doing the low seat option that DRB is now offering. Along with that will be some inginuity with the mounting brackets. That means some fab work. I have it worked out in my mind how to accomplish it. Now all I have to do is,,,, do it. I will post the results when done along with pics.

Bill
 
Hey Bill
My car has the super low floor option so yell if you want some measurements. It's flat so mounting a seat seems easier.
 

Attachments

  • Chassis #64 back from Paint Shop 5 June 2006 003.JPG
    Chassis #64 back from Paint Shop 5 June 2006 003.JPG
    59.8 KB · Views: 953
Dave,
It would be interesting to know how far down the deep seat option is. The "ribs" on the flooring are only one inch. I put the seats in full tilt and they almost meet the slope of the firewall. The top of the seat with one inch removed will just barely fit under the roll bar. Even then it will be tight. these are the wide option seat. The regulars are a very tight fit width wise. If most of you New Zelanders use the regular option, then you all have the skinnest arses in the world. I did some measurements to see what could be gained. From the top of the ribs to the sill is aprox. 9 inches. The height of the front lip of the seat is 13. So the front lip of the seat will still be above the sill height if the ribs are removed. The seat bottom where your bum goes is 4" off of the floor(top of the ribs). I could take the seat pad out and be an inch off the floor, but there is no padding. Guess I could trim the seat cushion, but that seems to defeat the whole purpose of the seat. That 4 inches also cuts down on the forward visability due to the roll bar. The leather wings(the grey area) seems to stick out too far, and the seat apears too big for the car(proportionally). It looks like I am going to have to go back to the drawing board on this idea. In a world of inches, and inch or two makes a big difference. These are really nice seats and also aren't very cheap either. I guess they would make nice lounge chairs for the garage!! If anyone has a setup where height isn't a problem, these would work out great. Let me know if anyone is interested.

Bill
 

Attachments

  • P1010262 (Small).jpg
    P1010262 (Small).jpg
    61.5 KB · Views: 959
  • P1010261 (Small).jpg
    P1010261 (Small).jpg
    63.5 KB · Views: 963
Dave,
It would be interesting to know how far down the deep seat option is. The "ribs" on the flooring are only one inch. I put the seats in full tilt and they almost meet the slope of the firewall. The top of the seat with one inch removed will just barely fit under the roll bar. Even then it will be tight. these are the wide option seat. The regulars are a very tight fit width wise. If most of you New Zelanders use the regular option, then you all have the skinnest arses in the world. I did some measurements to see what could be gained. From the top of the ribs to the sill is aprox. 9 inches. The height of the front lip of the seat is 13. So the front lip of the seat will still be above the sill height if the ribs are removed. The seat bottom where your bum goes is 4" off of the floor(top of the ribs). I could take the seat pad out and be an inch off the floor, but there is no padding. Guess I could trim the seat cushion, but that seems to defeat the whole purpose of the seat. That 4 inches also cuts down on the forward visability due to the roll bar. The leather wings(the grey area) seems to stick out too far, and the seat apears too big for the car(proportionally). It looks like I am going to have to go back to the drawing board on this idea. In a world of inches, and inch or two makes a big difference. These are really nice seats and also aren't very cheap either. I guess they would make nice lounge chairs for the garage!! If anyone has a setup where height isn't a problem, these would work out great. Let me know if anyone is interested.

Bill
 

Attachments

  • P1010262 (Small).jpg
    P1010262 (Small).jpg
    61.5 KB · Views: 836
  • P1010261 (Small).jpg
    P1010261 (Small).jpg
    63.5 KB · Views: 838
Bill,i noticed David Briggs in members rides has a CAV with Sparco seats that look really good and not too large.Not sure how low his floorpan is.Tried finding out what seats they are but unsure.Perhaps they might fit.
Kevin.
 
Back
Top