DRB #67 First Drive

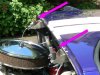
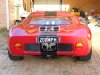
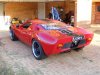
Finally got DRB #67 GT40 on the road on Sunday. Been over a year since I last drove it home from road registration inspection. Sigh... Video link attached. Now just gotta get the rest of the bits bolted to it. Then hit the track and find out how it handles. Drives very well on the road, but that does not tell you much, unless road driving is what you are aiming at.

And yes, I know the motor is very rich looking at the video. Was broken in on engine dyno and given a basic and safe tune with fuel fat and ignition not fully advanced. Will get some more distance on motor to free up and then get fully tuned on chassis dyno.

Specs:
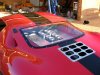
347 Windsor, DC&O throttle bodies, Audi 016 trans with Quaife ATB diff.
Fabricated rear uprights and links, fully rod-ended. Front is Corvette alloy arms and uprights. AVO dampers, 450 lb/in rear, 350 lb/in front Eibach springs.
17" X 10" & 8" Simmons rims, 330 mm Corvette font discs, 290 mm vented rear discs, Wilwood 4 piston front, mazda RX-7 4 piston rear calipers.

YouTube - GT40 DRB#67 First Drive

Cheers,

Julian
 
Awesome vid Julian......Camera Guy is a real pro.......how did he get such good action shots?? You might of IMHO got better shots if you tied a rope to the back of the car and dragged the camera...:thumbsup: I'll watch out for you in my rear view mirrors...
 
Troy - Yeah, Errol was following in his XR6 Turbo and Dave was the quality lensman. Shoulda tied him to my tow hook and shoved the camera in his mouth. Would keep him quiet and give better quality video! Note: Don't ask Dave to help with installing rego stickers..."No, actually that's supposed to be a 9, not a 6 Dave!" Then again, considering the car is as much his creation as mine, I suppose he's allowed to add his 'special touch'. Special all right...

Plan is to drive it to Wanneroo sprint this Saturday arvo, but like all plans it may or may not eventuate. With luck Dave will come all also (following of course) in his Daytona Coupe, freshly Webered.
 
Re: DRB #67 First Drive Now With Photos

Well, after yet another 'fun' Sunday in the garage, got pretty much all the bits bolted to it and now it looks basically complete. See attached photos. Plan is to put a black "GT40" strip down tank covers to break up the red, otherwise I'm fairly happy with how it looks.

Took it for a decent drive down the highway to a motorkhana nearby for about 10 mins each way in the middle of the day - it got pretty warm and so did I, being about 32 deg C at the time! Sitting in traffic was fun... Time for some cooling system tweaks methinks.

Dave was following in his clubman - he and I were eye to eye, but everyone else was towering above us. Including the Hyabusa rider who pulled alongside cruising down the hwy, looked down at me, then screamed off doing his best temporary citizen impersonation.

Cheers,

Julian
 

Attachments

  • DSCF1244.jpg
    DSCF1244.jpg
    80.5 KB · Views: 329
  • DSCF1245.jpg
    DSCF1245.jpg
    57.7 KB · Views: 510
  • DSCF1246.jpg
    DSCF1246.jpg
    72.6 KB · Views: 301
  • DSCF1247.jpg
    DSCF1247.jpg
    77.3 KB · Views: 255
  • DSCF1248.jpg
    DSCF1248.jpg
    65.8 KB · Views: 312
I believe they are the Aerocatch setupAerocatch Hood Pin Latches. I plan to have them on mine. Can be used for the side clips as well. Even come in Carbon fiber!! Attached is Jim Pearson's ride with the Aerocatch setup.

Bill
 

Attachments

  • Aerocatch Jim Pearson1.jpg
    Aerocatch Jim Pearson1.jpg
    56 KB · Views: 289
  • Aerocatch Jim Pearson4.jpg
    Aerocatch Jim Pearson4.jpg
    56.1 KB · Views: 276
  • Aerocatch Jim Pearson5.jpg
    Aerocatch Jim Pearson5.jpg
    65.5 KB · Views: 274
I believe they are the Aerocatch latches. My SL-C came with two sets for front & rear clips. They are very positive and work great. Lockable too.
 
Yep, they are aerocatches. I didn't like the look of any of the normal 'hood pins' and so went for these. Very happy with them.

Thanks for kind words Pete - we looked at your build log many, many times during the builds (my car is the 'sister' car to DRB #67, see Albany GT40 in build logs).
 
Dear Julian

Congratulations on the first drive. The aerocatch item is very interesting. I purchased 2 for the rear clip of my Dax. Again, I was not very happy about using the standard clips. However, when I came to try and fit them, it seems that I am going to have to cut away quite a bit of fibreglass from inside the rear clip. I am not too happy about this, so currently have not tried to fit them. I would be interested in seeing any photos you, or anyone else has, of the inside of the rear clip and what may need to be done.

I dont know whether this is strictly part of this thread, or whether a new one needs to be started ?

Regards

Stephen
 
Stephen,

I just used the template supplied with aerocatches and cut the rear clip to suit. Welded tabs on to cage backstays and mounted catch bolts. Bit fiddly trying to align it all though.
I can't speak forthe inside of a DAX rear clip, but on the DRB I had to remove quite a bit of fibreglass mouldings that were in the way to may room for radiator pressure tank, roll cage, aerocatches etc. Didn't worry me as it wasn't doing much useful...
 
My car is going to have to go back to the painters soon due to all the changes I am making with the rear clip. As you can see, the DRBs have a lot of fiberglass in the area of where the roll cage and the fill tank go.
P1010089.jpg

I had to remove a good bit just to accommodate these items. Depending on how or where you place the legs of the cage will depend on where you place the mounting for the rods.
P1010086.jpg
I just have the pieces taped in place and probably will be moved higher up close to the top. The pins that come with it are not that long. I have some others from the original ones that came with the car and may still use them instead of the aero ones. When my car came it had the pins through the top with securing pins. I didn't like that arrangement so the painter glassed it in when it was painted. There was an access hole through the supporting fiberglass, so rather than cut more, I just opened up the original hole to get a visualization of where the pin should be located. If you want to move the pins more centrally, that is O K if it doesnt interfere with anythig. If more needs to come out of mine when they are placed, I'll deal with it then.
P1010087.jpg
If you decide to go with the Aerocatch, I would suggest doing it with the motor out of the car. You just can't get a line of sight with it in the car.
Here are the pieces of the unit. It is really the only way to go. You CANNOT forget to latch the clip with this setup as it is activated only by a key. It also keeps prying eyes from peeking without asking.There is a side entrance to the unit that allows it to be used on the side of the car in place of the standard catches. If you are going for originality, they won't do. I am not, so it is a better alternative than the pricey clips that didn't come with my car.
P1010095.jpg


P1010096.jpg


P1010094.jpg


P1010091.jpg


P1010092.jpg


P1010093.jpg


Bill
 
Back
Top