Frank:
Looking good for just picking up the TIG torch.
A couple of suggestions that may help you get some better quality welds.
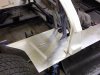
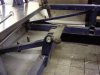
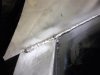
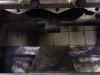
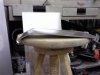
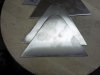
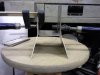
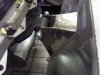
When you weld a panel as in your #2 photo, start with the cold panel and weld in from the ends about 1/2", then as you approach the edge from the other direction you wont have that melt-off that you are getting.
If your machine has a balance control for the arc profile try welding in balance mode, this will put a little more positive time in the arc cycle, and be a little harder on your electrodes, but at the current you are using it should not be a problem, and weld quality will be better.
I am assuming you are using a pure tungsten "green" electrode. These are great for AC but try some 2% ceriated electrodes "yellow", you can sharpen these to a fine point, and you will get better arc control with a smaller arc, also it will maintain its sharpness with a good amount of current.
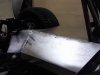
I don't know what size electrode you are using, from the size of the welds looks like a 3/32 diameter. Try a 1/16 electrode, you will get smaller welds, and need to use less curent, but the result is a much nicer looking weld.
See if you can't get a gas lens for your torch. This will concentrate the shielding gas and gives really nice coverage in the weld area. You can extend the electrode quite a way out of the cup to get to those tight corners, and a little more extension on the electrode will let you better see the process.
Try and back up some of those panels with a thicker plate if possible to soak up some of the heat while welding.
When you are finishing a bead back off the current slowly and add a little filler rod, this will prevent "Cratering".
You are doing such a good job on your project, and I would bet you will get this mastered easily. I hope some of the things I mentioned will help you with the project.
Keep those photos coming.
Good luck
Phil
Looking good for just picking up the TIG torch.
A couple of suggestions that may help you get some better quality welds.
When you weld a panel as in your #2 photo, start with the cold panel and weld in from the ends about 1/2", then as you approach the edge from the other direction you wont have that melt-off that you are getting.
If your machine has a balance control for the arc profile try welding in balance mode, this will put a little more positive time in the arc cycle, and be a little harder on your electrodes, but at the current you are using it should not be a problem, and weld quality will be better.
I am assuming you are using a pure tungsten "green" electrode. These are great for AC but try some 2% ceriated electrodes "yellow", you can sharpen these to a fine point, and you will get better arc control with a smaller arc, also it will maintain its sharpness with a good amount of current.
I don't know what size electrode you are using, from the size of the welds looks like a 3/32 diameter. Try a 1/16 electrode, you will get smaller welds, and need to use less curent, but the result is a much nicer looking weld.
See if you can't get a gas lens for your torch. This will concentrate the shielding gas and gives really nice coverage in the weld area. You can extend the electrode quite a way out of the cup to get to those tight corners, and a little more extension on the electrode will let you better see the process.
Try and back up some of those panels with a thicker plate if possible to soak up some of the heat while welding.
When you are finishing a bead back off the current slowly and add a little filler rod, this will prevent "Cratering".
You are doing such a good job on your project, and I would bet you will get this mastered easily. I hope some of the things I mentioned will help you with the project.
Keep those photos coming.
Good luck
Phil
")