

These modifications provide a cabin mounted fire extinguisher and an engine bay fire suppression system and were performed on a SPF GT40. Other cars may take a somewhat different approach. There are a number of places to mount fire bottles and this is just one option. If you have a better option, write it up and we will publish it up as an alternative. Also note that while the bottle in this install is mounted near the pipes, there is no issue with overheating the system. This may be due to the fact that it's mounted in a Mark II with all the snorkels and vents. Take that into consideration when deciding where to mount yours. Another issue is that this setup does not provide for driver coverage so is likely not SCCA approved. This would be easy to add to this install but is not covered here because I was more concerned with an engine fire than a race application.
The first aspect is the cabin extinguisher. This one is mounted near the left arm on the drivers side of a left hand drive car. Some may think this is a poor place to mount the unit because it may get in the way of ingress and egress. I find this to not be the case at all. The extinguisher is easily accessed in this location and I have yet to “hang up” on it getting in or out of the car. There are not too many options of where to mount a extinguisher because of the cramped conditions (assuming you want to be able to use the passenger seat to carry a passenger).
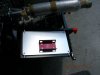
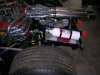
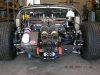
The next aspect is the engine bay system. This installation is based on a 5 pound Safecraft Halon unit. Obviously there are other options but in general, they all install basically in the same manner.
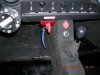
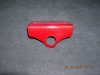
Make a bracket as shown below and mount it as shown. Once again there are few places to mount the release handle. One other option is to remove the 12 VDC adapter port and install the release handle there. The cable is then routed under the transmission linkage tunnel to the rear.
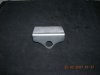
The mount for the bottle is the left side of the engine compartment. Using Adel (P) clamps, mount the aluminum plate as shown.
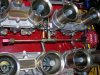
Route the discharge tubing as required. Custom brackets will likely need to be fab'd. Make sure all tubing clamps are of the rubber or plastic coated type. I use aircraft grade Adel clamps. DON'T use wire ties!
As is the case with all the modifications I have submitted to this site, every part made was powder coated. I use an Eastwood Home Powder Coating setup. I can not emphasize enough how easy this is and recommend it to everyone. A home powder coating thread will be posted shortly.
The first aspect is the cabin extinguisher. This one is mounted near the left arm on the drivers side of a left hand drive car. Some may think this is a poor place to mount the unit because it may get in the way of ingress and egress. I find this to not be the case at all. The extinguisher is easily accessed in this location and I have yet to “hang up” on it getting in or out of the car. There are not too many options of where to mount a extinguisher because of the cramped conditions (assuming you want to be able to use the passenger seat to carry a passenger).
The next aspect is the engine bay system. This installation is based on a 5 pound Safecraft Halon unit. Obviously there are other options but in general, they all install basically in the same manner.
Make a bracket as shown below and mount it as shown. Once again there are few places to mount the release handle. One other option is to remove the 12 VDC adapter port and install the release handle there. The cable is then routed under the transmission linkage tunnel to the rear.
The mount for the bottle is the left side of the engine compartment. Using Adel (P) clamps, mount the aluminum plate as shown.
Route the discharge tubing as required. Custom brackets will likely need to be fab'd. Make sure all tubing clamps are of the rubber or plastic coated type. I use aircraft grade Adel clamps. DON'T use wire ties!
As is the case with all the modifications I have submitted to this site, every part made was powder coated. I use an Eastwood Home Powder Coating setup. I can not emphasize enough how easy this is and recommend it to everyone. A home powder coating thread will be posted shortly.
Attachments
-
 mini-DSCN0339.JPG69.7 KB · Views: 628
 -
 mini-DSCN0336.JPG72.1 KB · Views: 524
 -
 mini-DSCN0337.JPG117.7 KB · Views: 501
 -
 mini-DSCN0625.JPG88.7 KB · Views: 555
 -
 mini-DSCN0637.JPG52.9 KB · Views: 566
 -
 mini-DSCN0693.JPG85.7 KB · Views: 602
 -
 mini-DSCN0747.JPG101.8 KB · Views: 559
 -
 mini-DSCN0754.JPG99.4 KB · Views: 606
Last edited: