Suspension Setup - Datum Bars
I have begun to attempt to setup my suspension as close as I can to enable the fitting of the body and flares.
I wanted to understand any misalignments in the chassis before I started setting up the whole car so I decided to setup two very straight steel angle bars on either side of the car. I want them exactly parallel, level and distanced evenly from hard points measured on the chassis. Determining the points to base the bar positions from became tricky.
ALIGNING THE BARS TO CREATE A VEHICLE CENTERLINE
To align the bars along the sides of the car I was able to measure from the top of each fuel tank side pod at the front and the rear. Measuring out 16mm at the rear and 20mm at the front gave me two parallel bars spaced at 1680mm. The two tanks have a taper to the front of 4mm per side. Not the end of the world, just worth noting.
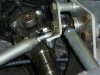
The position of the rear of the steel angle was also checked to the upper heim joint bolt marked "D" below. I chose this point as it was a critical and accessible main mount position that should be correct on both sides of the chassis. This suspension point lined up very well left (550mm) to right (549mm). Dimensions were also taken from the inside of the tanks, as above a good result here. This reinforces the position of the steel angles with the centerline of the chassis. The centerline lines up with the RH inside edge of the alloy tunnel tube, pretty good really.
Checking that the angles were perpendicular to the rear cross member resulted in a good pass result also. The front face of the chassis (face between A & B) is also perpendicular (within a few mm) to the steel angles. Basically the front face and rear "horseshoe" are parallel which is great.
However the front alloy chassis box at "A" (where your feet go) is "parallelogramed" by 5 mm to the RHS of the vehicle (looking from behind it). This did have a slight affect on the suspension settings. I was wondering why the two metal angles were originally skewed to the RHS of the car, it was caused by taking measurements from the front top edge of the chassis at "A". The image below shows pictorially (exaggerated) what I mean. The bottom chassis plate was aligned perfectly.
ALIGNING THE BARS IN THE VERTICAL PLANE
In order to set the bars up vertically a level bar was placed on top of the tanks through the passenger compartment and in the engine bay (with the engine removed). This did show that all surfaces were level with one point worth noting. The top of the LHS tank drops by 5mm at its extreme edge.
This occurs only on the LHS along its full length. 5mm spacers are placed under the LHS steel angle and I now also have a vertically level plane. This top plane based on the top of the tanks was compared to the bottom chassis plate. At the rear the LHS of the chassis plate sits 2mm lower than the right, a pretty good result. Measurements at the front show it to be level.
With the bars held firmly some checks were made on some chassis features with the following results:
1) Both tanks are 1565mm in length
2) Base of the RH A-pillar (where the door hinge attaches) is 7mm further forward than the LH one.
3) RH top radius arm mount (near the firewall) is 3mm further forward than the left.
4) Rear edge of the top of the tanks is the datum for me to set axle distances etc.
Overall the chassis has a few dimensional "characteristics".
With two parallel bars aligned to key chassis features I can begin to setup the suspension.


")


