My Ferrari 365 GTB4

A new pedal-box was required as the gearbox is now manual so I opted for a competition pedal-box with dual brake pistons to allow some level of brake balancing further down the line. The firewall was to be modified to allow fitment of this new pedal-box and as the firewall on this car is metal some fabrication was required - again - MDV did a lovely job of all the fabrication work required…..


Chris
 

Attachments

  • 28.JPG
    28.JPG
    506.8 KB · Views: 339
  • 36.jpg
    36.jpg
    276.1 KB · Views: 353
  • 41.jpg
    41.jpg
    290.2 KB · Views: 335
Firewall now modified for manual pedal-box - note the steel firewall is shaped to allow LHD or RHD steering setup - easy to convert if required (perhaps this might be something worth considering if I bring the car to the US)


Chris
 
When MDV evaluated the stopping capability of the car, it was decided the original large front vented disc brakes used on the car were sufficiently powerful to handle the stopping, even with a performance boost to the car. Therefore it was just a matter of restoring the original parts.


Some bits before and after………


Attachments

  • 05.jpg
    05.jpg
    234.6 KB · Views: 274
  • 06.jpg
    06.jpg
    257.9 KB · Views: 306
  • 00.jpg
    00.jpg
    253.2 KB · Views: 298
  • 01.jpg
    01.jpg
    155.2 KB · Views: 270
  • 02.jpg
    02.jpg
    166.1 KB · Views: 289
The rear of the car utilises the Jaguar V12 independent suspension with inboard disk brakes, and the whole Jaguar subframe is mounted up into the chassis. There is a large removable central panel just behind the seats that allows great access to the disk brakes, hand brake and differential without having to crawl under the car - very well thought out! Once again this whole setup was decided to be excellent for both braking and handling therefore is was just a matter of restoring the back-end and a uprating the shocks to something more adjustable (we’ve not finalised the shocks yet - but it shouldn't be a difficult task).


Subframe before and after………


Chris
 

Attachments

  • 04.jpg
    04.jpg
    245.8 KB · Views: 271
  • 03.jpg
    03.jpg
    145.8 KB · Views: 279
Just some details undertaken - The seats are exact copies of the original Ferrari Daytona seats, I utilised original seats as reference to ensure every element was accurate. The original Daytona seats have small strips inset into the cushions, sometimes in a contrast colour, with a punched hole and embossed ring around the hole. I measured these and had an aluminium pressing tool made to recreate these embossed strips. I purchased a set of authentic headrest from a Classic Ferrari spares dealer (these looked very difficult to reproduce as they are pretty complex) and mounted these to the copied seat frames. The seat frames were modified to add slider tubes to allow the headrest to correctly adjust up and down as the originals. I had seen an original Daytona in silver with blue seats and interior, and this had left an impression on me, therefore I wanted to change the colours of my car to this combination - Daytona’s in silver look awesome! I therefore had a selection of hides dyed blue by Connoly Leather in the UK. The seats took a trimmer friend of mine a considerable time to complete - if I remember correctly it took about 6 months to complete the pair - the embossing of the strips being an especially long process!! The final results look amazing and are truly beautiful…….


The place I purchased the headrest now sell complete reproduction seats too - check out the price of each seat on their website - scary!!


http://reoriginals.com/upholstery_28.aspx


Chris

 
The rest of the leather interior still needs to be re-trimmed in blue and black - on original Daytona’s the colour was usually only on the seats, centre consul and doors - the rest of the interior is usually black. But the other bits requiring trimming are a pretty simple and shouldn't take much to complete (one days soon!). I have, however, already had a full set of carpet created in black with leather edging and inset rubber heel pads, complete with embossed Ferrari emblems - so getting there!


A couple of shots of original cars with blue interior - very cool and a change from the cream most Ferrari's seem to be!!


Chris


Attachments

  • 07.jpg
    07.jpg
    168.7 KB · Views: 372
  • 08.jpg
    08.jpg
    217.3 KB · Views: 331
I was in Germany recently for the Essen Motor Show, and spotted this beautiful, original Ferrari Daytona in a pale blue metallic at the show - this colour would go very well with my dark blue interior don't you think?


Chris
 

Attachments

  • 57.jpg
    57.jpg
    382.7 KB · Views: 316
  • 56.jpg
    56.jpg
    391.4 KB · Views: 299
The closest I got to a Daytona was what was then called Palm Beach Int'l Raceway, for an SCCA drivers school in the early 70s.

I thought my little street-based Datsun 510 in B Sedan trim was really pretty quick, diving in on the Daytona in the turns and braking lanes. He owned the straights, though, and I almost didn't mind being passed, because you could hear all 12 glorious cylinders shrieking out a chorus of power as it re-passed me on every straight.

Almost.
 
And a black one that sounds amazing........

[ame=http://www.youtube.com/watch?v=E4AsigZ2fPE]Ferrari 365GTB/4 Daytona Competizione Sound! - YouTube[/ame]

I did contemplate converting the car into a 365GTB/4C (Competizione version) as the conversion would be pretty straight forward. The major difference between a production car and the race car being the extended wheel arches and wider wheels. The magnesium race wheels and associated hubs are available from Roelofs, and they look amazing....

Roelofs Parts

That would be one awesome track day monster!!

Chris
 
Great on-board from a Ferrari Daytona race car at Sebring.....

[ame=http://www.youtube.com/watch?v=cXDtHXAHg2o]Ferrari Daytona onboard at Sebring International Raceway Jim Pace & Predator Performance - YouTube[/ame]


Chris
 
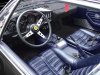
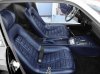
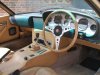
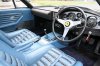
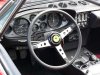
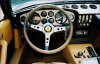
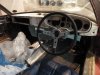
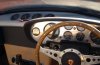
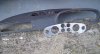
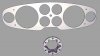
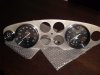
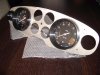
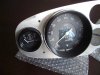
Some more details – When I purchased the car it had an instrument pod that contained a full set of Jaguar gauges, and although they looked similar to the Ferrari Daytona in layout, they were very different in reality. I set about sourcing a complete set of original Ferrari Daytona gauges, which wasn’t an easy task as these parts are extremely rare and expensive. Ferrari did, however, utilize these exact same Veglia Borletti gauges in a number of their cars – such as the Ferrari 275 and 330, so this did help a little when trying find some! When I eventually managed to purchase the first large and small dials, I dismantled them and had the plastic front bezels and rear casings scanned and duplicate parts created by SLA just in case I couldn’t find all of the 8 dials required. I did think I would have to build my own gauges as some point so was preparing for this!


Chris


Here is the dash in my car when I purchased it (the first image) complete with the Jaguar dials vs a few shots of original Ferrari Daytona dash with Veglia Borletti dials. Note also the shape of the dash pod on my car was shaped to fit around the Jaguar steering column and the Jaguar wiper switch. All of these Jaguar parts will not be used on the revised interior…..


Chris
 
Here are the pictures......


Chris
 

Attachments

  • 16.jpg
    16.jpg
    125.7 KB · Views: 387
  • 17.jpg
    17.jpg
    110.2 KB · Views: 335
  • 18.jpg
    18.jpg
    135.7 KB · Views: 318
  • 19.jpg
    19.jpg
    127.2 KB · Views: 348
As you can see – there was a lot of difference between my original dash and the real Ferrari Daytona – this has now been corrected and mine is extremely close now, including dash pod, center switch area, aircon unit and glove box pad and opening……


Chris
 

Attachments

  • 32.jpg
    32.jpg
    115.7 KB · Views: 303
The shape of the dash plate from my original dash – very different to the real Daytona as it needed to fit around the Jaguar cowl and switchgear.


Chris
 

Attachments

  • 33.jpg
    33.jpg
    114.1 KB · Views: 303
  • 20.jpg
    20.jpg
    225.7 KB · Views: 294
As mentioned previously, I had access to an original Daytona, so I took many measurements from the interior, specifically the dash pod and surrounding area. As the Ferrari Veglia Borletti gauges are huge (much larger in diameter than the Jaguar Smiths gauges) I had to completely resurface the dash pod area – only with the original Ferrari dials and the measurements of the original car was it so obvious how different my dash was dimensionally!! I created a new dash pod and alloy face plate in CAD – this process allowing me to accurately create parts that would fit the original dials perfectly. The dash pod was reproduced from the CAD surfaces using a rapid prototyping machine and the alloy face plate was laser cut from 2.5mm aluminum plate – the completed alloy plate then anodized to give the correct finish.


Chris
 
Some of the CAD work prior to manufacturing the parts – note also the steering boss I created in CAD. This was because I couldn’t find an original mating boss between the Ferrari Daytona steering wheel and the Ferrari 400 column – so I made my own…..


Chris
 

Attachments

  • 26.jpg
    26.jpg
    120.7 KB · Views: 268
  • 27.jpg
    27.jpg
    131.5 KB · Views: 244
Some of the original Veglia gauges, complete with plastic bezels and mounted in the newly cut face plate – ready to go into the car. Note the speedometer – this is an original vintage Ferrari part I found, brand new, still in the box – zero miles on the clock, complete with cable and knob for trip adjust!


Chris
 

Attachments

  • 22.jpg
    22.jpg
    123.9 KB · Views: 288
  • 24.jpg
    24.jpg
    144.6 KB · Views: 252
  • 25.jpg
    25.jpg
    112.8 KB · Views: 276
As you can see from earlier pictures, I still haven’t completed the reshaping of the final outer dash parts around the pod and steering column – but it won’t take much to do this – one of the jobs to do when I see the car again!


Chris
 
Back
Top