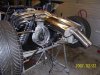
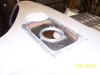
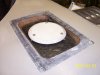
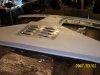
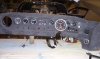
SteveB MDA MKII Build Diary

SteveBarker said:
So who else sits in and goes brrrm brrrm! ?

I've done it (after checking nobody else was around) a few times - it's just so tempting, how could one resist!!

Your build looks really well done so far so keep up the good work and I'm sure you'll replace the 'brrrms' with the real deal soon enough...

Cheers

Chris
 
Hey Steve - I have to ask, did you have a hard time finding the Marchal spot lamps? I've been looking for a while and have had no luck.

Looks like you'll be done soon at that rate! Nice job-

Cheers

Chris
 
Chris

I spent ages looking for suitable lamps, the best of them I ended up with was a pair of Rectilux 650 one of each 652 and 653, I gave up on these and bought a pair of lens only 653 NOS items, a bit pricy but nice!

I have attached pics of the lamps They look fine but the NOS items are so much brighter.

Steve
 

Attachments

  • Marchal652.jpg
    Marchal652.jpg
    22.4 KB · Views: 1,823
  • marhal653.jpg
    marhal653.jpg
    21.1 KB · Views: 1,803
  • Rectilux 650.jpg
    Rectilux 650.jpg
    19.5 KB · Views: 1,806
Chris
To ginger up the lights I have been checking out the aftermarket Xenon replacement bulbs that are available in the UK for both headlaps and spots. The Marchal units have a strange three pin bayonet that seems to fox the supplier, lots of time yet to find something.

The engine is in place and is very tight in every direction, the ZF mount puts the engine low and forward. Lots of clearance to the low side areas but the MSD billet distributor supplied with the Edelbrock EFI is too big to clear the engine bulkhead opening. In fact the cap could not be fitted.

After lots of contact with Edelbrock I find the diz is a special 'hall effect' unit in the MSD body, the only other compatible unit was a Mallory unit with a smaller cap but a similar height.

So drastic measures needed, I have chopped out 25mm (1"), the unit nw fits nicely under the frame and I can keep the big cap.

Before and after pic attached

This was a bit of a mind block but now I can move on to othe bits. I found a MkII oil cooler and am looking for a second 11" unit.
Has anyone details of the oil circuit that has been used; I was thinking of using a thermostatic take off plate under the filter then to the cooler which is the non coagulating type with the internal bypass normaly controled by a thermostat in the base plate/ Continental engine. Then what series or parallel? I have no base plate so I will fit the feed and return in the plate I have made, the slot in the plate is to allow feed to the bypass.

Steve
 

Attachments

  • Low res diz before.jpg
    Low res diz before.jpg
    35.1 KB · Views: 1,775
  • ow res diz after.jpg
    ow res diz after.jpg
    37.8 KB · Views: 1,755
  • Low res Oilcooler.jpg
    Low res Oilcooler.jpg
    29.8 KB · Views: 1,760
Here are a few update pictures, I have been trial fitting the exhaust and fuel system swirlpot and pipework etc. I am trying to get the location of all the pipes cables hoses in place, then take the engine out and final fix them.
Delays in finding parts for the ZF have held up the gearbox, hope to have it in place in a couple of weeks.
I am aiming for a driveable chassis then concentrate on the bodywork

Steve
 

Attachments

  • Gearbox missing LR.jpg
    Gearbox missing LR.jpg
    26.1 KB · Views: 1,697
  • Injection control LR.jpg
    Injection control LR.jpg
    28.8 KB · Views: 1,710
  • NS cooler and trial exhaust fit LR.jpg
    NS cooler and trial exhaust fit LR.jpg
    26.2 KB · Views: 1,655
  • NS cooler LR.jpg
    NS cooler LR.jpg
    25 KB · Views: 1,627
  • Trial fit exhaust LR.jpg
    Trial fit exhaust LR.jpg
    28.9 KB · Views: 1,702
The roof vent is now in place with a labrinth seal to try to keep out the UK weather.
Steve
 

Attachments

  • Roof venr 2.jpg
    Roof venr 2.jpg
    13.9 KB · Views: 1,563
  • Roof vent 1.jpg
    Roof vent 1.jpg
    11.5 KB · Views: 1,480
  • Roof vent 3.jpg
    Roof vent 3.jpg
    14.7 KB · Views: 1,502
  • Roof vent 4.jpg
    Roof vent 4.jpg
    18.7 KB · Views: 1,496
Last edited:
Update time, I've been spendig some time on things that seem to take ages with not much to show.
The dash is shaping up with the SW instruments, the dip switch on a prevous car was not easy to find quickly in the dark so I have made a dead pedal with a foot dipper switch.
Steve
 

Attachments

  • Dash.jpg
    Dash.jpg
    17.2 KB · Views: 1,458
  • Dead pedal dipper.jpg
    Dead pedal dipper.jpg
    23.9 KB · Views: 1,450
Brett

Yes it's Alcantara. The trimmers are the MDA's regular supplier, Mark at MDA arranged to have it done for me. You need to be careful with the colour choice and err on the side of darker as the nap on the fabric shows up lighter than the sample. I am well pleased with the result.

Steve
 
Progress is two steps forward and one back, the engine has bee in place several times to place pipe and wiring positions. There's a shot of the empty compartment reay for the engine and gearbox fit ( last time I hope).

I changed the heater pipes from the center section to pass down the LH sill, his gave a little more clearance for the crank pulley that is very low and forward as I'm using a ZF .

The dash is set out and wired, I am waiing for a chrome bezel speedo to match the SW instruments.

The doors have lots of wires for the electric mirrors/ heated mirror central locking and courtsey light switches etc, some closed cell pipe insulation fixed with some dabs of Sikaflex made a nice way of stoping them rattling about.

I am aiming for a driveable chassis then tackle the body

Steve
 

Attachments

  • Door wiring duct.jpg
    Door wiring duct.jpg
    23.5 KB · Views: 1,355
  • Dash 2.jpg
    Dash 2.jpg
    20.7 KB · Views: 1,342
  • Engine comp1.jpg
    Engine comp1.jpg
    27.1 KB · Views: 1,321
  • Fuel pumps.jpg
    Fuel pumps.jpg
    29.1 KB · Views: 1,345
  • Int 1.jpg
    Int 1.jpg
    20.4 KB · Views: 1,337
  • Hose runs.jpg
    Hose runs.jpg
    29.5 KB · Views: 1,272
Steve,

Looks really good, I especially like the black ally panels.

I notice your fuel filters have metal 'bowls' as opposed to the glass ones, do you have a part number and source for those??

Mine are the glass type & I'm told scrutineers are not happy with the glass bowls, it would be very convenient if they were interchangeable with the ally ones.

TIA
 
Steve,

I notice your fuel filters have metal 'bowls' as opposed to the glass ones, do you have a part number and source for those??

Mine are the glass type & I'm told scrutineers are not happy with the glass bowls, it would be very convenient if they were interchangeable with the ally ones.

TIA

Julian

The metal bowl filters are the standard MDA item as supplied, I think they are listed in Demon Tweeks and others

Steve
 
Steve
Thanks for your time today it was great to meet you and get a good luck at all your hard work. I have to say the quality of your workmanship is outstanding, not sure mine will be to your standard but I will have a go.
Thanks once again. Keep up the good work.
Martin
 
Bill
Thanks for your words of encouragement, much appreciated.

Martin,
Having you all to see the progress so far was very reasuring, I think we all learned a bit from each other!

In particular your observation on the rad mounting was spot on and I have modified the mountings per the pictures. I had not appreciated the ali rad core was affected by stress/ vibration fatigue cracking, the rubber mounts should do the trick.

I would appreciate contact details by PM for you all as I forgot to write anything down.

Steve
 

Attachments

  • Rad mount 1.jpg
    Rad mount 1.jpg
    11.2 KB · Views: 1,044
  • Rad mount 2.jpg
    Rad mount 2.jpg
    16.9 KB · Views: 1,083

Mike Pass

Supporter
Hi Steve , You have PM as requested. I must echo Martin's comments re: your GT40. We were very impressed by the quality of the build - I'm going to have to pull my finger out to get anywhere near what you have created. It really is top notch. I can't wait to see it mobile - it should go and handle like a racecar. The MK2 body will also be really different from the herd. Keep up the good work.
See you soon.
Cheers Mike
 
I finaly got my gearbox together for a trial fit with its new top plate and mountings. I am realy pleased with the look of it in the MDA yoke. Lots of build up to do now

Steve
 

Attachments

  • Gearbox Trial fit.jpg
    Gearbox Trial fit.jpg
    48.7 KB · Views: 1,183

Mike Pass

Supporter
This is more automotive porn that you keep posting. The problem is that is gets more seductive the more it gets dressed! Looks really nice with that motor and box sat in there. Bootiful!
Cheers
Mike
 
Back
Top