SteveB MDA MKII Build Diary

You've done an excellent job on your build Steve - looks like another MDA ready for the road soon - Mk II style!!

I know MDA are casting a reproduction of the ZF to SBF bell housing - was wondering what your plans were to power your MK II.

Cheers!


Chris
 
Chris
I've used the bellhousing and gearbox top as supplied by MDA to mount the engine, I have gone for a 347 Ford Racing unit as the option to build one appears to me to be confusing so many options!! Maybe later.
As it is a MKII that did not use multiple Webers I've opted to use the Edelbrock injection set up as it looks a bit like the four barrel carb but will give better management for emmissons control. I have worked out a simple fuel supply system for the feed and return to the tanks, there is a layout on the attached spreadsheet.
There is a photo of the layout that shows the rh tank return under the bulkhead window .

When I have a running chassis I wil start the bodywork, I hope it's not a mistake to build this way round, as I read that its better to fit the body when the fiberglass is still 'green' as you have.... we will see soon!

Steve
 

Attachments

  • Fuel pumps low res.jpg
    Fuel pumps low res.jpg
    24.4 KB · Views: 1,811
  • Fuel systems II Feb 07.xls
    27.5 KB · Views: 431
The engine and g/box are in finally and the driveshafts rollbar etc are making the back end look more business like. The gearshiff will need fine adjustment but has a nice positive feel.

The S/W fuel gauges I used need an O ohm empty and 90 ohm full sender unfortunatly the reverse of he standard sender. I have found a VDO unit that is the right way round, as soon as they are here the fuel system can be completed ..... then perhaps some real Brrumm Brrumm s

Steve
 

Attachments

  • Rear suspension.jpg
    Rear suspension.jpg
    47.2 KB · Views: 1,794
Some more progress, the header tank is now made up and fitted. The NACCA ducts have been opened up and ducting bonded in place with bulkhead intakes. Here are a few potos.
The front clip mounting is also now in place as used in the original MkII.

Steve
 

Attachments

  • Bulkhead air intake.jpg
    Bulkhead air intake.jpg
    29.2 KB · Views: 1,627
  • Front clip air ducts.jpg
    Front clip air ducts.jpg
    32.7 KB · Views: 1,669
  • Front clip mounting.jpg
    Front clip mounting.jpg
    28.2 KB · Views: 1,620
  • Header tank MkII.jpg
    Header tank MkII.jpg
    31 KB · Views: 1,604
The S/W fuel gauges I used need an O ohm empty and 90 ohm full sender unfortunatly the reverse of he standard sender. I have found a VDO unit that is the right way round, as soon as they are here the fuel system can be completed ..... then perhaps some real Brrumm Brrumm s

Steve


Steve,
I know the frustration in finding a sender for your fuel gauge. I am using the S/W Maximum gauge and it is also as yours. I found a Fuel Safe unit
Pegasus - Fuel Level Gauge for Fuel Cells, 0-90 Ohm

that will work. It is a non moving unit, so you don't have to worry about a swing arm and never knowing when your are truely empty. Can be shortened to any lenght between 3" and 12". It has the benefit of having a circuit that can be used for a low level warning lite, which I have incorporated. They are easily calibrated. It is not cheap, at $159.99, but then I have set mine up to flow to one tank, thus one gauge.

Bill
 
Bill

Thanks for the info had decided to buy new SW deluxe 82303 gauges that are compatible with the SW Intellesensor 114635 a 7 dip tube unit. I will compare the prices.
Was the Pegasussender zero ohms when empty or full? Its not clear on the web site.

Steve
 
Ian

Thanks for the tip. I have tried the VDO route, they promised a sender that had the right Ohms and claimed to be the right way round 0 Ohms empty. wasted months waiting then recieved the sender that was 0 Ohms Full!
Gave up ; now need a good Stewart Warner dealer for the new gauges and senders or the Pegasus item

Anyone recomend a S/W Dealer on line?

Steve
 

Attachments

  • http www.sw-performance.com index.pdf
    61.5 KB · Views: 424
The installation papers don't specify which way it goes. I will give them a call and ask them, then post. They are in Wisconsin. All of the S/W gauges are wired the same as far as I know, so it ought to work. I didn't see any that were listed any special way. Surely they would list if it is different, but will call them anyway.

Bill
 
I would be interested in additional information, Craig B (MDA Mk II) sent me some info for running original S/W 240A's with the S/W IntelliSensor and S/W gauges. A local dealer would be nice to know.

Chris
 
Here is a quick update.

The fuel senders are on the way with matching gauges, the S/W 'Intelesensors' senders have to be specialy made, I should have them in about a month.
John at Automotiveengineering was very helpful in sorting this out Automotive Engineering (1-800-284-3551) TOLL FREE # 800-284-3551

The handbrake calipers and cables have been fitted , nice setup with a smooth action. I have posted a few shots of the the engine compartment, gear shift gate and brakes.

I have started to tweek the rear clip to take a standard glass rear window as used on the MkI this should be better for the SVA test.
The clip now has all the air ducting vents in place, the vents need some cleaning up of the tracts to blend them into the clip openings.
The dust gets everywhere!!

Steve
 

Attachments

  • 100_0769.jpg
    100_0769.jpg
    31.1 KB · Views: 1,397
  • 100_0770.jpg
    100_0770.jpg
    31.9 KB · Views: 1,363
  • 100_0771.jpg
    100_0771.jpg
    36.5 KB · Views: 1,423
  • 100_0772.jpg
    100_0772.jpg
    32.1 KB · Views: 1,442
  • 100_0773.jpg
    100_0773.jpg
    30.8 KB · Views: 1,398
  • 100_0774.jpg
    100_0774.jpg
    33.9 KB · Views: 1,435
  • 100_0775.jpg
    100_0775.jpg
    38.5 KB · Views: 1,484
  • 100_0776.jpg
    100_0776.jpg
    41.8 KB · Views: 1,440

Mike Pass

Supporter
That's looking good Steve (as ever). Will try to get over and get a closer look soon.
P.S. Are you coming down to the club meeting at the Whipping Stocks in Knutsford this Wednesday? Should be a good turnout.
Cheers
Mike
 
Mike

Thanks for the reminder, I can't make it this time to the meet. However the refreshments are cool / kettles on ready for your visit.

Steve
 
Hi,
An update of recent progress has not had much to show, lots of setting panels and mechanicals making good previous trial fits. The exhausts are now in place, quite a tight fit due to the low ZF configuration, the fabricated brackets work well.

I have made up some seat frames that will fit either side of the waterpump bump and are not handed untll upholstered, just have to decide on materials and colour.

A few photos are attached

Steve
 

Attachments

  • Exhaust 1.jpg
    Exhaust 1.jpg
    25.7 KB · Views: 1,189
  • Exhaust mounts.jpg
    Exhaust mounts.jpg
    34.2 KB · Views: 1,220
  • Seat 1.jpg
    Seat 1.jpg
    28.2 KB · Views: 1,240
  • seat 2.jpg
    seat 2.jpg
    37.4 KB · Views: 1,287
  • seat 3.jpg
    seat 3.jpg
    33 KB · Views: 1,261
  • seat 4.jpg
    seat 4.jpg
    29.1 KB · Views: 1,251
Hi Steve,
builds looking really good, a good inspiration to get on with my Torndao.
The seat frames look good, what thickness of aluminuim are you using. Do you have any drawings that you wouldn't mind passing on, as this would be then one less thing I have to design & mock-up
Thanks in advance
Andy
 
Steve - those seat frames look really nice, let me know what material you're going to use and some pics of the seat construction when you get to it. You must be closer to finishing your build, great job as per usual!


Chris
 
Chris , Andy

Thanks for your comments.
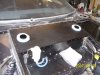
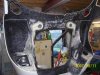
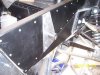
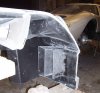
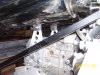
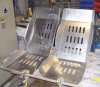
The frames are in 3mm ali.
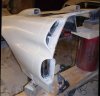
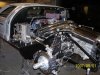
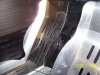
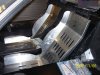
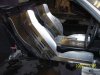
Because my engine gearbox combination is very low and forward there is a bigger bump than normal in the engine cover, so I had to amend the standard seat frame from MDA. I took the route to make a frame that will fit left or right seat and have a beveled sides to accomodate the 'bump'.
Mark at MDA loaned me a standard frame as a guide and I made a cardboard replica with the shaped sides then folded it flat for the patern.
Colours... The dash is grey Alcantara so the door pockets will be the same, carpet set will be the same shade of grey with edge bindings in the seat colour which will be a lighter grey leather in the MDA patern.
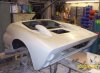
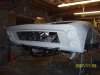
The car will be the Shelby Guardsman blue with the white stripes, hope it will be a good combination.
Anybody know the paint code / ref for the blue and white.
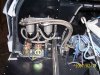
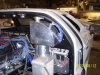
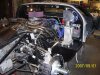
My long running saga to get the S.W fuel guage senders is resolved, the senders are fitted and work correctly

Chris, how do your painting masks and sticker sets work to get the look of the car in the picture of 1031 at the 1966 Le Mans that is in the book 'The Ford that beat Ferrari' page 116? ( if you have it).

Steve

Steve
 
Hi Steve,

I was originally going to paint my car the exact same colors, like 1036 on the Racing Icons website. I love the Guardsman Blue and I will email you the PPG color code for it. I have the 1031 Le Mans decal/paint mask set available, just let me know.

Any chance of going for the 1031 paint color? ;)

Thanks for the seat info and pics!

Chris
 
The latest addition is the clutch lever and cylinder set up. Thanks to Brian Magee I have the lever in place.

Chris I would like to see the 1031 images you can provide, have you any photos?

Steve
 

Attachments

  • Clutch lever.jpg
    Clutch lever.jpg
    37.4 KB · Views: 994
Back
Top