And so it begins...the AP build.

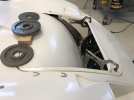
I contacted Chris about it before I did any cutting. He recommended lots of heat to get the shape and fit to the top back to where it needs to be.
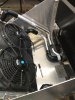
My radiator is 4” thick and mounted as far forward as possible while still allowing space for the condenser (I believe I was sent the wrong one, waiting to hear back).
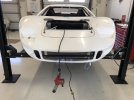
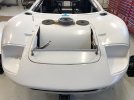
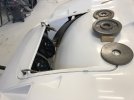
The front clam is very close, but the lower front portion of the spider is a mystery as to why it wants to be up off of the chassis to make the door-spider-clam area gaps appropriate.
I’ve been through all of this before with 2 other frame-off restoration, only they were in metal. Fiberglass has its own challenges.
IMG_0435.jpeg
IMG_0434.jpeg
IMG_0436.jpeg
IMG_0437.jpeg
IMG_0439.jpeg
IMG_0438.jpeg
 
I see good reason to have the spider up off the chassis. You can always shim it up, but it's not so easy to lower it if touching is too close.

But I think I see a bigger shim on yours than mine had. Mine was only a 1/4" piece of aluminum strap under the flange.

A good bead of polyurethane caulk will fill the void and adhere it after all is set and for sure where you want it.
 
I’m probably going to heat the perimeter of the hood to get there curvature closer, then cut and move the corners to get them set with a workable gap, then bond everything back into place and fill gaps with mat and resin. The hood simply isn’t long enough to fit over the lip on the clam opening.
I have touched base with one of Chris’s body guys about the spider. He thinks it has todo with the cage a-pillar. I’ll probably get everything where it needs to be, set the windshield, then split the base of the front spider and fill the gap back it’s that spacers/shims aren’t needed.
IMG_0445.jpeg
IMG_0446.jpeg
IMG_0444.jpeg
IMG_0448.jpeg
 

Randy V

Moderator-Admin
Staff member
Admin
Lifetime Supporter
I have a similar fitment issue with the front lid. Since the whole front tips, I'm considering bonding it permanently and maybe just leaving a body line to suggest it... or maybe just making it go away.

But I'm not looking to be historically accurate.

I think you’re going to find that the panel must be removed to tilt the front clip…. Tape the panel to the clip and try it..
 

Randy V

Moderator-Admin
Staff member
Admin
Lifetime Supporter
Joe - don’t be tempted to bend cold, clamp and then heat. That will screw up your front clip. Get it good and hot (200°) and then bend, clamp.. you may need to get it hotter - check with Chris as he would know the characteristics of his glass/resins..
 
I think you’re going to find that the panel must be removed to tilt the front clip…. Tape the panel to the clip and try it..


I will check before I commit. I'm not using a "GT40" radiator, so I have it laid down at a much steeper angle and think it'll clear on the way up.
 

Attachments

  • IMG_20230510_194853.jpg
    IMG_20230510_194853.jpg
    271.5 KB · Views: 84
Joe - don’t be tempted to bend cold, clamp and then heat. That will screw up your front clip. Get it good and hot (200°) and then bend, clamp.. you may need to get it hotter - check with Chris as he would know the characteristics of his glass/resins..
Good idea. I could probably heat the border of the insert better with it off of the clam, then place and clamp. I hit each side with heat and was able to concentrate it on the insert...for the most part and got the shape to change some. I also figured out that the lip on the clam opening is also part of the problem.
IMG_0451.jpeg
IMG_0453.jpeg
IMG_0452.jpeg
 
I will check before I commit. I'm not using a "GT40" radiator, so I have it laid down at a much steeper angle and think it'll clear on the way up.
My radiator is at a 33.5 degree angle, but I think it isn't as tall as yours.
 
Yes, mine is taller than the typical used. I think it's 15 or 16", and well over 45 degrees. I went with a shorter condenser raised from the bottom of the radiator to get it to barely fit without raising the package.
 
No, but I welded a solid piece of .125 5052 to the bottom to square and support the 2 provided sides, and added a support for it. You can see 2 plates of .120 mild steel that will have 6- 1/4" bolts, and not shown are horns off of the upper control arm C channel that the provided sides will bolt to as well as be bushings for the front sway bar. The provided couple of bolts to the L bend will not last for long. The brake bend will flex and break with the weight of the radiator and front clam. I don't have a good picture to attach.
 
I've been doing some research and will be fabricating a front frame out of 1.25" square tubing coming off of the chassis to hang the radiator, bolt closeout panels to for the frunk, and maybe even attach hinges of some sort to do away with the cross bar of the original front clam hing.
 
I thought I remembered seeing that earlier in your thread. What is provided alone is not adequate. It's obvious if you lift up or push down on the nose. The radiator should not be a structural element providing lateral support for the nose.
 
After rebuilding the rear clam hinge, it moved very easily side to side. I set wheel lip to fender gap even side to side and installed a stainless collar in each side to hold it in place.
IMG_0474.jpeg
 
Yes, the hood was that bad! Major surgery and heat required.
 

Attachments

  • IMG_0611.jpeg
    IMG_0611.jpeg
    298.3 KB · Views: 77
  • IMG_0613.jpeg
    IMG_0613.jpeg
    251.3 KB · Views: 81
  • IMG_0614.jpeg
    IMG_0614.jpeg
    236 KB · Views: 79
  • IMG_0615.jpeg
    IMG_0615.jpeg
    219.2 KB · Views: 78

Randy V

Moderator-Admin
Staff member
Admin
Lifetime Supporter
I was a bit put-out when I found the rear lip of my dual-nostril panel had about 1/4” of warpage (not too difficult to fix) - but your panel should have been thrown out by the mfgr and a suitable replacement sent…
 
I was told that I only hear would be required to get it back into shape, but it was off in so many dimensions, that nothing I did seemed to work. Even the length and width as it relates to the lip around the opening of the clam was off.
The radiator opening was restricting a fair amount of the radiator, so the slope of the snorkel had to be made deeper. There was still too much tension in the slope after cutting it in both sides, so I ended up adding some heat to set it.
IMG_0616.jpeg
 
What is going to be the best way to rejoin all of the pieces? I have ideas, just wondering what everybody else has done in the past.
 
Back
Top